Upgrades by Category

From SmartWiki
Jump to: navigation, search

Template:UnderConstruction


Security Enhancements

Feature Upgrade Date
Password Expiration
You can now set a system-wide password expiration number of days. Each user will be forced to change their password once that number of days has passed.
April 2009
Password History
You can set the number of previous passwords (to a maximum of 32) that the system will remember for each user. When changing their password, users will not be permitted to re-use a previous password until the specified number of unique passwords has been used.
April 2009
Instance Lock-Down
  • The Instance Lock-Down provides the ability to remove access to all settings in your copy of SmartSimple using a global system-lock password.
  • This will prevent creation, deletion or modification of Standard or Custom Fields, changes to any of the Settings or Application Configuration pages, changes in permissions, portal views, etc.
  • The lock will be in effect for all users, including Global Administrators. It can only be unlocked by re-entering the global system-lock password.
  • This can be configured and enabled on the Global Settings page in the Login & Security Settings section.
May 2009
Remove User Access
  • You can disable system access for multiple internal users all at the same time.
  • This is accessed through Global Settings > Licensing (at the top of the page) > Licenses > Then click on the hyperlink for the number of enabled Internal Users.
  • Select the check box(es) to the left of the users from which you wish to remove system access and click on the Disable Button.
May 2009
Terminate User Session
  • Global Administrators can instantly disconnect a logged in user if required for security reasons.
  • This is performed by clicking on the name of the user in the People Online pane and selecting Terminate User Session from the top of the Quick Message Window.
Terminate.GIF
May 2009
Enable Logout
  • The system can be configured to automatically logout the user and store the session end time in the user log whenever:
  • The Logout button is clicked.
  • The user navigates to a different website while logged into the SmartSimple system.
  • The browser is closed.
  • A pop-up message can also be enabled to confirm that the user will be logged out.
Note If this feature is enabled, any Record Locks will be immediately released at the time of logout.
May 2010
Custom Password Policy
  • You will be able to specify complex password requirements, such as a minimum quantity of upper case, lower case, numbers and/or symbols.
May 2010
Local Administrator E-mail Alert
  • The e-mail that is sent to all current administrators when a contact is enabled as a Local User Administrator can be suppressed via Global Settings.
May 2010
Primary Authentication Controller
  • Note: this is only relevant to clients that use multiple instances of SmartSimple.
  • This feature allows one instance of SmartSimple to authenticate users to gain access to a separate instance (the Authentication Member instance) without having to log in separately (Single Sign-On)
  • This access can be granted to all users, or limited to a subset of users.
October 2010
Reporting on User Type and Access Type
  • The Access Type (Administration or Portal Interface, User Centric or Applicant Interface , Web Services User, No Access) and User Type (Global User Admin, Local User Admin, User) can be displayed in Reporting.
October 2010
Hierarchical Password Policy

A different password policy can be defined for each company which will automatically apply to all sub-companies in the hierarchy, unless they have defined their own password policy.

May 2011
Persistent Login
  • Rather than having to log in to SmartSimple each time you open your web browser, a "cookie" can be installed on your computer that will automatically authenticate you, allowing you to bypass the login screen. (This setting can be enabled or disabled by your system administrator).
May 2011
Email Restriction
  • The ability to send e-mails from within SmartSimple can be restricted by user role.
May 2011
Backup Server Access
  • Access to the backup server can be disabled for all non-Global User Administrator accounts.
May 2011
SSencrypt Command
  • A new command called ssEncrypt allows object IDs to be encrypted manually
May 2011
URL Parameter Encryption
  • A new setting will encrypt object IDs such as userid, companyid, activity. This enhances security by making it impossible to guess URLs.
May 2011

UTA Enhancements

Feature Upgrade Date
Standard Field Visibility Control
  • You can now set visibility logic on standard fields at all levels in the same manner that you set these conditions on custom fields.
  • To set the visibility logic, navigate to the appropriate standard field screen and enter the condition into the Visibility Condition column.
April 2009
Level 1: Tabs for Contact and Account Lists
  • If you associate a large number of contacts or accounts (companies) with Level 1 items, you can now display different users based on roles on different tabs (and different accounts based on account roles on different tabs).
  • You can access the feature within the UTA Settings tab - Contact Tabs and Account Tabs hyperlinks in the Level 1 Settings section. You can associate as many tab names to roles as required. Tabs can also be deleted through the same screen.
April 2009
Level 1: UTA Contact and Account Filters
  • You can define who can see which contacts and accounts (companies) at Level 1 based on role membership. To implement these features, navigate to Settings > Application Configuration and within the Security Settings panel, select the check boxes beside Enable UTA Contact Filter and Enable UTA Account Filter.
  • Once the feature has been enabled for either Contacts or Accounts, the UTA Contact Filters and/or UTA Account filters hyperlinks are available under the UTA's Settings tab - Settings panel.
  • You can now configure visibility of the contacts/accounts associated with a Level 1 based on User Roles and Account Roles.
April 2009
Level 1: Contact Restrictions
  • You can now restrict the number of contacts belonging to a given Role that can be associated with a Level 1 record.
  • This can also be used to restrict the total number of contacts that can be assigned to a Level 1 record.
  • You can also restrict the number of times a given user can be assigned to a Level 1 record, or the number of times a given user can be assigned to the record with a given Role.
  • To access this feature, click on the Contact Restrictions hyperlink on the UTA Settings tab.
April 2009
Level 2: Multiple Contact List

If you enable the Use Multiple Contact List checkbox on the Settings > Application Configuration screen you will be able to associate and control contact associations in a similar manner to Level 1 contacts.

April 2009
Level 2: Multiple Account List

If you enable the Use Multiple Account List checkbox on the Settings > Application Configuration screen you will be able to associate and control account associations in a similar manner to Level 1 contacts.

April 2009
Level 2: Role Filtering

You can restrict the selection of contacts that can be associated with Level 2 items by role. Previously you could only restrict by specified named contacts. An additional lookup text area has been added the bottom of the Level 2 Types Settings page to specify the roles.

April 2009
Disabling Specific Transaction Types by Template
  • You can now restrict the types of transactions available for each Level 1 template type.
  • If Level 1 Transactions are in use, within the Settings tab > Application Configuration, when you select one of the Level 1 templates, the Disabled Transaction Type section of check boxes will appear. One or many Transaction Types can be disabled per Level 1 Template.
April 2009
Level 3 Template Formulas

You can now associate template formulas with Level 3 items in the same manner as Level 2 and Level 1 items.

April 2009
Submitted URL Redirect
  • A Submitted URL option is now available within the submit settings for each Level 1 Status, which will implement an automatic redirect to the specified URL based on status when the record is submitted.
  • For example, you may want the user to be returned to their standard Portal View whenever a record is closed.
May 2009
Suppress New Level 2 or Level 3 Buttons
  • Advanced Logic is being put in place to allow you to suppress the New button used to create Level 2 or Level 3 activities.
  • For example, you may want to prevent creation of new Level 2 records when the associated Level 1 record has a Status of Closed.
May 2009
Batch Update Owner Field
  • On the Batch Update tab you will now be able to change the Owner of many records as a batch. This is done in the same way that you can batch update the Status of a number of records all at once.
May 2009
Cross-UTA Transactions
  • UTA Transactions can bridge 2 different UTAs, either at Level 1 or at Level 2.
May 2009
Level 1 Submit Button Script
  • Allows you to define a script that is run when the Submit button is pressed. The normal Submit button functions are not executed (validation and status change).
  • This will allow you to create a Browser Script that will perform custom validation of the data on the page, and can then optionally change the status or execute the submit function as part of the script.
July 2009
Level 2 and Level 3 Submitted URL
  • When the Submit button is pressed for a given Status, instead of remaining on the view of the current record the user will be redirected to the URL defined in this section. If no URL is entered the current record will stay in view.
  • This was introduced for Level 1 in the last upgrade, and now has expanded to include Level 2 and Level 3.
July 2009
Level 2 Type Tab Label
  • Currently you can configure Level 2 Types to be shown on their own tab in the list view at the bottom of Level 1 records, with each tab labelled with the name of the Level 2 Type it contains.
  • Following this upgrade you will be able to define the tab name for any Types that you wish to have on tabs. If you use the same tab name for multiple Types they will appear on the same tab, allowing you to group related Level 2 Types.
July 2009
Skills Matching Template
  • There are now 2 different types of Level 1 Templates available. In addition to the Standard Template there is now a Skills Matching Template.
  • The Skills Matching Template allows you to define a set of skills that are related to a particular Level 1 record. In the Contact section of that record a Skills Match button will appear which will allow you to find contacts that have the relevant skills defined for that entity.
  • For example, if the Level 1 record is a funding application for a project researching whale migration patterns you may want to assign reviewers with skills in oceanography, marine biology and meteorology.
July 2009
Advanced Logic to Suppress Contact Hyperlinks
  • Using Advanced Logic you are now able to suppress the Contacts hyperlink at Level 1.
  • This allows you to define criteria to prevent UTA users from clicking into and viewing the contact record for contacts associated with a Level 1 record.
July 2009
Record Lock
  • This new feature will allow you enable a Record Lock at Level 1, Level 2, and/or Level 3.
  • The Record Lock will give the first person to access a record in Edit mode exclusive access to the record so that other cannot edit it until released:
CheckedOut.png
  • Other users trying to edit the record will be prevented from doing so:
Locked.png
October 2009
Level 1, Level 2 & Level 3 Formulas
  • You can now define formulas on the Application Configuration page that apply to all Level 1 Templates. These formulas will run prior to any that are defined on the Template pages.
  • Similarly you can define formulas that apply for all Level 2 Types or all Level 3 Types.
October 2009
Advanced Logic to Suppress Public Notes
  • Using Advanced Logic you are now able to suppress Public Notes at Level 1, Level 2 and Level 3.
October 2009
Internal Branch Filter
  • When using the Branch standard field at Level 1 you can restrict which companies are available in the Branch drop-down list based on which user is editing the record to either their own company (using companyid = @companyid@) or to the branches under their company (using parentlist like '%,@companyid@,%' ).
October 2009
Level 3 Default Type Setting
  • As with Level 2, you will be able to define a Level 3 Type to be the default when creating a new Level 3 record. Currently the first Level 3 Type in the list is selected by default.
October 2009
Batch Update
  • The Batch Update feature has been expanded to include Level 2 and Level 3 as well as Level 1. The fields that can be updated have also been expanded:
  • Level 1: Status, Owner and Person can all be batch updated.
Contacts can assigned to records with a given Role
UTA Consumer/Provider
Level 1 records can be archived (see below)
May 2010
Archive Level 1 Activities
  • Level 1 activities can now be archived (via the Batch Update tab) so they no longer appear in the Level 1 list view.
  • Reports can also be filtered based on whether or not the object has been archived.
May 2010
Filter Person Based on Customer
  • The contacts available to be selected in the Person standard field can be restricted to those belonging to the organisation (and it's sub-organisations) selected in the Company Standard Field at Level 1
May 2010
Level 2: Disable Default Assign
  • When a new Level 2 is created the current user is normally added to the Assigned standard field. A new setting will disable that behaviour.
May 2010
Focus Highlight
  • The field being edited will be highlighted.
  • This feature only applies to the Universal Tracking Application, but will be expanded to other system areas in future upgrades.
May 2010
Record Unlock
  • The Record Lock will automatically release all records that have been locked by a user when they log out. This can be used in association with the Automatic Logout above.
May 2010
UTA Data Exchange Automatic Unpack
  • The data exchange can now be configured to automatically unpack incoming packages.
May 2010
Role-Based List Views
  • The List View of UTA records can now be defined separately for each user Role within the system.
  • User with multiple Roles will be able to select from each List View that is configured for their assigned Roles. The sequence these will be listed in the combo box can also be defined.
  • This feature is available at Level 1, Level 2 and Level 3.
October 2010
Level 2 & 3 List View Colour
  • The List View at Level 2 and Level 3 can now be configured to be colour coded based on the Type instead of the Status
  • This is controlled within the List View setting at Level 2 and at Level 3, and can be set separately for each Role-Based List View.
  • If the Calendar is enabled (Application Configuration page - Level 1 settings section) you can determine if the Level 2 activities are colour coded by Status or Type.
October 2010
Level 3 Activity List Batch Update
  • The Level 3 Activity List Batch Update feature allows the status of one or more Level 3 Activities to be changed directly from the Level 3 List View.
  • This includes both the List View of all Level 3 activities (if enabled) and the list of Level 3 activities at the bottom a Level 2 record.
October 2010
Master Schedule Template
  • A Level 1 record can be configured to be a Master Schedule. When using the Level 1 Copy function on a Master Schedule, the Level 1 record will be copied along with all attached Level 2 records. A new Level 1 start date is selected, and the start and end dates on the new record will be offset to the same scheduled date ranges defined on the Master Schedule template and its Level 2 records.
October 2010
Level 2 Assign By Role
  • When using the Restrict Contact Assignment by Role setting on Level 2 Types, you can now automatically assign the contacts on a Level 1 to the associated Level 2 records based on their roles assigned at Level 1 and the contact Role assignment restrictions in place on the Level 2 Type.
  • A manager permission controls the visibility of this feature.
October 2010
Level 2 Side Scrolling
  • You can now use the navigation bar to move sideways between Level 2 records, the same way you can with Level 1 records.
October 2010
Transaction Batch Update
  • Within a UTA you can use the Batch Update function to find Transactions that are not linked to a record within the UTA (orphans) and attach them to a selected Level 1 record.
October 2010
Data Exchange

The Data Exchange has 3 new features:

  • The data exchange can now be configured to exchange Level 3 activities, restricted by Status.
  • Data Exchange Contact Creation can be enabled and configured to automatically create a contact upon unpack. For example the contact record for a Claimant can be created based on the First Name, Last Name, Phone Number and other details send as part of a Level 1 record.
  • The Roles permitted to exchange records, notes and view the Exchange History can now be controlled with a Manager Permission. (Everyone will be selected by default)
October 2010
Level 1 Status Indicator
  • A graphical indicator can be enabled which will appear at the top of the Level 1 record to show the status pathway and indicate the position of the current record along the path.
May 2011
Default Contact Role
  • --Select Role-- can be set as the default role in the Level 1 contacts section to ensure a role is selected and not left at the first role listed.
May 2011
Level 1 Template Branch Restriction
  • Level 1 templates can be restricted to any number of internal branches, rather than just one.
May 2011
Quick Entry
  • The Quick Entry method of creating multiple Level 2 items has been enhanced. Up to ten records can be created at once with any combination of Level 2 Types, and the custom fields that appear on the quick entry page can be selected. Additionally, an auto-number can be assigned to all records at the time of creation.
May 2011
List View Heading
  • The column headings in the list views can be defined on the list view settings page. This applies to Level 1, Level 2, Level 3, Invoices, Contacts and Companies.
May 2011
"Is Empty" Search
  • Standard and custom fields and Level 1, Level 2 and Level 3 records can be searched to find empty values using the "Is Empty" search option.
May 2011
Lock on Type
  • Level 2 and Level 3 records can have their type locked after creation to prevent it from being changed.
May 2011
Creation Roles
  • The user roles that are permitted to create each Level 2 and Level 3 record type can be configured separately.
May 2011
Available Statuses
  • The statuses that are available to each type of Level 2 or Level 3 record can be defined.
  • Similarly, you can define which other statuses are available from each status. This is for Level 2 and Level 3.
May 2011
Recurring Activities
  • Recurring activities can be scheduled weekly on multiple days of the week.
May 2011
Level 2 Contact Calendar Status
  • When displaying Level 2 records on the contact calendar, the records that are shown for each Level 2 type can be controlled by status.
May 2011
Assign By Role Expansion
  • Can now be done from Level 2 to Level 3, or Level 1 to Level 3
  • Controlled by Manager Permission
May 2011
Invoice Status Batch Update
  • Invoice status can now be changed using batch update.
May 2011
Void Invoice
  • A button to automatically void invoices has been introduced. Visibility of the button is controlled by Advanced Logic.
May 2011
UTA Role Custom Fields
  • UTA Role Custom Fields at Level 1 and Level 2 as well as Associations can be defined to appear for all user roles.
May 2011
Group Contact Assignment
  • When the multiple contact list is enabled, groups of contacts can now be assigned at Level 2 and Level 3 in the same manner as they are at Level 1. Advanced Logic has been introduced to allow this feature to be suppressed at Levels 1, 2 and 3.
May 2011
Multiple Contact/Company List
  • When the Level 2 multiple contact or company lists are enabled they can now be re-positioned below the custom fields, in the same relative location as they appear at Level 1.
May 2011
Aggregation UTA
  • Creating an aggregation UTA will facilitate creating reports that span multiple related UTAs by defining the association between equivalent fields in each UTA.
May 2011
Data Exchange
  • Settings have been added to specify "preserve template", "preserve type", "reject new template" and "reject new type" (Level 2 and Level 3). Additionally there is a new setting to prevent the exchange of new Level 2 records.
May 2011
UTA Connection List View
  • The fields to be shown in the UTA connection list view can be selected when the consumer/provider relationship is enabled.
May 2011
Template Pages
  • Level 1, Level 2 and Level 3 Template pages now go through the variable processor. This means you can include variables directly on the template page.
May 2011


Calendars

Feature Upgrade Date
Recurring Calendar Events
  • You will now be able to configure calendar events to recur bi-weekly.
May 2009


Contacts/Accounts

Feature Upgrade Date
Contact and Account Standard Field Terminology
  • You will be able to define your own names for the standard Company and Account fields via the Global Settings page.
  • Visibility Conditions will also be implemented on the Company and Account Standard Fields to allow control of these using logic, and any fields you don't wish to use can be removed.
July 2009
MS Outlook Contact Synchronization
  • Previously only contact owners were able to synchronize contacts using MS Outlook. We are introducing a new manager permission that will allow users to synchronize contacts for which they are not the owner.
  • If this manager permission is enabled, a new section will appear on the user's System Settings page that will allow them to select the contact roles they wish to include in the synchronization.
July 2009
Geocoding
  • The latitude and longitude of an address can now be automatically stored as a property of the user or company.
  • This is achieved by enabling Geocoding for one or more User Roles or Account Categories.
Geocoding.png
  • This will allow calculation of the distance between 2 addresses. For example you could generate a report which indicates how far a given client is from each of your branch offices, listing the nearest first.
  • Use of this feature will incur an additional subscription fee. Contact SmartSimple Support for details.
October 2009
Unique Contact Identifier
  • Each contact in the system will now be issued a unique contact identifier code. This code can be accessed and displayed using @uuid@.
May 2010
Primary Contact May 2010
Accounts List View
  • The List View for Contact and Accounts (both internal entities and external entities separately) can now be defined via the Global Settings page.
  • This affects the List View of contacts and accounts everywhere within the system, except within UTAs other Applications where the List Views are defined within those Applications.
May 2010
E-mail From Address
  • You can now define one or more alternate addresses as your From address via your personal System Settings page.
  • When sending e-mail from within SmartSimple you can select which address will be on the e-mail as the From address.
May 2010
Contact/Company Ajax Search

The fields that are searched and displayed when using the Ajax Lookup can be defined for Contacts and Companies. The column headings can also be customised.

  • User can also specify how many matching records are displayed as Ajax results on their system settings page. (10, 15, 20 or 30)
May 2011
Edit Contact Logic
  • Global Advanced Logic has been added to allow control of who is permitted to edit contact records.
May 2011
Contact/Account List View
  • The column headings in the standard Contact and Company list views can be defined on theList View settings page.
May 2011


Custom Fields

Feature Upgrade Date
Auto Save Custom Field
  • This new custom field type automatically saves the current page in the background at a specified interval (5 minutes, 10 minutes, etc.)
  • Using the Auto Save Custom Field will ensure that users filling in long forms will have their work automatically saved at the specified interval in case of an Internet outage or connection time-out. Specifically designed for Level 1 Template Pages, but will also work for the internal view of Level 1 records.
  • The page is not refreshed on-screen, simply saved in the background. No Validation or Calculations will be performed until the record is saved in the usual fashion.
May 2009
Bar Code Custom Field
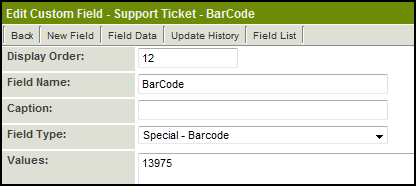
  • There is a new custom field type called Special - Bar Code.
  • When creating this field type, in the Values section you must enter the Custom Field ID of the field that contains the integer or text string you wish to have converted to a bar code.
BarCode.PNG

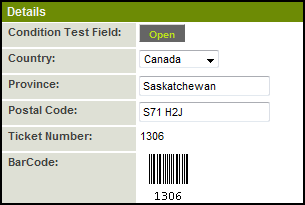
In the above example 13975 is the Custom Field ID of the "Ticket Number" field, which would display on the record as:

BarcCode2.PNG
May 2009
Custom Field Tabs
  • Custom Fields can now be displayed on different tabs, with a Next and Previous button at the bottom of each tab to facilitate navigation between the tabs.
  • This will enable separation into sections for records that have a large number of Custom Fields.
This isn't actually a new type of custom field, but rather an additional option within the Title Bar - Multiple Columns custom field type.
  • A Custom Field Tab can be added by creating a new Title Bar - Multiple Columns custom field and selecting the Use As Tab check box. The caption/name of the field will be used as the heading on the tab.
CFTabs.png
In the above example there are 3 tabs named "Additional Details", "Company Information" and "Contract Details"
Navigation between the tabs can be accomplished by either clicking on the Next or Previous buttons, 
or by clicking on the name of the tab you wish to access.
May 2009
MS Word Merge Enhancement
  • If you have configured a MS Word Merge to be uploaded back into a Custom Field within SmartSimple you can now select any Single or Multiple file field on the current level, parent level, or grandparent level as the destination.
  • For example, if your MS Word Merge field is on Level 3 you can configure the MS Word document to be uploaded to a Single or Multiple File field on the associated Level 3, Level 2 or Level 1 record.
May 2009
Field ID Variable
  • It is now possible to reference the field ID of Custom Fields using a variable rather than the actual field ID. The syntax is @fieldname.ID@
  • This will allow you to write Browser Scripts without looking up field numbers, as well as making it easy to identify which field is being referenced. When exporting Custom Fields this will also allow you to avoid having to change the field IDs in exported Browser Scripts.
  • If you have fields with the same name (on different Templates or Types) you will still have to use the fieldid, since that is the only way to differentiate fields with identical names.
July 2009
Custom Field Number Format
  • In addition to the current "Currency" number format option which outputs dollars ($20,000.00) you will be able to specify other currencies:
Number Format Display
Currency $20,000.00
Currency-QAR QAR 20.000,00
Currency-EUR €20,000.00
Currency-GBP £20,000.00
  • Any currency defined by ISO 4217 can be shown by using the appropriate 3 letter currency code.
  • This setting only applies in view mode, or when the values are displayed in a Web Page View, Report, MS Word Merge, etc. No formatting is applied in edit mode.
Note: in edit mode you must use a period (.) as the decimal, even if the currency defined uses a comma (,).
October 2009
Single File Field Online Editing
  • Online editing is now possible for the Single File field. If a file is being edited by one user it will be shown as checked out to prevent other users from trying to edit it at the same time.
  • Single File Field with online editing enabled:
SFFEdit.png
  • File checked out by another user:
SFFOut.png
October 2009
Single/Multiple File Field Upload Workflow October 2009
Edit Data
  • When using Rich Text Fields, pasting complex HTML in the field it can sometime prevent the page from being displayed correctly. Occasionally this prevents saving the record, and thereby makes it impossible to remove the faulty data in the field.
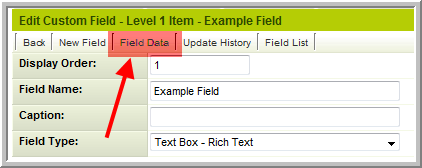
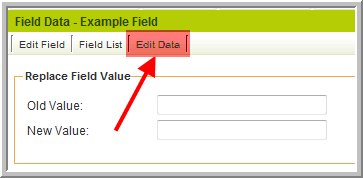
  • It is now possible to edit the data in the field without actually viewing the faulty record. This is done via the settings of the Custom Field concerned.
Select Field Data:FieldData.png then Edit Data:EditData.png

When prompted enter the opportunityid (Level 1) or eventid (Levels 2 & 3) for the relevant record and a pop-up window will appear allowing you to directly edit the data in the selected field for that record.

October 2009
Custom Field Type: Special - XML Data
  • The XML field type can be used to store blocks of XML in a single field.
  • Variables can be used to extract values from this block into other custom fields.
May 2010
Custom Field Type: Special - Spreadsheet
  • This field type is used to present the user with a spreadsheet that is compatible with MS Excel. This spreadsheet is stored as part of the record and can be exported as a .xls file, or be opened directly by MS Excel.
  • Formulas are included.
  • Information can be moved from MS Excel into this field using a macro within Excel.
  • The values in one or more cells on the spreadsheet can be referenced as variables.
May 2010
New Custom Field Type: Select One - User Group
  • The Select One - User Group Custom Field can be used to link any entity (company, UTA Level 1, Level 2 etc.) to a User Group.
  • User Groups are defined in Configuration, Roles and Permissions, User groups.
  • On its own this field only links the group to the entity. It can then be used in conjunction with a display field (Web Page View or Read Only System Variables custom field) to display information derived from the contacts in the related Group.
May 2010
New Custom Field Type: Lookup - ICD Code
  • The standard list of ICD Codes (International Statistical Classification of Diseases and Related Health Problems) is now available as a custom field type.
  • The field stores the actual ICD code (i.e. G44.0). If you wish to display the description (i.e. Cluster Headache Syndrome) you can use the syntax @field name.value@ in a Read Only - System Variables field or similar.
May 2010
Web Page View Field: SSattach
  • Static PDF documents can now be attached to Web Page Views using ssattach at a defined page location desired using the following syntax:
<!--@ssattach(insert;@static pdf.value@;n)-->  
where n is the page number at which the PDF document should be placed.
  • ssattach can now be used to attach PDF documents from multi-file fields:
Syntax for single file field:
<!--@ssattach(after;@Cvfile.value@)-->
Syntax for multiple file field:
<!--@ssattach(after;@Cvfiles.files@)--> 
May 2010
Web Page View Settings
  • PDF Page Restriction: Within the Web Page View custom field settings you can define a maximum number of pages for the resultant PDF. If the PDF generated has more than the specified number of page it will not be permitted to be automatically stored into the Multiple Files Custom Field specified in the Value Stores To setting.
  • Automatically Use User ID as File Name: When the Web Page View is stored the userid of the person who created it will be used as the file name. When used in association with the Save to Multiple File Field setting this will ensure each user is only permitted to generate and store one file in that folder (Keep Versions must be disabled on the Multiple Files Custom Field).
  • Value Stores To: The Multiple Files field selected can be enforced as the only file field the Web Page View can be saved into, rather than simply being the default.
May 2010
Single File Custom Field Settings
  • Disable E-mail Button: Removes the ability of users to e-mail the file directly from within SmartSimple.
  • No Deletion: Prevents deletion of the file. It can only be replaced with a new file.
May 2010
Multiple Files Custom Field Settings
  • PDF Merge Sort Order: The PDF merge functionality will now allow you to specify the order in which the documents are merged.
May 2010
ICD Code Lookup Button
  • The Lookup - ICD Code Custom Field will now have a Lookup button to facilitate browsing for the relevant item.
October 2010
Onload Function
  • similar to savefunc and sbfunc, the system will look for a user defined Browser Script with a function called onloadfunc which will be executed as soon as the page has loaded fully.
  • This is in place in the UTA at L1, L2, L3 and Invoicing, as well as on Contacts and Accounts
  • It only runs in Edit mode at Level 1, Contacts and Accounts.
October 2010
Post to External Server
  • Posting to external servers via a Web Page View has been updated to allow the response from the server to be stored.
October 2010
Standard Field Edit Condition

A conditional statement can be entered to control whether standard fields appear as editable or read only. The conditions can be based on role, status, or other criteria. This feature applies to company, contact and Universal Tracking Application standard fields.

May 2011
Custom Field Language Display

The captions displayed on custom fields can be configured for multiple languages. When viewing a record the personal language setting for each user will determine which language is displayed to them.

May 2011
New Custom Field Type: Special - Hand Drawing

This field type stores freehand drawings done either with a mouse or touch sensitive screen. The background image can be defined, as well as the colours to be used and patterns/images that can be "stamped" onto the image.

May 2011
Enable Camera Snapshot

The "Display Only - Image" custom field has a setting that enables a web cam attached to the computer to be used as the source of the image to be stored in this field type.

May 2011
Document Console

When using the Multiple Files custom field you can enable the document console. This allows you to easily preview and print the documents.

May 2011


Document Management

Feature Upgrade Date
MS Word Merge Custom Field
  • This new Custom Field type provides the ability to dynamically create an MS Word document from underlying SmartSimple data.
  • The MS Word document can also include tables that will list details of Level 2 or Level 3 activities associated with a given record.
  • The SmartDoc for MS Word Template also allows you to easily upload the resulting MS Word document back to SmartSimple to be stored in a specified Single or Multiple file field.
April 2009
Allow Merging of PDF Documents
  • If you are using a Multiple File field to store PDF documents then you can enable a "Merge" button.
  • Clicking the Merge button displays a list of all the PDFs document stored in the Multiple File field and you select which documents you wish to merge into a single PDF document.
  • The resultant document will also be stored in the Multiple File field. The original documents will not be changed.
  • This feature will provide for easier printing of "sets" of documents.
April 2009
Multiple File Field: Display Additional File Attributes for PDF Documents
  • This feature allows you to display extra information (called Meta Data) extracted from each PDF file stored in a Multiple File field, and display it as extra columns in the list view.
  • The additional attributes that can be extracted and displayed are: author, creator, producer, keywords, subject, title, number of pages, creation date and modified date.
  • Only PDF files stored in the Multiple File field will display this information. The added columns will be blank for all other document types.
April 2009
Single File Field: Display Additional File Attributes for PDF Documents
  • This feature allows you to extract extra information (called Meta Data) from a PDF stored in a Single File field and store it in a Read Only - System Variables field.
  • The additional attributes that can be extracted and displayed are: author, creator, producer, keywords, subject, title, number of pages, creation date and modified date.
  • Only PDF files stored in a Single File field will display this information.
April 2009

Personal Settings

Feature Upgrade Date
Time Format
  • On the Personal Setting page users are able to select whether the time is displayed in 24h or 12h format.
  • The setting will be be reflected in times displayed within UTAs for the standard start and end time fields at Levels 1, 2 and 3.
May 2009

Reports

Feature Upgrade Date
Report Variables
  • Exportdata: when using the Exportdata report variable, the variable will be replaced with data from the specified report, in the format defined by the advance export template.
@ReportProperty(reportid,exportdata)@
  • Csvdata: when using the Csvdata report variable, the variable will be replaced with data from the specified report, as comma separated values.
@ReportProperty(reportid,csvdata)@

Example: To display the exported report for the report with ID 12345

@ReportProperty(12345,exportdata)@

These 2 variables can be used in a Web Page View or Read Only - System Variables custom field, or be included in the body of a Workflow message.


  • When using any of the ReportProperty variables (recordcount, exportdata and csvdata) the object ID (opportunityid, eventid, userid, etc) will be passed to the report processor. If the specified report includes the variable: @objectid@, it will be replaced by the object ID of whichever object (Level 1, Level 2, Contact, etc) called the ReportProperty attribute.
May 2010
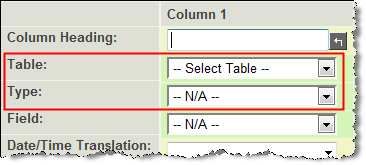
Report Builder - Table Selection
  • The columns in the Report Builder are now filtered by the Table and the Type. This will simplify locating the desired field for the report.
NewRB.png
  • For example if Tracking Application is chosen as the table, the Type combo box will be populated with all the UTAs and UTA template types.
  • Only newly created reports will employ this version of the report builder. Existing reports will not.
May 2010
Show Total
  • Another new feature within the report builder is the Show Total checkbox. When selected the last row of the report will include a total for that column. This is similar to the [[List View] Show Total feature, as it only shows the total of the column of records that are displayed on the current page.
May 2010
Caching and Record Limit
  • Reports and Charts can now be cached. Complex report and reports that are accessed regularly can be configured to be cached by the server to improve loading time and reduce the processing load on the server.
Repcache.png
  • Reports can also be Cached By User when appropriate (Note that you must select both Enable Caching and Cache by User and enter an appropriate Cache Life Span.
May 2010
Record Lock
  • A new table called Tracking Application Lock can be used to report on records that have been locked by the Record Lock.
May 2010
Export Button
  • For reports that have defined Advanced Export Settings, when viewing the report within your browser there will now be an Export button located next to the Print button.
  • This will allow the report to be easily exported to a file after previewing it in the browser.
October 2010
Flash Charts
  • Graphs such as bar and pie charts created from SmartSimple reports can be displayed using Flash animation.
May 2011
Dashboard Layout
  • New dashboard layout configurations of 1x7, 1x8, 1x9 and 1x10.
May 2011


SmartFolders

Feature Upgrade Date
Inclusion of Folders in Search
  • When you search within SmartFolders the results will include both files and folders that match the search term.
May 2009

Variables / Variable Processor

Feature Upgrade Date
Report Record Count Variable
  • Introduction of a variable that can generate the number of records within a specified report.
@ReportProperty(reportid,recordcount)@

Example: To generate the number of records (equivalent to the number of rows in the report) for report with ID 12345

@ReportProperty(12345,recordcount)@

This can be used in a Web Page View or as a Read Only - System Variable to display a record count, as part of Submit Logic, or included in the title of a Portal shortcut to indicate how many records are at a given status (for example).

October 2009
Assign Level 1 Customer
  • Ability to assign to the Customer Level 1 Standard field (also called Client).
  • Example template formula: @opportunity.companyid@=@opportunity.owner.companyid@
October 2009
User/Company Association List
  • Ability to use the list syntax [#...#] to show all companies that a user is associated with, or all users associated with a company.
October 2009
Currency Formatting
  • Values can now be changed to standard currency formats using the following syntax: @format(FIELD NAME,currency,CURRENCYCODE)@
May 2011
System Library
  • A global System Library has been added that can be accessed as system variables. The available values and functions can be found under System Variables on the Global Settings page. The syntax is: @system.library.variable name@
  • When viewing the list of custom fields will identify those that are using System Library variables.
May 2011
System Variable Pre-processing
  • Variables within System Variables will be pre-processed to allow dynamic selection of the appropriate variable. The syntax to be used is: @system2.@variable name@@
  • System variables appearing within other system variables is also now supported.
May 2011
Global Auto-number
  • A global auto-number field can be specified as a System Variable. This will allow sequential numbers to be provided across different objects and/or in different UTAs.
May 2011

Web Forms

Feature Upgrade Date
Web Form Status
  • Web Forms now support a Status which is changed by a Submit button at the end of the form.
May 2009
Convert Web Form to PDF
  • Completed Web Forms can be converted to pdf using a button on the Results page.
May 2009

Workflows

Feature Upgrade Date
Level 2 Creation
  • The Create New Activity workflow can now be driven by custom fields. For example, you could have check boxes at Level 1 corresponding to various Level 2 Types. Selecting each check box could create and attach the relevant Level 2 activity type.
  • The Create New Activity workflow will also trigger any relevant Auto-assignments, Level 2 Workflows and Level 2 Formulas.
May 2009
HTML E-mail Format
  • Workflow e-mails can now be sent using HTML format as well as plain text.
May 2009
Recurring Workflows
  • Recurring Workflows can be used to send out e-mails on a daily, weekly or monthly basis.
  • These workflow e-mails can use the ReportProperty functions mentioned above to automatically e-mail periodic reports.
May 2010
People Association Workflow Task Type
  • A new Workflow Task allows you to automatically add contacts to Level 1 activities with the role specified in the Workflow Task.
May 2010
Level 1 Date Trigger
  • Workflows associated with Level 1 records can now be set to trigger based on a date on the Level 1 record.
May 2010
UTA Role Assignment Tasks
  • The recipient for these tasks can now be defined as the user that was added to the record.
  • You can include information from the Level one record using variable syntax: @levelone.customfieldname@
May 2010
Transaction Workflows
  • Workflows can now be attached to Transactions.
May 2010
Workflow E-mails
  • The e-mail header can now be defined.
May 2010
Select User for Next Task
  • This Workflow Task Type allows the current user to select which user will be responsible for the subsequent task.
  • This is necessary if the following task is due to be triggered in future, since select Let Current User Select on the subsequent task isn't possible since the trigger is delayed.
October 2010
Create Activity
  • The Create Activity workflow task can now be used at Level 2 to create one or more Level 3 activities.
May 2011
Workflow Requests
  • Workflow task types Request for Comment and Request for Approval at Level 2 and Level 3 can now be configured to display the record either in view or in edit mode.
May 2011

Miscellaneous

Feature Upgrade Date
Custom Defined Holidays
  • Instead of using the holidays that are built-in to SmartSimple it is now possible to define which dates should be considered holidays.
  • When using the busdateadd() or isHoliday() functions, a new variable called ssvar_holidays can be used to override the system defined holiday dates on that level.
  • The ssvar_holidays variable must be included in a Browser Script custom field on the same level as the busdateadd() or isHoliday() function.

Example:

ssvar_holidays=',2009-01-01,2009-02-16,2009-04-10,2009-05-18,2009-07-01,2009-08-03,
2009-09-07,2009-10-12,2009-12-25,2009-12-26,2009-12-28,2010-01-01,2010-04-02,2010-05-24,
2010-07-01,2010-08-02,2010-09-06,2010-10-11,2010-12-27,2010-12-28,';
May 2010
System Date & Time
  • Clients on dedicated servers that are not configured with automatic time synchronization can set the server date and time on the Global Settings page.
May 2010
Chat
  • The chat window (accessed via the Chaticon.png icon located next to the Logout button) will now open as a layer on top of your current window instead of opening in a new window.
May 2010
Variable Processor Enhancements
@fieldname.value@

or using field ID:

@#fieldid.value#@


  • You can use @roleid@ on a UTA Role based Custom Field to obtain the role ID that the user is assigned with on the Level 1.


  • For Multiple Files fields you can obtain a count of the number of files stored within the field using the following syntax:
@fieldname.numoffiles@

or using field ID:

@#fieldid.numoffiles#@
May 2010
Advanced Logic
  • The visibility of Associations on both contact and account profiles now can be controlled using Global Advanced Logic.
  • Within a UTA the hyperlinks in the Level 1 Company List View can be disabled using Advanced Logic.
  • Hide Associates on User/Company Profile.
  • Transactions: Show attribution button.
May 2010
Company and Contact Role-Based List View
  • The List View for Companies/Accounts and Users/Contacts can be configured by role, just as the UTA Level 1, 2 and 3 List Views.
October 2010
List Calendars by Company
  • The list of Calendars that you can view will be grouped by internal and/or external entity. Your calendar (and your Company/Account/Branch) will always be on top.
October 2010
Autoloader Support for XML Files October 2010
Email Attach from Smart Folder
  • When sending an e-mail to a contact you can now select one or more files from Smart Folders to be attached to the e-mail, in addition to attaching files from your local disk.
October 2010
HCAI Status
  • The status of submissions to HCAI can be displayed from the invoice view (or OCF-18 view if enabled). It can also be stored to a custom field on the Invoice (or Level 2 for OCF-18s) so that it can be displayed within the List View or Reports
October 2010
SMTP Settings
  • The outgoing mail port can be configured (uses 25 as default)
  • TLS can be enabled.
October 2010
Advanced Logic
  • Hide View Tab on User Profile allows the View tab on user and account profiles to be suppressed.
October 2010