Difference between revisions of "Custom Field Type: Special – MS Word Merge"
Nancy Sabo (talk | contribs) |
|||
| Line 1: | Line 1: | ||
__TOC__ | __TOC__ | ||
| + | |||
==General Description== | ==General Description== | ||
| − | This field type provides the ability to dynamically create an MS Word document from underlying [[SmartSimple]] data. | + | This field type provides the ability to dynamically create an MS Word document from underlying [[SmartSimple]] data. |
Configuring a Word Merge in SmartSimple is a three-step process: | Configuring a Word Merge in SmartSimple is a three-step process: | ||
| + | |||
# Create the MS Word document that will be used as the template. (See [[Adding Form Fields to a MS Word Document]] for instructions.) | # Create the MS Word document that will be used as the template. (See [[Adding Form Fields to a MS Word Document]] for instructions.) | ||
# Upload the Word document to a [[SmartFolder]]. (See [[Uploading Word Merge Document to a SmartFolder]] for instructions.) | # Upload the Word document to a [[SmartFolder]]. (See [[Uploading Word Merge Document to a SmartFolder]] for instructions.) | ||
# '''This page describes how to create a Custom Field Type: Special - MS Word Merge custom field that maps the SmartSimple fields you wish to merge to the Word template.''' | # '''This page describes how to create a Custom Field Type: Special - MS Word Merge custom field that maps the SmartSimple fields you wish to merge to the Word template.''' | ||
| − | {{FieldOptions}} | + | <!--<span class="mceNonEditable template" id="bs_template:@@@TPL0@@@" data-bs-name=" FieldOptions" data-bs-type="template" data-bs-id="0"><span class="mceNonEditable template" id="bs_template:@@@TPL0@@@" data-bs-name=" FieldOptions" data-bs-type="template" data-bs-id="0"><span class="mceNonEditable template" id="bs_template:@@@TPL0@@@" data-bs-name=" FieldOptions" data-bs-type="template" data-bs-id="0"><span class="mceNonEditable template" id="bs_template:@@@TPL0@@@" data-bs-name=" FieldOptions" data-bs-type="template" data-bs-id="0"><span class="mceNonEditable template" id="bs_template:@@@TPL0@@@" data-bs-name=" FieldOptions" data-bs-type="template" data-bs-id="0">{{ FieldOptions }}</span></span></span></span></span>--> |
| − | + | <!--<span class="mceNonEditable template" id="bs_template:@@@TPL2@@@" data-bs-name="AppearMandatory" data-bs-type="template" data-bs-id="2"><span class="mceNonEditable template" id="bs_template:@@@TPL2@@@" data-bs-name=" AppearMandatory" data-bs-type="template" data-bs-id="2"><span class="mceNonEditable template" id="bs_template:@@@TPL2@@@" data-bs-name=" AppearMandatory" data-bs-type="template" data-bs-id="2"><span class="mceNonEditable template" id="bs_template:@@@TPL2@@@" data-bs-name=" AppearMandatory" data-bs-type="template" data-bs-id="2"><span class="mceNonEditable template" id="bs_template:@@@TPL1@@@" data-bs-name=" AppearMandatory" data-bs-type="template" data-bs-id="1"><span class="mceNonEditable template" id="bs_template:@@@TPL1@@@" data-bs-name=" AppearMandatory" data-bs-type="template" data-bs-id="1">{{ AppearMandatory }}</span></span></span></span></span></span> | |
| − | + | <span class="mceNonEditable template" id="bs_template:@@@TPL3@@@" data-bs-name="ToolTip" data-bs-type="template" data-bs-id="3"><span class="mceNonEditable template" id="bs_template:@@@TPL3@@@" data-bs-name=" ToolTip" data-bs-type="template" data-bs-id="3"><span class="mceNonEditable template" id="bs_template:@@@TPL3@@@" data-bs-name=" ToolTip" data-bs-type="template" data-bs-id="3"><span class="mceNonEditable template" id="bs_template:@@@TPL3@@@" data-bs-name=" ToolTip" data-bs-type="template" data-bs-id="3"><span class="mceNonEditable template" id="bs_template:@@@TPL2@@@" data-bs-name=" ToolTip" data-bs-type="template" data-bs-id="2"><span class="mceNonEditable template" id="bs_template:@@@TPL2@@@" data-bs-name=" ToolTip" data-bs-type="template" data-bs-id="2">{{ ToolTip }}</span></span></span></span></span></span> | |
| − | + | <span class="mceNonEditable template" id="bs_template:@@@TPL4@@@" data-bs-name="HideFieldForNewRecord" data-bs-type="template" data-bs-id="4"><span class="mceNonEditable template" id="bs_template:@@@TPL4@@@" data-bs-name=" HideFieldForNewRecord" data-bs-type="template" data-bs-id="4"><span class="mceNonEditable template" id="bs_template:@@@TPL4@@@" data-bs-name=" HideFieldForNewRecord" data-bs-type="template" data-bs-id="4"><span class="mceNonEditable template" id="bs_template:@@@TPL4@@@" data-bs-name=" HideFieldForNewRecord" data-bs-type="template" data-bs-id="4"><span class="mceNonEditable template" id="bs_template:@@@TPL3@@@" data-bs-name=" HideFieldForNewRecord" data-bs-type="template" data-bs-id="3"><span class="mceNonEditable template" id="bs_template:@@@TPL3@@@" data-bs-name=" HideFieldForNewRecord" data-bs-type="template" data-bs-id="3">{{ HideFieldForNewRecord }}</span></span></span></span></span></span> | |
| − | {{AppearMandatory}} | ||
| − | {{ToolTip}} | ||
| − | {{HideFieldForNewRecord}} | ||
| − | |||
| − | |||
| − | |||
| − | |||
| − | |||
| + | <span class="mceNonEditable template" id="bs_template:@@@TPL5@@@" data-bs-name="OptionsTab" data-bs-type="template" data-bs-id="5"><span class="mceNonEditable template" id="bs_template:@@@TPL5@@@" data-bs-name=" OptionsTab" data-bs-type="template" data-bs-id="5"><span class="mceNonEditable template" id="bs_template:@@@TPL5@@@" data-bs-name=" OptionsTab" data-bs-type="template" data-bs-id="5"><span class="mceNonEditable template" id="bs_template:@@@TPL5@@@" data-bs-name=" OptionsTab" data-bs-type="template" data-bs-id="5"><span class="mceNonEditable template" id="bs_template:@@@TPL4@@@" data-bs-name=" OptionsTab" data-bs-type="template" data-bs-id="4"><span class="mceNonEditable template" id="bs_template:@@@TPL4@@@" data-bs-name=" OptionsTab" data-bs-type="template" data-bs-id="4">{{ OptionsTab }}</span></span></span></span></span></span> | ||
| + | <span class="mceNonEditable template" id="bs_template:@@@TPL6@@@" data-bs-name="AppearMandatory" data-bs-type="template" data-bs-id="6"><span class="mceNonEditable template" id="bs_template:@@@TPL6@@@" data-bs-name=" AppearMandatory" data-bs-type="template" data-bs-id="6"><span class="mceNonEditable template" id="bs_template:@@@TPL6@@@" data-bs-name=" AppearMandatory" data-bs-type="template" data-bs-id="6"><span class="mceNonEditable template" id="bs_template:@@@TPL6@@@" data-bs-name=" AppearMandatory" data-bs-type="template" data-bs-id="6"><span class="mceNonEditable template" id="bs_template:@@@TPL5@@@" data-bs-name=" AppearMandatory" data-bs-type="template" data-bs-id="5"><span class="mceNonEditable template" id="bs_template:@@@TPL5@@@" data-bs-name=" AppearMandatory" data-bs-type="template" data-bs-id="5">{{ AppearMandatory }}</span></span></span></span></span></span> | ||
| + | <span class="mceNonEditable template" id="bs_template:@@@TPL7@@@" data-bs-name="DisableFromGlobalSearch" data-bs-type="template" data-bs-id="7"><span class="mceNonEditable template" id="bs_template:@@@TPL7@@@" data-bs-name=" DisableFromGlobalSearch" data-bs-type="template" data-bs-id="7"><span class="mceNonEditable template" id="bs_template:@@@TPL7@@@" data-bs-name=" DisableFromGlobalSearch" data-bs-type="template" data-bs-id="7"><span class="mceNonEditable template" id="bs_template:@@@TPL7@@@" data-bs-name=" DisableFromGlobalSearch" data-bs-type="template" data-bs-id="7"><span class="mceNonEditable template" id="bs_template:@@@TPL6@@@" data-bs-name=" DisableFromGlobalSearch" data-bs-type="template" data-bs-id="6"><span class="mceNonEditable template" id="bs_template:@@@TPL6@@@" data-bs-name=" DisableFromGlobalSearch" data-bs-type="template" data-bs-id="6">{{ DisableFromGlobalSearch }}</span></span></span></span></span></span>--> | ||
| + | <!--==Value Storage== | ||
| + | <span class="mceNonEditable template" id="bs_template:@@@TPL8@@@" data-bs-name="ValueStoresTo" data-bs-type="template" data-bs-id="8"><span class="mceNonEditable template" id="bs_template:@@@TPL7@@@" data-bs-name=" ValueStoresTo" data-bs-type="template" data-bs-id="7"><span class="mceNonEditable template" id="bs_template:@@@TPL7@@@" data-bs-name=" ValueStoresTo" data-bs-type="template" data-bs-id="7">{{ ValueStoresTo }}</span></span></span> | ||
| − | == | + | <span class="mceNonEditable template" id="bs_template:@@@TPL9@@@" data-bs-name=" CFPermissionsTab" data-bs-type="template" data-bs-id="9"><span class="mceNonEditable template" id="bs_template:@@@TPL8@@@" data-bs-name=" CFPermissionsTab" data-bs-type="template" data-bs-id="8"><span class="mceNonEditable template" id="bs_template:@@@TPL8@@@" data-bs-name=" CFPermissionsTab" data-bs-type="template" data-bs-id="8">{{ CFPermissionsTab }}</span></span></span>--> |
| − | {{ | + | ==Set Up: Creating the Field== |
| − | + | ===Setting the Values=== | |
| − | + | Now that the Word document to be used as the template [[Adding Form Fields to a MS Word Document|has been created (step 1)]] and [[Uploading Word Merge Document to a SmartFolder|uploaded to a SmartFolder (step 2)]], you can now proceed to step 3: creating the MS Word Merge custom field that will be used to dynamically populate the document. | |
| − | |||
| + | * In the '''Values''' section, the form fields you created on the MS Word document are now assigned by name to the associated [[SmartSimple]] Field Names or [[Custom Field ID|Field IDs]]. The syntax is ''Mergefield = @SmartSimple field name@;'' where ''Mergefield'' is a Bookmark you have assigned to a Form Field in [[Adding Form Fields to a MS Word Document|step 1]]. | ||
| − | + | : ''Examples:'' | |
| − | + | : ''signatory=@me.fullname@;'' | |
| − | + | :: or | |
| − | + | : ''datesigned=@#565346#@;'' | |
| − | :''Examples:'' | + | : [[Image:WordMergeValues.png|link=]] |
| − | :''signatory=@me.fullname@;'' | ||
| − | ::or | ||
| − | :''datesigned=@#565346#@;'' | ||
| − | :[[Image:WordMergeValues.png|link=]] | ||
* Each ''Form Field'' on the MS Word Merge Document should be represented on a different line in the MS Word Merge Field '''Values''' section, and each line must end with a semi-colon. | * Each ''Form Field'' on the MS Word Merge Document should be represented on a different line in the MS Word Merge Field '''Values''' section, and each line must end with a semi-colon. | ||
* The variables used for the '''MS Word Merge''' are the same as for a [[Web Page View Field]] and can be found at [[Web Page View Field Variables]]. | * The variables used for the '''MS Word Merge''' are the same as for a [[Web Page View Field]] and can be found at [[Web Page View Field Variables]]. | ||
| Line 43: | Line 38: | ||
* [[Rich Text]] fields are not suitable for including in MS Word Merges because of the additional encoding to support formatting. | * [[Rich Text]] fields are not suitable for including in MS Word Merges because of the additional encoding to support formatting. | ||
* The sequence is not important, as the variables are matched using the bookmark name. | * The sequence is not important, as the variables are matched using the bookmark name. | ||
| − | + | ** The only exception is when SmartSimple variables are merged to a Word table; the table references must be at the bottom of the list of '''Values'''. See [[Including Tables in a Word Merge Document|this page]] for instructions on configuration. | |
* You can assign more than one field from SmartSimple into a single MS Word form field, and include other text and characters: | * You can assign more than one field from SmartSimple into a single MS Word form field, and include other text and characters: | ||
| − | + | *: ''time=@starth@:@startminute@ @startpmam@;'' would display in this format: '''"12:35 pm"''' in the time form field | |
| − | + | *:: or | |
| − | + | * ''contractdetails=@duration@ with a monthly fee of $@monthlyfee@;'' would result in '''"24 months with a monthly fee of $200"''' in the contractdetails form field | |
* You can include ''<!--hideifnotfound-->'' in front of variables that may not be present to ensure nothing is displayed, rather than the variable name. | * You can include ''<!--hideifnotfound-->'' in front of variables that may not be present to ensure nothing is displayed, rather than the variable name. | ||
| − | + | ** An example would be ''monthlyfee=<!--hideifnotfound-->@monthly fee@;'' | |
| − | * You can include HTML code embedded within | + | * You can include HTML code embedded within tags. The SmartSimple Word Merge engine will apply the HTML formatting to the value before merging to the Word document. |
| − | + | ** Note that HTML code will only function when merging to a single record, not for the [[Exporting List View Results to Microsoft Word|batch merge mode]]. | |
| − | + | ** Example: | |
| − | <pre>bookmarkname=< | + | |
| − | + | <pre>bookmarkname=</pre> | |
| − | + | [#(?object=activity)#] | |
| − | * You can use the following special characters in this section to control the output on the MS Word Merge document: | + | |
| − | + | {| style="width: 100%;" | |
| − | + | |- | |
| + | !|# | ||
| + | !|Date | ||
| + | !|Details | ||
| + | |- | ||
| + | | style="width: 10%;"|~Index~ | ||
| + | | style="width: 40%;"|<!--@sscalculation(DATE_FORMAT("~startdate~","%d %M %Y"))--> | ||
| + | | style="width: 10%;"|$Activity Details$ | ||
| + | |} | ||
| + | <pre>;</pre> | ||
| + | ** You can use the following special characters in this section to control the output on the MS Word Merge document: | ||
| + | *** ^p = Line break | ||
| + | *** ^t = Tab | ||
===Custom Field IDs=== | ===Custom Field IDs=== | ||
| − | You can use the Extract IDs and Display Field Names links in the section to display associated Field IDs and Field Names.<br> | + | You can use the Extract IDs and Display Field Names links in the section to display associated Field IDs and Field Names.<br /> |
| − | [[Image:Extract.PNG|link=|400px]]<br> | + | [[Image:Extract.PNG|link=|400px]]<br /> |
'''See [[Custom Field IDs]] for more information.''' | '''See [[Custom Field IDs]] for more information.''' | ||
===Smart Folder/File ID=== | ===Smart Folder/File ID=== | ||
| − | You must also specify the either the Field ID or File ID (as described [[Uploading_Word_Merge_Document_to_a_SmartFolder|in the previous step]]) of the MS Word document.<br> | + | You must also specify the either the Field ID or File ID (as described [[Uploading_Word_Merge_Document_to_a_SmartFolder|in the previous step]]) of the MS Word document.<br /> |
[[Image:FileID.PNG|link=]] | [[Image:FileID.PNG|link=]] | ||
| − | * If you specify the Folder ID, all documents in the folder will be displayed in a combo-box upon initiating the Word merge. The [[User|user]] can select the document that he/she wishes to create. | + | |
| − | + | *** If you specify the Folder ID, all documents in the folder will be displayed in a combo-box upon initiating the Word merge. The [[User|user]] can select the document that he/she wishes to create. | |
| − | * If you specify the File ID, that specific document will be used as the template for the Word merge. | + | ***:: ''Useful if you have several different versions of a document to be generated from the same underlying data'' |
| + | *** If you specify the File ID, that specific document will be used as the template for the Word merge. | ||
==Generating the Document== | ==Generating the Document== | ||
| − | * In order to generate the document when viewing or editing a record you simply click the button associated with the MS Word Merge. | + | *** In order to generate the document when viewing or editing a record you simply click the button associated with the MS Word Merge. |
| − | + | ***: ''If a Folder ID was specified in the [[Custom Field]] settings you will be prompted to select which document should be used.'' | |
| − | * The document will be dynamically created and the [[SmartSimple]] data added. | + | *** The document will be dynamically created and the [[SmartSimple]] data added. |
| − | *'''Note''': If the [[User|user]] wishes to edit or retain the document he/she may need to use the MS Word '''Save As''' feature. Some [[Browser|browsers]] may cause it to be read only initially. | + | *** '''Note''': If the [[User|user]] wishes to edit or retain the document he/she may need to use the MS Word '''Save As''' feature. Some [[Browser|browsers]] may cause it to be read only initially. |
| − | * Remember to check the size of the file, header and footer pictures may interrupt the document to merge. | + | *** Remember to check the size of the file, header and footer pictures may interrupt the document to merge. |
| + | ==Field Options== | ||
| + | * '''Value''': Allows the form fields you created on the MS Word document are now assigned by name to the associated [[SmartSimple]] Field Names or [[Custom Field ID|Field IDs]] | ||
| + | * '''Custom Field IDs''': You can use the Extract IDs and Display Field Names links in the section to display associated Field IDs and Field Names. | ||
| + | {{ButtonLabel}} For Word Merge fields, the default label is "Open". | ||
| + | * '''SmartFolder / File ID''': Here you can specify the either the Field ID or File ID (as described [[Uploading_Word_Merge_Document_to_a_SmartFolder|in the previous step]]) of the MS Word document. | ||
==See Also== | ==See Also== | ||
Revision as of 16:21, 25 October 2018
Contents
General Description
This field type provides the ability to dynamically create an MS Word document from underlying SmartSimple data.
Configuring a Word Merge in SmartSimple is a three-step process:
- Create the MS Word document that will be used as the template. (See Adding Form Fields to a MS Word Document for instructions.)
- Upload the Word document to a SmartFolder. (See Uploading Word Merge Document to a SmartFolder for instructions.)
- This page describes how to create a Custom Field Type: Special - MS Word Merge custom field that maps the SmartSimple fields you wish to merge to the Word template.
Set Up: Creating the Field
Setting the Values
Now that the Word document to be used as the template has been created (step 1) and uploaded to a SmartFolder (step 2), you can now proceed to step 3: creating the MS Word Merge custom field that will be used to dynamically populate the document.
- In the Values section, the form fields you created on the MS Word document are now assigned by name to the associated SmartSimple Field Names or Field IDs. The syntax is Mergefield = @SmartSimple field name@; where Mergefield is a Bookmark you have assigned to a Form Field in step 1.
- Examples:
- signatory=@me.fullname@;
- or
- datesigned=@#565346#@;
-
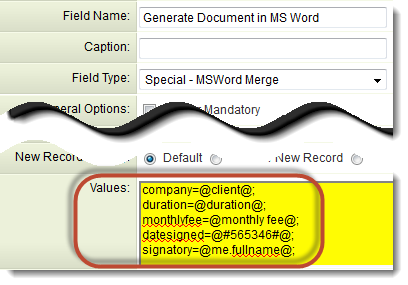
- Each Form Field on the MS Word Merge Document should be represented on a different line in the MS Word Merge Field Values section, and each line must end with a semi-colon.
- The variables used for the MS Word Merge are the same as for a Web Page View Field and can be found at Web Page View Field Variables.
- Only fields containing text can be used for the Word Merge. Please note that you cannot use image fields, file fields etc.
- Rich Text fields are not suitable for including in MS Word Merges because of the additional encoding to support formatting.
- The sequence is not important, as the variables are matched using the bookmark name.
- The only exception is when SmartSimple variables are merged to a Word table; the table references must be at the bottom of the list of Values. See this page for instructions on configuration.
- You can assign more than one field from SmartSimple into a single MS Word form field, and include other text and characters:
- time=@starth@:@startminute@ @startpmam@; would display in this format: "12:35 pm" in the time form field
- or
- time=@starth@:@startminute@ @startpmam@; would display in this format: "12:35 pm" in the time form field
- contractdetails=@duration@ with a monthly fee of $@monthlyfee@; would result in "24 months with a monthly fee of $200" in the contractdetails form field
- You can include <!--hideifnotfound--> in front of variables that may not be present to ensure nothing is displayed, rather than the variable name.
- An example would be monthlyfee=<!--hideifnotfound-->@monthly fee@;
- You can include HTML code embedded within tags. The SmartSimple Word Merge engine will apply the HTML formatting to the value before merging to the Word document.
- Note that HTML code will only function when merging to a single record, not for the batch merge mode.
- Example:
bookmarkname=
[#(?object=activity)#]
| # | Date | Details |
|---|---|---|
| ~Index~ | $Activity Details$ |
;
- You can use the following special characters in this section to control the output on the MS Word Merge document:
- ^p = Line break
- ^t = Tab
- You can use the following special characters in this section to control the output on the MS Word Merge document:
Custom Field IDs
You can use the Extract IDs and Display Field Names links in the section to display associated Field IDs and Field Names.

See Custom Field IDs for more information.
Smart Folder/File ID
You must also specify the either the Field ID or File ID (as described in the previous step) of the MS Word document.
![]()
- If you specify the Folder ID, all documents in the folder will be displayed in a combo-box upon initiating the Word merge. The user can select the document that he/she wishes to create.
- Useful if you have several different versions of a document to be generated from the same underlying data
- If you specify the File ID, that specific document will be used as the template for the Word merge.
- If you specify the Folder ID, all documents in the folder will be displayed in a combo-box upon initiating the Word merge. The user can select the document that he/she wishes to create.
Generating the Document
- In order to generate the document when viewing or editing a record you simply click the button associated with the MS Word Merge.
- If a Folder ID was specified in the Custom Field settings you will be prompted to select which document should be used.
- The document will be dynamically created and the SmartSimple data added.
- Note: If the user wishes to edit or retain the document he/she may need to use the MS Word Save As feature. Some browsers may cause it to be read only initially.
- Remember to check the size of the file, header and footer pictures may interrupt the document to merge.
- In order to generate the document when viewing or editing a record you simply click the button associated with the MS Word Merge.
Field Options
- Value: Allows the form fields you created on the MS Word document are now assigned by name to the associated SmartSimple Field Names or Field IDs
- Custom Field IDs: You can use the Extract IDs and Display Field Names links in the section to display associated Field IDs and Field Names.
- Button Label: Text to be displayed on the field's button. If no text is entered, the system will use a default label. For Word Merge fields, the default label is "Open".
- SmartFolder / File ID: Here you can specify the either the Field ID or File ID (as described in the previous step) of the MS Word document.
See Also
To set up a Word merge:
- Step 1 - Create the MS Word document that will be used as the template.
- Step 2 - Upload the Word document to a SmartFolder.
- Step 3 - Create a Special - MS Word Merge custom field.
Advanced Word Merge Features Include:
- Exporting List View Results to Microsoft Word
- Uploading a MS Word Merge Document to a Custom Field
- Including Tables in a Word Merge Document
- Using ReportProperty with a Word Merge Document
- Including Check Boxes on an MS Word Merge Document
- Including XML on an MS Word Merge Document
- Using Conditional Logic on a MS Word Merge Document