Adding Form Fields to a MS Word Document
Configuring a Word Merge in SmartSimple is a three-step process:
- Create the MS Word document that will be used as the template. This page describes the process to add form fields to your Word document.
- Upload the Word document to a SmartFolder. (See Uploading Word Merge Document to a SmartFolder for instructions.)
- Create the Special - MS Word Merge custom field that maps the SmartSimple fields you wish to merge to the Word template.
Your Word document will contain Form Fields which are linked to "Bookmarks." The SmartSimple Word Merge field will be configured to match the bookmarks up with SmartSimple variables in the third step.
In this step, you will add the Form Fields and assign Bookmarks to each field in your Word document that is to be merged. The steps vary slightly in different versions of Word.
Note that SmartSimple's Word Merge feature works with all versions of MS Word. As opposed to using the user's version of Word to create the merged document, the merge is performed by SmartSimple's Word Merge engine using an programmatic object compatible with MS Word (all versions). Once the merge is launched, SmartSimple streams the resultant document back to the client’s browser where the extension of the streamed document (*.doc, *.docx, etc.) will trigger the launching of MS Word. If the user does not have MS Word on a Windows machine, the process will simply open whatever program is associated with the document's extension.
Take note of all the Bookmarks that you add to the Form Fields below. They will be used in step 3: creating an MS Word Merge custom field.
Contents
MS Word 2000-2003
- From the View Menu select Toolbars and enable the Forms Toolbar
- Click in your Word document wherever you wish to insert a Form Field.
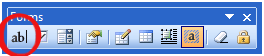
- On the Forms Toolbar click on the first button to insert a Form Field into your document:
- Right-click on the Form Field and select Properties. Then provide a name for the field in the Bookmark section.
MS Word 2007
- Click on the Menu button and select Word Options
- In the Popular section, select Show Developer Tab in the Ribbon
- Click in your Word document wherever you wish to insert a Form Field.
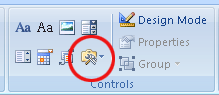
- On the Developer Menu select the Legacy Tools icon which is in the Controls section:
- On the Legacy Forms menu click the first icon to insert a Form Field.
- Right-click on the Form Field and select Properties. Then provide a name for the field in the Bookmark section.
MS Word 2010/2013
- Click in your Word document wherever you wish to insert a Form Field.
- Click on the Developer tab.
- If the "Developer" tab is not visible, click on File > Options > Customize Ribbon, and check off the "Developer" tab in the right hand frame.

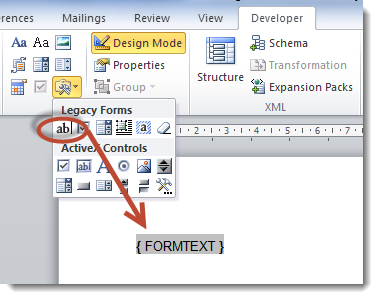
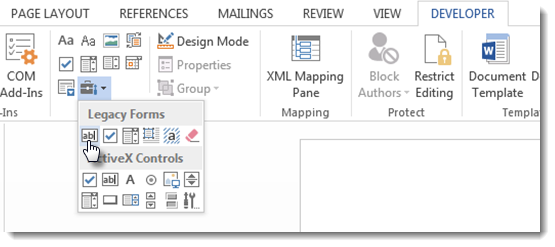
- On the Developer tab, click on the Legacy Tools button:
 .
. - Click on the Text Form Field button
Word 2010
Word 2013
- A Text Form Field will be inserted at the cursor location.
- Right-click on the Form Field and select Properties. Then provide a name for the field in the Bookmark section.
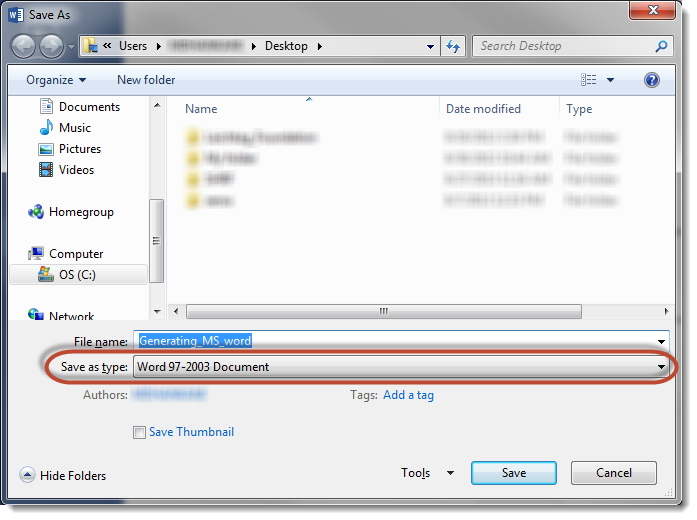
In Word 2013, the document must be saved as a "Word 97-2003 Document":
Preparing Template for List View Export
List View Export to a Word Merge field required the fields used be Word Merge instead of the old bookmarks which is described above. This method will also work for Word Merge fields used outside of the list view.
To ensure the list view export functions, fields must be created using the following:
- In Word 2007 and higher, select Mailings from the ribbon menu.
- If you haven't already, click on Select Receipients then Use Existing List.
- When the Select Data Source dialog box appears, select a blank Excel document (or any existing Excel document you have accessible). This will enable the required buttons.
- Click on Insert Merge Field.

- Select the Address Fields radio button
- With the first field on the list selected, click on Insert. The selected field name will now appear within the document.
Ex. «Field_Name» - You can now close this dialog box.
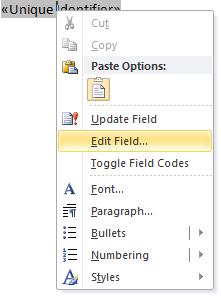
- To rename the newly added Word Merge field, right-click on the field and select Edit Field
- You can now relabel the Field name with whichever name you wish to use.
- Copy and paste this field to other parts of your document and rename accordingly.


Note: If you do not rename the field, then the data merged within will be the same for all like-named fields.
See Also
To set up a Word merge:
- Step 1 - Create the MS Word document that will be used as the template.
- Step 2 - Upload the Word document to a SmartFolder.
- Step 3 - Create a Special - MS Word Merge custom field.
Advanced Word Merge Features Include:
- Exporting List View Results to Microsoft Word
- Uploading a MS Word Merge Document to a Custom Field
- Including Tables in a Word Merge Document
- Using ReportProperty with a Word Merge Document
- Including Check Boxes on an MS Word Merge Document
- Including XML on an MS Word Merge Document
- Using Conditional Logic on a MS Word Merge Document