Custom Field Type: Special – MS Word Merge

This field type provides the ability to dynamically create an MS Word document from underlying SmartSimple data.
The feature works as follows:
- Any MS Word document can be used, up to and including MS Word 2007 documents.
- You can use a normal Word document (doc or .docx), or you can use Word templates (.dot or .dotx).
- You must first create a document which includes the MS Word Form Fields to be populated by SmartSimple. Each Form Field must be provided with a name (called a Bookmark in MS Word). This name will be used to link the form field on the Word document to a Standard or Custom Field within SmartSimple.
Contents
Field Options
| Option | Description | Format |
|---|---|---|
| Custom Field ID | The unique ID number associated with the custom field. | Not Applicable |
| Field Type | The list of available Field Types. | @fieldtype@ |
| Field Name | The name of the field, used internally to reference the user's input; | @fieldname@ |
| Caption | The leading question or prologue before the field. | @caption@ |
| Display Order | The order (relative to other fields) in which this field is displayed. | @displayorder@ |
| Description | Definition and general description of the custom field. Will not be displayed. | @description@ |
- Button Label: Text to be displayed on the field's button. If no text is entered, the system will use a default label.
- Appear Mandatory: Makes the field appear as though it is a required field. Typically used in conjunction with browser scripts, JavaScript Validation or Submit Logic that perform validation.
- Label Display: Determines the location of the field caption. Options include: Left of Field, Above Field, No Caption, Hide Caption. Note: this option was previously called Label Display. (See examples here.)
- On New Record: Controls how the field should be displayed until record has been saved once.
- Always Display: Field will be exposed both before and after the record is saved.
- Hide on New Record: Field will be hidden until record is saved.
- Only Show on New Record: Field will be exposed until record is saved, and then it will be hidden. This option is useful for fields that provide instructions for filling out forms before saving.
Adding Form Fields to a MS Word Document:
MS Word 2000-2003:
- From the View Menu select Toolbars and enable the Forms Toolbar
- Click in your Word document wherever you wish to insert a Form Field.
- On the Forms Toolbar click on the first button to insert a Form Field into your document:
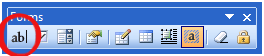
- Right-click on the Form Field and select Properties. Then provide a name for the field in the Bookmark section.

MS Word 2007:
- Click on the Menu button and select Word Options
- In the Popular section selectShow Developer Tab in the Ribbon
- Click in your Word document wherever you wish to insert a Form Field.
- On the Developer Menu select the Legacy Tools icon which is in the Controls section:
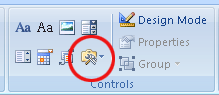
- On the Legacy Forms menu click the first icon to insert a Form Field.
- Right-click on the Form Field and select Properties. Then provide a name for the field in the Bookmark section.

Upload to SmartFolder
When the document/template is ready it must be uploaded to a Smart Folder. Once it has been uploaded take note of either:
- The file ID, which can be obtained by hovering your mouse over the file link
-or- - The folder ID, which can be obtained by right-clicking on the folder link and selecting Properties:

The folder ID is the resourceID. For example if the URL is
http://smart.smartsimple.org/s_editresource.jsp?resourceid=67159
the Folder ID is 67159
Creating the MS Word Merge Field
You can now create the MS Word Merge custom field in SmartSimple that will be used to dynamically populate the document.

- In the Values section: the form fields you created on the MS Word document are now assigned by name to the associated SmartSimple Field Names or Field IDs:
- signatory=@me.fullname@;
- or
- datesigned=@#565346#@;
- signatory=@me.fullname@;
- Note: Each Form Field on the MS Word Merge Document should be represented on a different line in the MS Word Merge Field Values section, and each line must end with a semi-colon.
- The sequence is not important, as the variables are matched using the bookmark name.
- You can assign more than one field from SmartSimple into a single MS Word form field, and include other text and characters:
- time=@starth@:@startminute@ @startpmam@; would display in this format: "12:35 pm" in the time form field
- or
- contractdetails=@duration@ with a monthly fee of $@monthlyfee@; would result in "24 months with a monthly fee of $200" in the contractdetails form field
- time=@starth@:@startminute@ @startpmam@; would display in this format: "12:35 pm" in the time form field
- You can include <!--hideifnotfound--> in front of variables that may not be present to ensure nothing is displayed, rather than the variable name.
- You can include HTML code embedded within <html></html> tags. The SmartSimple Word Merge engine will apply the HTML formatting to the value before merging to the Word document.
Note that HTML code will only function when merging to a single record, not for the batch merge mode.
- You can use the following special characters in this section to control the output on the MS Word Merge document:
- ^p = Line break
- ^t = Tab
NOTES:
- The variables used for the MS Word Merge are the same as for a Web Page View Field and can be found at Web Page View Field Variables.
- Only fields containing text can be used for the Word Merge. Please note that you cannot use image fields, file fields etc.
- Rich Text fields are not suitable for including in MS Word Merges because of the additional encoding to support formatting.
Custom Field IDs
You can use the Extract IDs and Display Field Names links in the section to display associated Field IDs and Field Names.

See Custom Field IDs for more information.
Smart Folder/File ID
You must also specify the either the Field ID or File ID (as described above) of the MS Word document.
![]()
- If you specify the Folder ID, all documents in the folder will be displayed in a combo-box upon initiating the Word merge. The user can select the document that he/she wishes to create.
- Useful if you have several different versions of a document to be generated from the same underlying data
- If you specify the File ID, that specific document will be created.
Including Tables
You can also add data to one or more existing tables in the resultant MS Word document if you have multiple records that you need to include.
- In the MS Word document you must create a table with the relevant number of columns. The table should only include a single row with the column headings (the heading do not have to match the field names within SmartSimple.)
- You do not have to create form fields within the table. New rows will be created automatically and populated with data in the order specified in in the MS Word Merge Custom Field Values section.
- Tables should be included at the very end of the Values section.
- The table you create in MS Word for the example above would look like this:

- For example: to include all Level 2 Activities related to a Level 1 entity you could use:
table_1=[#(?object=activity)|~description~|~statusname~|~startdate~|~enddate~|$1139409$|#];
- Be sure there are no spaces between the pipes (|) and variables.
- In the example below the first table (identified by position and referenced as table_1) is set to the records associated with the entity.

Generating the Document
- In order to generate the document when viewing or editing a record you simply click the button associated with the MS Word Merge.
- If a Folder ID was specified in the Custom Field settings you will be prompted to select which document should be used.
- The document will be dynamically created and the SmartSimple data added.
- Note: If the user wishes to edit or retain the document he/she may need to use the MS Word Save As feature. Some browsers may cause it to be read only initially.
- Remember to check the size of the file, header and footer pictures may interrupt the document to merge.
Uploading the MS Word Merge Document to a Custom Field
The document created when you click on the MS Word Merge button is "disconnected" from SmartSimple. If you wish to upload the document to SmartSimple you can use one of two techniques:
- Login and upload the document to the appropriate single or multiple file field.
-or- - Use SmartDoc for Microsoft Word to automatically upload the document to a specified single or multiple file field, without directly logging into the system.
SmartDoc plug-in document uploading:
Note: "Enable URL Parameter Encryption" on Global Settings must be disabled to use this.
- To use SmartDoc for Microsoft Word to upload a Word document you need to specify the field within SmartSimple that will be used to store the document. It can be either a Single File or Multiple File field.
- The field name is set in the MS Word Merge Field type - Custom Field setting.

- All Single File and Multiple File fields on the same level and any parent levels (Level 1 and or Level 2) will be available in the Value Stores To combo box.
- i.e. if the MS Word Merge field is at Level 2, you will be shown all File fields on Level 2 and Level 1.
- If all fields are being displayed rather than just file storage fields you should save the MS Word Merge Custom Field.
- Each user will need to download and install the latest version of SmartDoc for Microsoft Word to take advantage of this feature.
Once the MS Word Merge document has been generated as described above the user can edit the document and/or save it locally if desired.
Selecting the Upload Document button on the SmartDoc toolbar in MS Word will cause the document to uploaded to SmartSimple and attached to the designated field.
Troubleshooting
Issue:
- Clicking the button to generate the MS Word Merge causes a browser window or tab entitled SmartSimple MS Word Merging to open, but does not open (or prompt you to open) the MS Word document.
Solution:
- Add the following to your list of "Trusted Sites" within your browser:
- http://msword.smartsimple.biz/
Cause:
- Depending on your browser's security settings when you generate a MS Word Merge document it will either open the document, or prompt you before opening document. If you have disabled the warning messages the browser may simply not open the file without prompting you. Adding the above URL to your trusted site list will allow it to open anyway. Alternately you can reset your browser's security settings.
Issue:
- The variable name (i.e. @variable@) is displayed on the MS Word document.
Solution:
- On the MS Word Merge field in the Values section include <!--hideifnotfound--> in front of any variables that may not be present to ensure nothing is displayed, rather than the variable name.
Cause:
- If a variable is not found the @variablename@ is not able to be converted to stored data, so is displayed on the MS Word Merge document exactly as written. This can happen if the associated Custom Field is on a different Template or Type.
Issue:
- Using sslogic within an MS Word Merge custom field results in a missing custom field in the Field List View.
Solution:
- The following syntax will resolve the issue. You must include an return/enter line at the end, as well as including a duplicate of the variable name immediately following the sslogic condition.
<!--@sslogic(',@client.categoryids@,' regexp ',1853,'>'0')-->
companyName=@client.name@;
companyName=@client.name@;
companyAddress=@client.address@;
<!--@end-->
<!--@sslogic(',@client.categoryids@,' regexp ',1853,'<'0')-->
companyName=@client.parent.name@;
companyName=@client.parent.name@;
companyAddress=@client.parent.address@;
<!--@end-->
<newline at the end>