Entering a New Calendar Event
Contents
[hide]Entering a New Calendar Event
Calendar events can be set up using either the daily or monthly views.
In the daily view, click the time of the event and in the monthly view, click the date.
1. Click on any date.
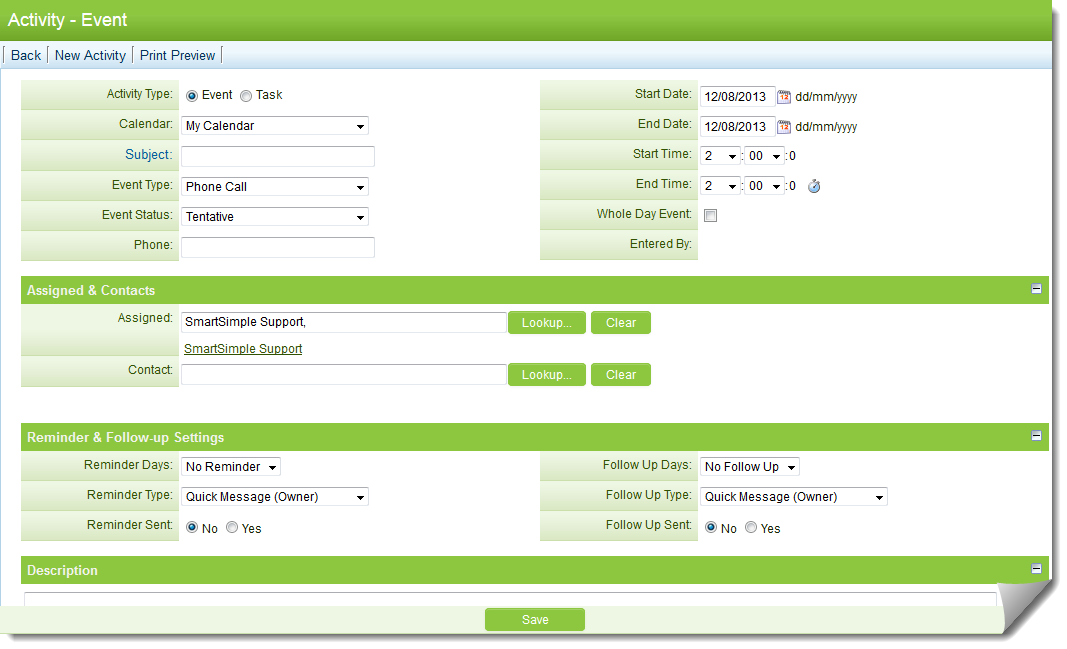
The activity window is displayed:
If you have more than one calendar selected, you will be prompted to select the specific calendar to which the event should be added.
Calendar Activity Types
Each Activity can be either an event or a task. The following event types are standard:
| Event Type | Notes |
| Phone Call | This type will be automatically set if you click on a contact's phone number. |
| Conference Call | A call with several parties. |
| Meeting | Indicates a physical meeting. |
| Appointment | Generally a personal appointment. |
| A letter received. | |
| Email received | This type is automatically set if you receive an email within the system. |
| Interview | Used with the Applicant Tracking system to indicate a candidate interview. |
| Phone Interview | Used with the Applicant Tracking system to indicate a candidate telephone interview. |
| Email Sent | This type is automatically set if you send an email from the system. |
| Seminar | A meeting for giving and discussing information. |
| Conference | Indicates a conference. |
| Training | Indicates a training session. |
| Other | Indicates an event which is not included on this list. |
| Vacation | Used to indicate an individual vacation day. |
| Holiday | Typically used to indicate a statutory holiday on a company calendar. See Holiday Calendar. |
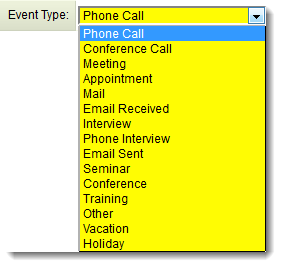
Note: In addition to the standard event types, you can create custom Event Types as described here.
Changing from Events to Tasks
Clicking the Activity Type options button switches the activities between an event and a task.]
![]()
Event Type Activities

- An event has a “start date and time” plus an “end date and time”.
Task Type Activities

- A task has a priority - A, B, C and a target completion date and time.
Activity Fields
Both events and tasks use the following common fields:
- Calendar - If you selected the wrong calendar, you can use this combo box to associate the activity with a different calendar.
- Subject - Description of the activity, for example, "Meeting with Vendor."
- Event Type - See table in previous section.
- Event Status - The status of the event: tentative, confirmed, completed or cancelled.
- Phone - Phone number.
- Start Date - Date event begins. You can click the calendar link and select a different date.
- End Date - Date event ends. You can click the calendar link and select a different date.
- Start Time - Start time for a planned event.
- End Time - End time for a planned event.
- Whole Day Event - Check box to indicate if the event lasts all day.
- Entered By - The name of the user that created the event.
- Assigned - The event is initially assigned to the contact that creates the event. You can use the look-up icon to select internal contacts.
- Contact - External contacts associated to events. You can use the look-up icon to select external contacts.
- Reminder Days - Specifies the number of days or hours before the activity that people should be informed.
- Reminder Type - Reminders can be sent to the owner, the owner and contact, the owner and assigned, or everyone. You can choose to send the reminder by email or quick message.
- Reminder Sent - This option is set automatically by SmartSimple and indicates that the reminder was sent. Manually setting to the “sent” option will suppress the reminder.
- Follow Up Days - Specifies the number of days after the activity that people should be informed.
- Follow Up Type - Follow ups can be sent to the owner, the owner and contact, the owner and assigned, or everyone. You can choose to send the reminder by email or quick message.
- Follow Up Sent - This option is set automatically by SmartSimple and indicates that the follow up was sent. Manually setting to the “sent” option will suppress the reminder.
- Description - Narrative description of the event.
1. Complete the calendar details.
2. Click the Save button.
![]()
3. Click the Back button.
![]()
The Calendar is redisplayed with the new event added.
