Workflow Task Type: Acknowledgement
Contents
Acknowledgement Workflow Task Types send messages to SmartSimple contacts.
Task Settings
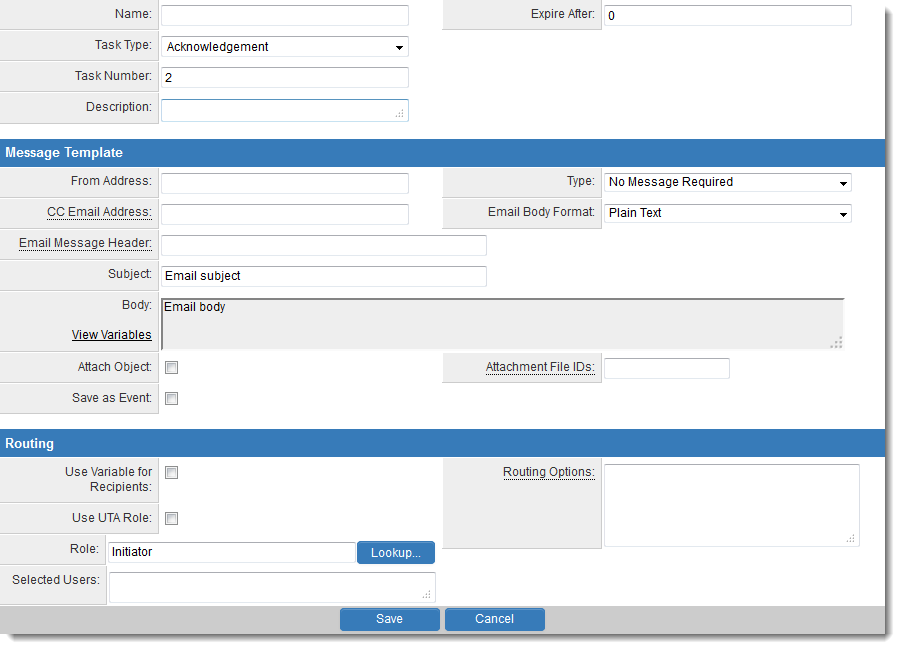
Acknowledgement Tasks have the following settings:
- Name - Narrative name for the task.
- Task Number - A system generated number that determines the presentation order of the task in the workflow. This number can be changed to display the step in a different location.
- Description - Detailed description of the task (optional).
- Expire After - Intended duration of the workflow.
Message Template
- Message Type - Type of message – e-mail, instant message, both, or none required with this task. E-mail and instant messages can be created using variables that will create custom messages specific to instances of the workflow. Options are No Message Required (default), Quick Message, Email Only and Quick Message and Email.
- From Address - Email address sent from. This field accepts variables, so you can either hard-code a value (i.e. donotreply@mycompany.com) or use variable syntax (i.e., on a Level 1 Workflow, @owner.email@)
- CC Email Address - CC recipients address. (Separate multiple addresses with commas). Additional Email Syntax options can be used within this field.
- Email Body Format - Options are Plain Text or HTML.
- Email Message Header - The email header can be modified using the following syntax, with the arguments separated by semicolon:
- X-Priority={1,2,3,4,5}
- Priority={normal,urgent,non-urgent}
- Importance={high,normal,low}
- Sensitivity={personal,private,company,confidential}
- e.g. Priority=urgent;Importance=high
- Subject - Narrative subject line of the message.
- Body - Narrative body of the message.
- Attach Object - Attaches the details of the object to the message. In the case of a SmartSimple object, such as a company, person, or application, the textual details of the object will be added. If the object is a file, then the file will be attached to an e-mail message, but not an instant message.
- Attachment File IDs - Attach additional default files when triggered from a Smart Folder. See the Determining the File ID article for instructions.
- Save as Event - will create an e-mail activity. If its L1/L2 workflow, where the UTA L2/L3 Email Activity settings have been configured, then the it will be saved as L2/L3 event under the L1/L2 object. Otherwise it will be saved as user event against each recipient in the To field.
CC Email Syntax Options
Used with Acknowledgement, Request for Approval and Request for Comment Workflow tasks.
- Scenario One
- To : peter@smartsimple.com
- Cc : susan@smartsimple.com
Result : ONE email will be sent to Peter and CC Susan
- Scenario Two
- To : peter@smartsimple.com
- Cc : (sendasto)susan@smartsimple.com
Result : TWO email will be sent TO Peter and TO Susan
- Scenario Three
- To : peter@smartsimple.com
- Cc : (sendnoto)susan@smartsimple.com
Result : ONE email will be sent TO Susan ONLY
- Scenario Four
- To : peter@smartsimple.com
- Cc : (reply-to)susan@smartsimple.com
Result : ONE email will be sent to Peter and REPLY will default to Susan
Routing
- Use Variable for Recipients - Allows recipients of the message to be selected using variables. See this article for configuration details.
- Use UTA Role - When using roles to select recipients, the UTA Role can be used to determine recipients.
- Role - Used to select recipients by role.
- Selected Users - If required, specific users can be selected to complete this task. This technique restricts the number of users that the initiator can select.
Workflow Task Preview
All Acknowledgement workflows tasks will have a Preview button exposed at the bottom of the Task screen.
The Preview button will allow users to preview the content of the Email Body and Subject fields, including any processed variables, without the need of actually triggering the workflow.
This will make it much easier to confirm that all variables in a workflow email are being processed correctly.
If the task sits under a Level 2 or 3 workflow, then when the user clicks the Preview button they are required to choose the UTA first, before selecting a sample record to preview.

If the task sits under a Level 1, User or Company workflow, then when the user clicks the Preview button they can select a sample record to preview straight away, without having to indicate UTA .

Once selected it should go to preview screen, which displays the contents of the subject and body after populating the variables for the selected record.

- Routing Options - Specifies the types of options available to process this workflow step. In many instances, the default options can be used, such as Approved, Rejected or Revise. But additional and alternate sets of options can be created to reflect more complex business processes.
Configuration Walk-Through
The following articles walk through the steps needed to configure this Workflow Task Type
- Adding a Workflow Task in an Acknowledgment Workflow
- Setting the Message Type in an Acknowledgment Workflow
- Setting the Step Role in an Acknowledgment Workflow
- Selecting Recipients in an Acknowledgment Workflow
- Completing an Acknowledgment Workflow
- Attaching an Acknowledgment Workflow to an Object