Completing an Acknowledgment Workflow
Finally, you will connect the step to the Start and Complete events. A workflow cannot be triggered unless the Start event is connected to a task. A workflow process cannot fully complete unless a task is connected to the Complete event.
1. Click the New Connector at the right of the Start event.
![]()
The New connector window is displayed.
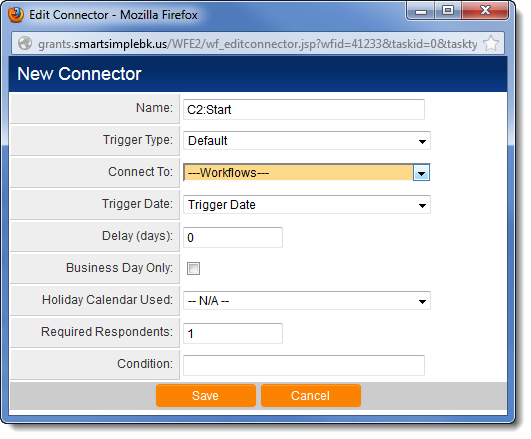
The Connector has following properties:
| Name | Narrative name for the connector. |
| Trigger Type | Default: The default trigger type
Expired: The connector is triggered when the task expires Routing Options: For Request for Approval workflows, the Routing Options can be selected as the trigger type. |
| Connect To | Connects To Tasks in the workflow or to another workflow
Start - connects to the workflow Start task Complete - connects to the workflow Complete task |
| Trigger Date | The connector is triggered when the date in the selected date field is reached. Trigger Date - The date the task is triggered. |
| Delay (days) | Delays the connector from triggering next task for a set number of days. (Allows for four-digit entry.) Negative numbers can be used to specify that the next task should be triggered a number of days before a date in the future. Important: The recipients of the subsequent task are processed at the time the workflow fires, not after the delay. See Delay Connector Recipients for more information. |
| Business Day Only | Connector only triggers on Business Days. |
| Holiday Calendar Used | Select the SmartSimple calendar that will be used as a holiday calendar. This is used in conjunction with the Business Day Only setting. |
| Required Respondents | The number of respondents who must respond to the task before the connector will trigger. See also Selecting Recipients in an Acknowledgment Workflow. |
| Condition | A logical condition can be specified that must be met in order for the connect to trigger the next workflow task. Multiple connectors can be set up with mutually exclusive conditions to have branching logic on the workflow. |
2. Leave the Name as default C1: Start.
3. Set the Connect to: to the New Contact Alert task.
4. Click the Save button.
The start event is connected to the step.

5. Click the New Connector at the right of the New Contact Alert task.
The New connector window is displayed.
6. Set the Connect to: to the Complete event.

7. Click the Save button.
The workflow is complete.

Viewing a Workflow Diagram
You can now view the workflow diagram.
1. Click the Diagram button.

The start event is linked to the task you created, and that is linked to the complete event. There is no branching logic in this workflow.
See Also
- Workflow Connectors
- Workflow Condition for details on configuring branching logic
- Workflow Condition Examples
- Delay Connector Recipients