Difference between revisions of "Configuring List Views"
| Line 133: | Line 133: | ||
* Edit button label: language specific text to appear on the Quick Edit buttons. Only appears if Quick Edit enabled on the list view. | * Edit button label: language specific text to appear on the Quick Edit buttons. Only appears if Quick Edit enabled on the list view. | ||
| − | {{ListViewFooter}} | + | {{ListViewFooter}}{{Category:Translation}} |
Revision as of 12:03, 10 January 2017
 Click here to watch a video on creating and editing List Views.
Contents
- 1 Defining a List View
- 2 The Properties Tab
- 3 The Columns Tab
- 4 Sort Order Tab
- 5 Export Tab
- 6 Language Settings
- 7 See Also
- 8 User Language Setting
- 9 Performing Configuration work in another language
- 10 Configuring the platform for use by users in other languages
- 11 Configuration settings to be translated
- 12 Translating Content
- 13 Using UK English
- 14 Variables
Defining a List View
There are two types of List Views:
System Views and Personal Views.
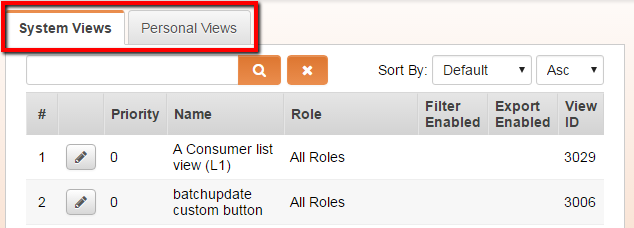
- System Views belong to a specific role. All users in that role will have the option to select this List View. Multiple System Views can be defined for each role.
- Personal Views are only visible to the user who creates them. Multiple Personal Views can be defined for each user.
System Views
- When you click on the "New" button in the System View section, you will be prompted to select the role to which the System View pertains.
- Select the appropriate role, enter a name for the list view and click "OK."
- You will now see four tabs in the right-hand frame: Properties, Columns, Sort Order and Export.
Personal Views
- When you click on the "New" button in the Personal View section, the only difference from System Views will be that you will not have the option to select a role.
- Enter a name for the list view and click "OK."
- You will now see four tabs in the right-hand frame: Properties, Columns, Sort Order and Export.
The Properties Tab
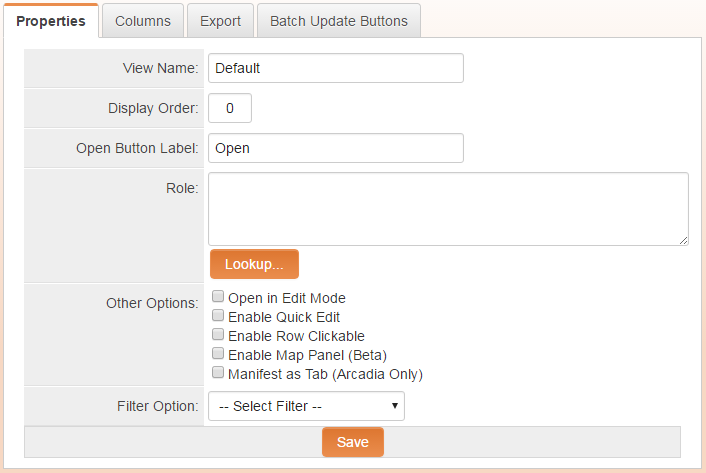
- View Name - The name of the list view is editable. Give your list view a distinctive name.
- Display Order - Enter a display order. This will define which list view will be the default for users who possess multiple roles. List views with lower display orders will be displayed before those with higher display orders.
- Open Button Label - The default value for the "Open Button Label" is "Open." Changing this value will change the caption on the button used to access a specific record in the list view.
- Role - The Role Lookup field will specify which user roles the list view will be available to. This option is available only for System Views (see above).
- Color Based On:
- Other Options
- Open in Edit mode: Checking this option will mean that when records are opened, they will default to edit mode as opposed to view mode.
- Enable Quick Edit: Checking this option will allow the list view to be configured with the Quick Edit feature enabled.
- Enable Row Clickable: Checking this option will mean that each row will act as a clickable button to open the referenced record.
- Enable Map Panel - Displays a map panel to the right of the list view.
- Manifest as Tab (Arcadia only): Only appears for UTA specific system list views and will mean the list view appears as separate tab when the UTA is accessed in Arcadia mode. It also means that the list view will not be made available in the normal list view drop-down.
- Filter Option - Select from a saved System Filter to default the list view to the filter's search criteria. Users will be able to choose search criteria other than the default.
- Language Option - Select an alternate language for multi-language systems. The column headings and record Open button can be re-captioned.
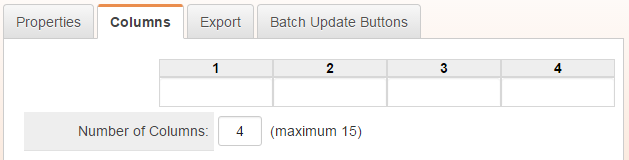
The Columns Tab
- The Columns tab is where the standard and custom fields that you want to be displayed in your list view are defined.
- When you first click on this tab, you will see the default four blank columns.
- There are a maximum of 15 columns that can be configured per list view.
- When you click into a cell, you will see the configuration options below. Note that the Available Field List will display at the right. The Available Field List displays those fields that can be added to the list. The available fields are organised by entity or object, with the available categories dependent on the current object that the list is being created against. For each category Standard fields are shown first, followed by the custom fields available.
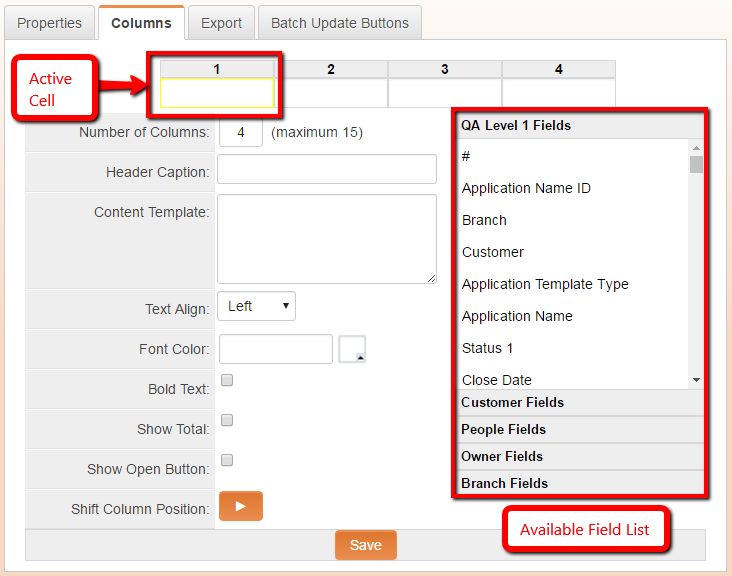
- You can quickly click through the cells and use the Available Field List to choose the fields you wish to display.
- When you select a field from the Available Field List, the Content Template will be populated with a SmartSimple variable that references that field.
- In the example below, the Status field has just been selected for Column 4.
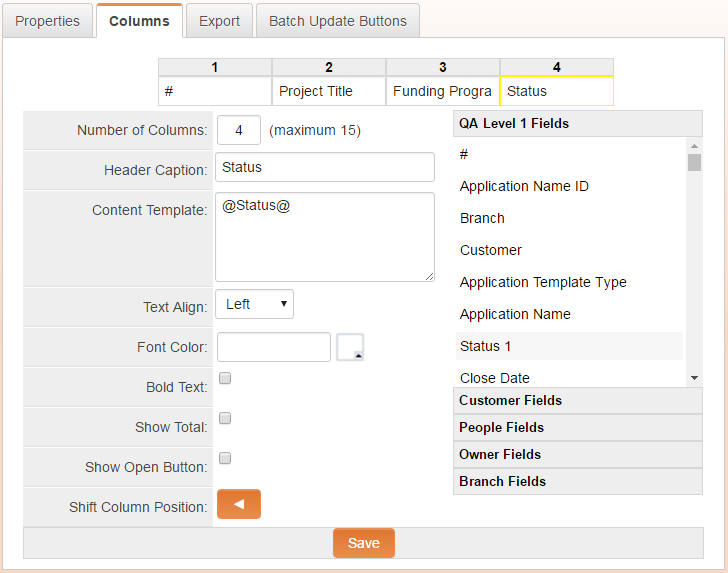
- Note that multiple fields can be selected for each column in the list view.
- First, click into an Active Cell and click on the fields you want to display in the column in the Available Field List.
- Then, add extra characters, such as parentheses and explanatory text as in the example below.
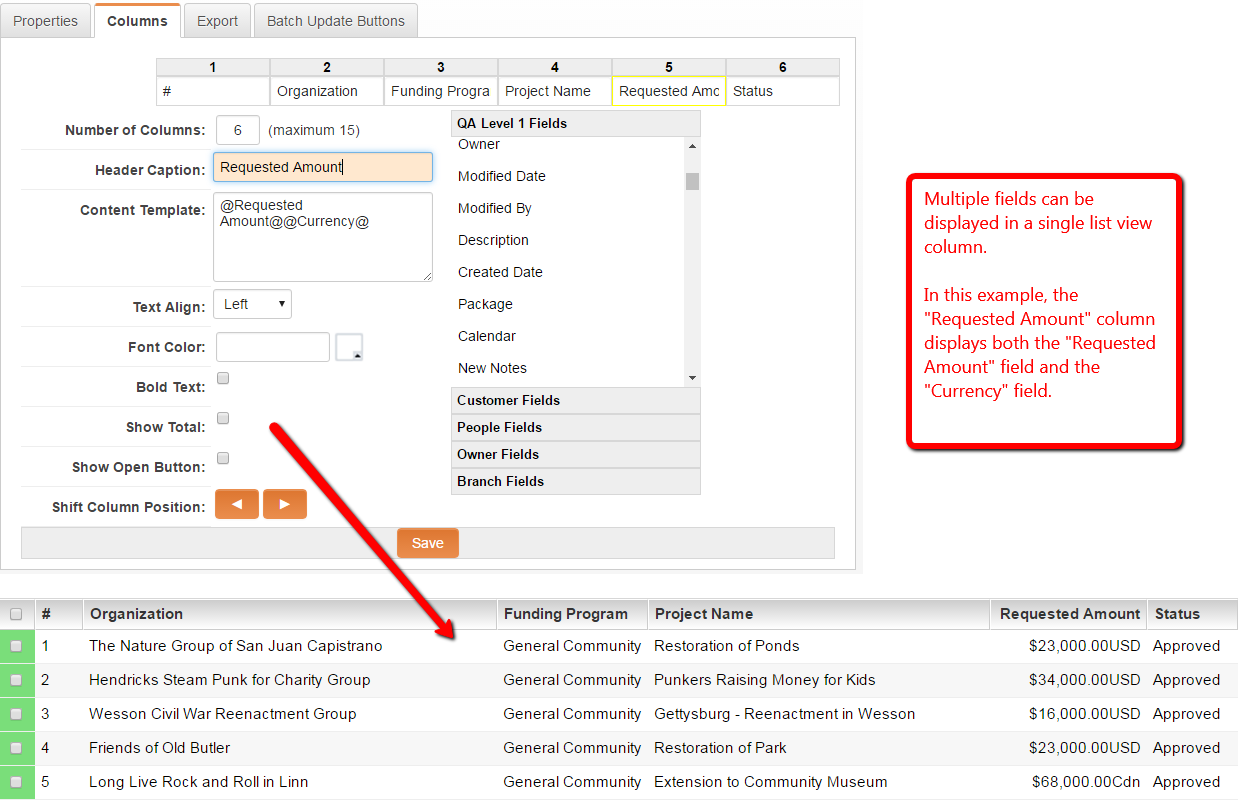
- HTML tags can also be employed, surrounding the variable(s) in the Content Template, to add formatting to the column values.
- An example would be entering @Requested Amount@(@Currency@) into the Content Template, which would result in Requested Amount values in the list view displaying in the format: $25,000.00USD or Cdn
Note: Since the configuration of list views is performed by system administrators, any field can be selected to display in the list view. This means that if a field is selected for a given role's list view that has field permissions that deny visibility to that given role, that field will be visible to that role on that list view. The edit permissions set on the field permissions setting of custom fields will still hold sway, however.
Allowing users to click into the records from the list view
- What's missing from the "Sample List View" example above is a way for the user to access their records from the list view.
- The Open button can be added to any column in the list view, by selecting the "Show Open Button" option while clicked into a cell.
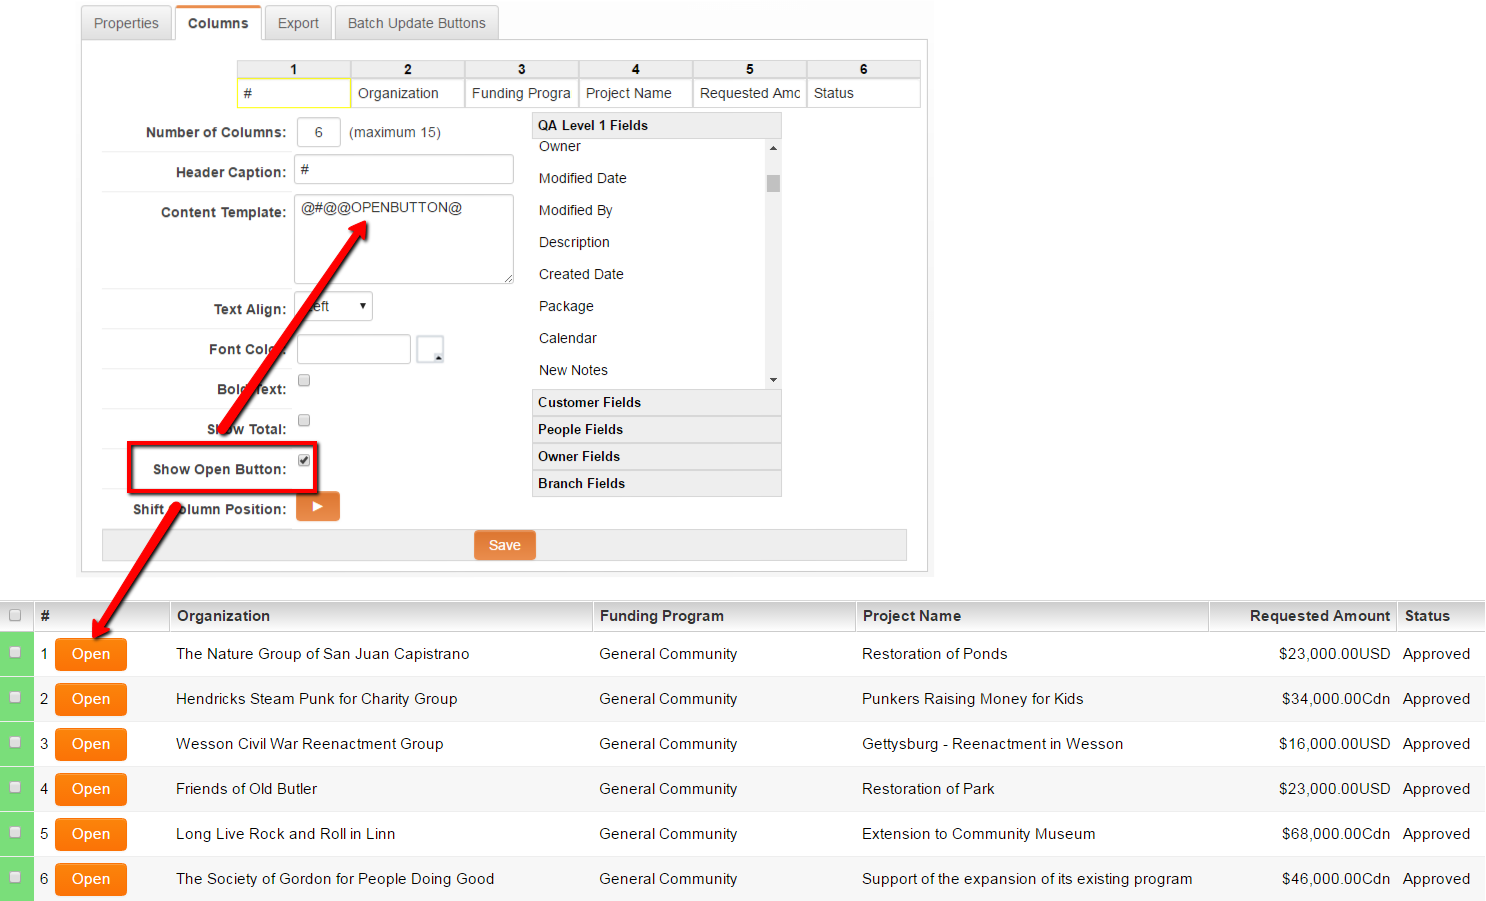
- Clicking on the "Show Open Button" option displays the @OPENBUTTON@ variable in the Content Template, which displays the button on the list view.
- As described above, the caption on the Open button can be changed on the "Properties" tab of the list view.
Definition of Options Available on the Columns Tab
- Number of Columns - This is the total number of columns visible in your list view. You can add or subtract the number of columns shown by editing this value and clicking out of the field.
- Header Caption - You can choose the name of the columns in your list view using the Header Caption option.
- Content Template - This will display the variable or variables you have selected using the Available Field List.
- Align - This will determine the alignment of the values in your list view column. The options available are "Left," "Right," and "Center."
- Font Color - Allows you to choose the color used for the column text.
- Bold Text - This option will boldface the text in this column.
- Show Total - If you have selected a single field containing numeric values, checking this option will display the total of the values currently displayed in your list view at the bottom of the list view.
- Show Open Button - Selecting this value will display the open button in the column selected, allowing users to click into the pertinent record from the list view.
- Shift Column Position - This will move the currently selected column to the left or right, relative to the other columns.
Sort Order Tab
Now that the list view has been created and the fields that should be presented have been defined, you will define the Sort Order and Export Settings (optional) for your list view.
- NOTE: Read-only fields cannot be sorted against. As a result such fields are not included in the List View Builder on the Sort Order tab.

- Click on the "Add" button to add rows to the Sort Order definition.
- Choose a field that the list view should be sorted by, by default.
- Choose the "Direction" in which the sort should occur.
- "Ascending" will sort the selection from A to Z, from 0 to 9.
- "Descending" will sort the selection from Z to A, from 9 to 0.
- In the example above, the list view will be sorted by:
- first name (A to Z), then, within sets of matching first names,
- last name (A to Z), then, within sets of matching first and last names,
- email addresses (A to Z)
- NOTE: If you wish to sort on the Status Display order when configuring a list view, then you must select the "Status Display Order" option from the Sort Order drop-down. This option will order your list view by the status' display order, but will only be exposed it there is at least one column with the "Status" field.
- NOTE: Note that this process defines the default sort order for the list view. The list view can be re-sorted using the "Sort By" feature within the list view.
When configuring a list view, the "Sort Order" tab will have another option in the drop-down called "Status Display Order", which will order your list view by the status' display order. The list view must have at least one column with the "Status" field.
Export Tab
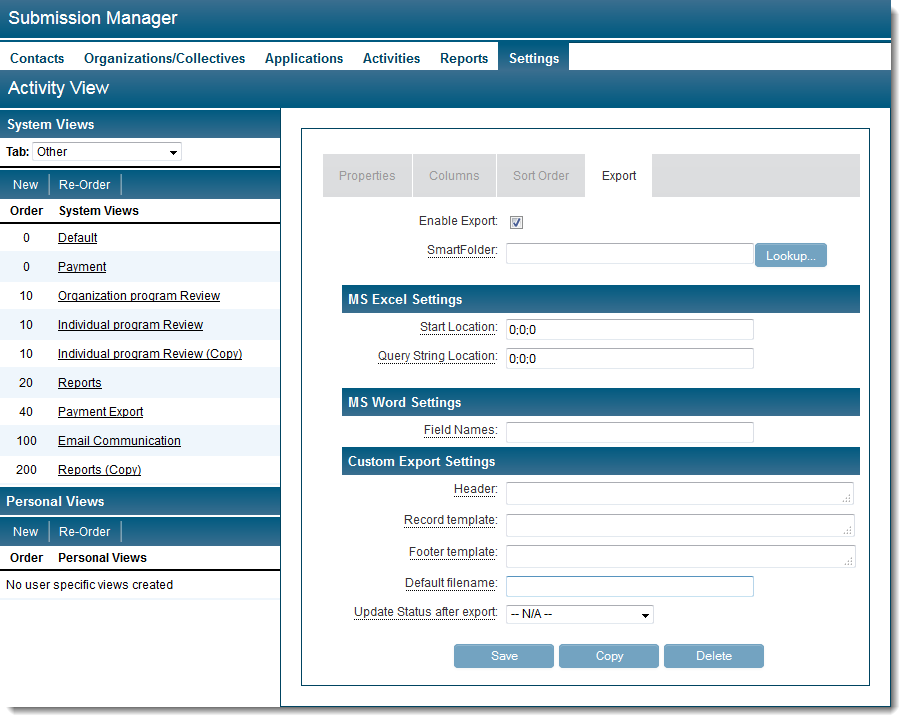
- Enable Export:
- SmartFolder:
- MS Excel Settings: See Positioning Exported List View Results in your Excel Spreadsheet
- MS Word Settings: Enter semicolon-delimited list of MS Word Merge field names (fieldname1;fieldname2;fieldname3) into the Field Names setting.
- Custom Export Settings
- Header: define the text and column headings that will appear above the main body of the exported list view
- Record template: define the columns from within the list view that are to be exported
- Footer template: define text that will appear below the main body of the exported list view
- Default filename: define the name of the exported file
- Export Values Only: will strip out any formatting (e.g. commas, currency, decimal places) associated with the selected field
- Update Status after export: each exported record will be updated to the selected Status
- Trigger Workflow after export: selected workflow will be triggered for each exported record
Language Settings
When configuring a list view users will see a language drop-down on the top right of the screen. This drop-down is used to create other language specific versions of the same list view.
When the user selects the new Language from the drop-down they are taken to a screen with the following :
- Columns: Fields for entering new language specific column headers. There should be the same number and order of columns as in the original list view.
- List View Name: language specific name for the list view
- Open Button label: language specific text to appear on the Open buttons
- Edit button label: language specific text to appear on the Quick Edit buttons. Only appears if Quick Edit enabled on the list view.
See Also
- List View Overview
- Accessing the List View Configuration Page
- Configuring List Views
- Setting the Sort Order on a List View
- Exporting List View Results to Microsoft Excel
- Exporting List View Results to Microsoft Word
- Download files from List View
- Preparing Existing Word Template for List View Export
- Quick Edit
- Historic List View
- Configuring Interactive List View ChartsThis category references articles related to providing SmartSimple to different users in different languages.
User Language Setting
Each user can select the language of their choice through System Profile menu. There are over 20 languages available. However changing language does not automatically translate the system. The behavior of the system will still depend on the configuration.
- If all interface elements have been translated then the entire system will be rendered in the selected language.
- If only parts of the interface have been translated then only the translated components will be rendered in the selected language, the rest will be rendered in English.
- If nothing has been translated for that language then everything will be displayed in English.
Note: you can always see the Language ID (numeric value) being using in the Address Bar of your browser and, in fact, you can simply change that number to change the language.
Performing Configuration work in another language
System Administrators can perform the configuration work in one of three languages; English, French and Danish.
Choosing one of these languages only affect configuration pages and have no impact on the system that you configure for users. For all user elements you will need to provide the translations for all the objects.
- If a System Administrator switches their language to any these three languages then the entire platform will be rendered in that language.
- If any other language is selected then the system will continue to rendered in English.
Configuring the platform for use by users in other languages
- A single language system has all field captions, tool tips, instruction, object names, statues etc. configured for the language you wish to use.
- A multiple language system has multiple field captions, tool tips, instruction, object names, statues etc. configured for each language needed.
- If a user switches to an language where you have not set any language setting then everything will be displayed in English.
The usual process to deploy a system in multiple languages would be to first configure all of the processes in one language. Then, all of the configured elements in the system are translated in the additional language(s). This provides an opportunity to refine the processes in the system in the one language and reduces multiple requests for translation of configured elements.
The process for translation includes:
- Exporting the list of fields that need to be translated from the system as well as button labels, statuses, type names, portal instructions, emails, etc.
- The client provides the translated content
- Importing the translated fields into the system
- Manual updates are required for some of the items where there currently no import ability
- Testing end to end process in the new language
- Complete any remediation
Generally, our clients are responsible for providing all translated content. Many systems are available in multiple languages for the end users. However, only very few have multiple languages configured for internal staff/system administrators.
Your System Administrator is able to configure the translated content. The effort involved depends on the number of processes and portals which require updating.
Configuration settings to be translated
There are multiple parts of the system where translation options are defined:
- Custom Field Language Settings - each custom field in your system can be given multiple language settings so that the caption, selection options and tool tips can be displayed in different languages. Administrators are able to use Translation Import/Export to export and import custom field translations. If a translation service is used, ensure any html tags or sslogic syntax, etc. are retained. Some custom field types such as Custom Field Type: Special - Advanced Data Table benefit from manual updating rather than import of the translation file.
- Standard Field Language Settings - each standard field in your system can be given multiple language settings so that the caption, selection options and tool tips can be displayed in different languages. System Administrators are able to configure each field.
- Login Page - System Administrators create a separate login page for each language you want to support
- Signup Page - each signup page in your system can be given multiple language settings so that the translations of instructions, as well as custom and standard field captions, are displayed in different languages.
- Organizations - includes standard and custom fields, status captions, submit buttons, SmartCheck Validation, List view captions
- People - includes includes standard and custom fields, status captions, submit buttons, SmartCheck Validation, List view captions
- Roles and Categories - System Administrators are able to update the captions of user roles and categories
- UTA Settings - includes status captions, type captions, submit buttons, SmartCheck Validation, Invitation Templates, List view captions for each UTA as well as each level
- Transactions - includes status captions, type captions, submit buttons, SmartCheck Validation, List view captions
- Portals including Shortcuts
- Workflow Email Templates - each workflow email can be configured with SSlogic to identify the language of the user using @me.langid@
- Email Templates
- Reports - Users toggle the Enable Translation option and when a language specific version is required, add the parameter for the language to the report url.
- System Variables - System Administrators may need to create new system variables for referencing common variables. For example, the name of the client in different languages.
- Language Library - for hard-coded labels on core SmartSimple pages, translations can be entered into the Language Library.
Translating Content
In addition to the translation of the user interface, the platform also supports the translation of content. So if a user enters content in Chinese the content can be automatically translated to any other language and the resultant translation stored in another field.
- The purpose of this feature is not to replace the high quality translation service that your organization used but rather to provide quick translation of content that would otherwise be unavailable to someone that does not understand the source language.
- For details of this feature, please review the following article Enable Translation Service.
Using UK English
If a user sets their language to UK English then you will need to ensure that you have provided translations for standard fields such as organization (to organisation) and Postal Code /Zip (to Postal Code).
Variables
Below are a list of translation-specific variables you can use.
- @type_lang@ : Outputs the translated type name.