Default User Settings
The default user settings option provides you with a way of controlling the setting each user will have when they first log into the system. We recommend that you set these values before setting up any additional users.
To access the feature go to: 1) Global Settings - Users 2) Scroll down to the User and Contact Settings 3) Click Default User Settings link.
The Default User Setting window is displayed.
You can set the following values:
Default User – Display Options
- Left Navigation Style – choose Static for menus that don’t expand or dynamic for menus that open and close.
- UTA Tabs – used to control the presentation of tabbed fields when the Universal Tracking Application is used.
- Number of Records Per page – defines the number of records per page you wish to see when information is displayed as a list. You can choose 10, 15, 20, 30, 40, 50, 60, 80 or 100.
- Text Editor – enables and disables the Rich Text/HTML Editor.
- Publish Pin Board – make your personal Pin board visible to other people.
- List View Thumbnail Size – determines the size of images in reports.
- Number of Ajax Records - defines the number of records displayed in an Ajax field. You can choose 10, 15, 20, 25, 30, 35, 40, 45 or 50.
Default User – Regional Settings
These options determine the default regional settings for new users. The checkbox beside each setting is a "Force Setting" option, meaning that users will not be able to re-set this option in their System Settings.
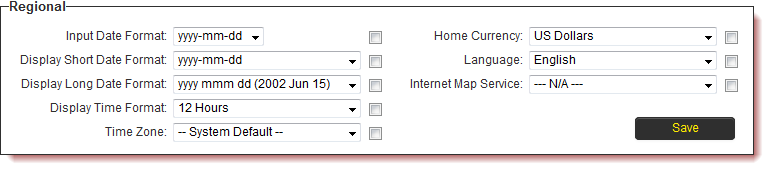
- Input Date Format – the individual user’s preferred entry format for date values.
- Display Short Date Format – the individual user’s preferred short display format for date values.
- Display Long Date Format – the individual user’s preferred long display format for date values.
- Display Time Format – displays time values in 12- or 24-hour format.
- Time Zone - sets the default user time zone. Any time zone on the planet Earth can be chosen as the default for new users.
- Home Currency – the default currency for this user. This currency will be referenced in applications such as Sales Tracking and Expense Tracking. This currency will be assumed to be the default currency for this user.
- Language – the language that you wish to use. Currently you can select from fourteen languages.
- Internet Map Service – determines the Internet service you wish to use when displaying maps.
Default User – New User Default Settings
These options determine the role and company that will be assigned to all new user created in the system. These are simply the default settings applied at the time of creation and can be modified if they do not apply to an individual user. The checkbox beside each setting is a "Force Setting" option, meaning that users will not be able to re-set this option in their System Settings.

Default User – New Company Default Settings
These options determine the category and parent company that will be assigned to all new organizations created in the system. These are simply the default settings applied at the time of creation and can be modified if they do not apply to an individual organization. The checkbox beside each setting is a "Force Setting" option, meaning that users will not be able to re-set this option in their System Settings.

Default User – UTA Specific Settings
These options determine the statuses and level 1 templates that will be pre-selected in the Search panel when the user accesses the UTA Level one list view for the first time. This ensures that users are immediately presented with information after accessing the List view, rather than having to manually select Statuses and Template types and run the search.

In the example above when the user first accesses the GMS360° - Donations Management UTA the Search Panel will have the Pledged, Received, Distributed and Confirmed statuses pre-selected, while the Donor Advised Donation, Thematic Donation and One-time Donation templates will be selected.
Return to Global Settings
1. Click the Global Settings tab to return to the Global Settings page.