Level 1 Types
Level 1 type provide a method of delineating between different types of Level 1 items. Each type that you create can have the following characteristics:
- A unique Level 1 Workflow, which will trigger whenever a new item using this type is added.
- A unique Level 2 Workflow, which will trigger whenever a new item using this type is added.
- A set of forms that are to be associated with the Level 1 item.
- The list of statuses that you wish to associate with the specific type.
- An external Internet-available web page that can be used to create new Level 1 items.
- A set of custom fields.
Contents
Creating Level 1 Types
You can create and modify Types by clicking the Types link on the Settings tab of your UTA.
- Existing Typees are listed on the left of the page.
- Details of each type are displayed on the right of the page and new type are added to the right of the page.
L1 Type Settings
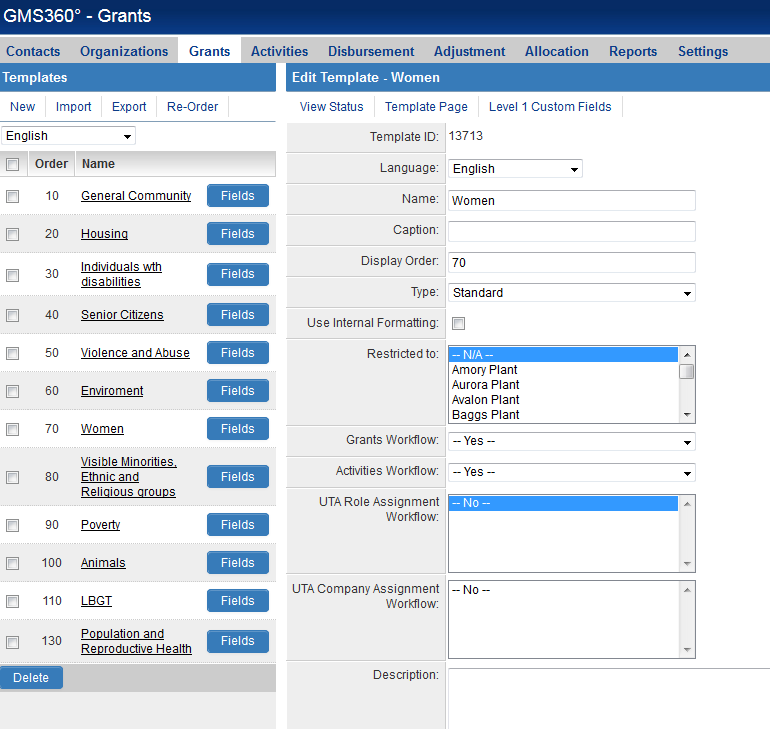
The L1 Type Settings page has the following links to other configuration pages:
![]()
- View Status - See the Types & Statuses page for information.
- Template Page - See Template Page for information.
- Level 1 Custom Fields - Brings you to the Custom Fields page relevant to this template.
Each Template Settings page has the following settings:
- Template ID - Internal system ID used to reference the Template.
- Language - Allows you to create a language-specific display name for the template.
- Name - Name for the template.
- Caption - Default display name for the Template.
- Display Order - The order that templates are displayed in the template combo box.
- Use Internal Formatting - Selected when templates are configured as external pages, so the formatting and functionality of the external page will reflect the display and operation of the internal pages.
- Restricted to - A single internal company that can use this template.
- Level 1 Workflow - A workflow connected to this template. See Enabling Workflows in the UTA.
- Level 2 Workflow - A workflow connected to Level 2 activities connected to a Level 1 item based on this template. See Enabling Workflows in the UTA.
- UTA Role Assignment Workflow - Allows you to define one or more UTA Role Assignment Workflows that are triggered by this Template.
- UTA Company Assignment Workflow - Allows you to define one or more UTA Company Assignment Workflows that are triggered by this Template.
- Description - Any comments or notes you wish to include. Note: These don't manifest anywhere except on this page.
- Master Schedule Enabled - See Master Schedule Template.
- Access Roles - Sets the roles able to access records associated with this template.
- Creation Roles - Sets the roles that are able to create records with this template.
- Template Formula - One or more formulas or expressions associated with the template, which are automatically executed whenever a Level 1 item associated with this template is saved. (See Template / Type Formula)
- ID Used - Used in conjunction with Template Formula above: if not left blank, Template Formulas are restricted to process variables only from the Custom Field IDs that are entered here.
Associating Templates with Statuses
Not all Level 1 templates may require all the same statuses. Although the statuses are created globally, you are able to associate only the required statuses to each individual template.

You can also navigate into the Status Settings then populate the Enabled on Level 1 Templates field with the templates you wish to make the status available against.

Template Custom Fields
You can define Custom Fields that will appear only on the Level 1 records of a given Template.
- To define these fields, click on the Fields button next to the relevant Template. Then create the desired custom fields in the normal fashion.
- The Display Order of the Custom Fields you create on a Template works in conjunction with the Display Order on any general Level 1 Custom Fields that have been defined.
- For example, if you have a Custom Field on a Level 1 Template with Display Order of 15, it would appear between the global Level 1 custom fields with display orders of 10 and 20.
See Also
| |
Search Panel Options |