Difference between revisions of "Creating a Universal Tracking Application"
Mark Bridger (talk | contribs) m (next buttons) |
|||
| (4 intermediate revisions by 3 users not shown) | |||
| Line 27: | Line 27: | ||
* '''Field Settings''' – Defines the display of activities in the [[Workflow|workflow]] list and the calendar. | * '''Field Settings''' – Defines the display of activities in the [[Workflow|workflow]] list and the calendar. | ||
| − | + | ==Terminology Settings== | |
| + | [[Image:GeneralSettingsPage-TerminologySettings.png|link=]] | ||
| − | + | Terminology Settings allow you to personalize the terminology used by your copy of SmartSimple. | |
| − | * ''' | + | * '''Menu Name''': The application name that will display on the left navigation bar. |
| − | * ''' | + | * '''Title Bar Name''': The name that will display at the top Title Bar when application is open. |
| − | * ''' | + | * '''Description''': Text that allows you to describe your application. |
| − | * ''' | + | * '''Template/Templates''': Nomenclature for singular and plural references to {{l1}}s. |
| − | * ''' | + | * '''Activity/Activities''': Nomenclature for singular and plural references to {{l2}}s. |
| − | * ''' | + | * '''Sub-Activity/Sub-Activities''': Nomenclature for singular and plural references to {{l3}}s. |
| − | * ''' | + | * '''Form/Forms''': Nomenclature for singular and plural references to Forms. |
| − | * ''' | + | * '''Skill/Skills''': Nomenclature for singular and plural references to skills. This option only appears when the [[Skill Settings]] is turned on within the UTA. |
| − | |||
| − | |||
| − | + | Changing the terminology in this section will change the captions of various settings and objects throughout the administration and user [[interface]]s. | |
| + | <BR><BR> | ||
| − | + | ==Application Settings== | |
| + | [[Image:GeneralSettingsPage-ApplicationSettings.png|link=]] | ||
| − | 3. | + | * '''Enable Activities - Use to specify that grants have activities''' - Enables {{l2}}s to be used in this application. Once this option has been selected, the configuration options for {{l2}}s will be visible. |
| + | * '''Enable Level 3 Activities - Use to specify that activities have level 3 activities''' - Enables {{l3}}s to be used in this application. Once this option has been selected, the configuration options for {{l3}}s will be visible. | ||
| + | * '''Enable Transactions - Add UTA transactions and attribute personal and organisation transactions''' - Enables [[transactions]] to be used in this application. Once this option has been selected, the configuration options for transactions will be visible, including the [[UTA_Settings_-_Transaction|Transaction tab]] on the [[UTA Settings Page]]. | ||
| + | * '''Enable Invoicing - Use Invoicing features in this application''' - Enables [[invoice]]s to be used in this application. Once this option has been selected, the configuration options for invoices will be visible, including the [[UTA_Settings_-_Invoice|Invoice tab]] on the [[UTA Settings Page]]. ''Mutually exclusive with the Enable Professional Services option.'' | ||
| + | * '''Enable Professional Services - Use Professional Services features in this application''' - Enables [[Professional Service]]s to be used in this application. | ||
| + | * '''Enable Auto Assignment - Assign people to entities at different level automatically''' - Enables [[Auto Assignments]] to be used in this application. Once this option has been selected, the Auto Assignment Settings section becomes visible. | ||
| + | * '''Enable Contact Skill Matching - Use Contact Skill Matching features in this application''' - Enables [[Skill Settings]] to be used in this application. Once this option has been selected, the Skill Settings section becomes visible. | ||
| + | * '''Enable Content Management - Use Content Management features in this application''' - | ||
| + | * '''Enable Aggregration - Use this application as a repository for all other UTAs''' - Enabling this will turn the UTA into an [[Aggregation UTA]], allowing the definition of the association between equivalent fields in each UTA. | ||
| + | * '''Auto Assignment Settings - Settings for people assignment at different levels''' - Hyperlink appears when '''Enable Auto Assignment''' is checked. Used to define rules for automatically assigning contacts to Level 1 and Level 2 entities (see [[Auto Assignments|Auto Assignments]] for further details). | ||
| + | * '''Web Service Settings - Enable and manage Web service (SOAP) for grants''' - allows the posting of data to another system, outside of SmartSimple, and the storing of results into a custom field on the object against which the Workflow was triggered. See [[Web Services Overview|Web Services]] for additional information. | ||
| + | <BR><BR> | ||
| − | |||
| − | |||
| − | |||
| − | |||
* Enabling the Level 2 activities changes the '''Configuration''' screen layout and adds a section for defining these activities. | * Enabling the Level 2 activities changes the '''Configuration''' screen layout and adds a section for defining these activities. | ||
Once you save these basic settings the configuration page will display the Level 1, Level 2 (and Level 3, if enabled) [[Entity|entity]] settings. | Once you save these basic settings the configuration page will display the Level 1, Level 2 (and Level 3, if enabled) [[Entity|entity]] settings. | ||
| + | ==Connectivity Settings== | ||
| + | [[Image:GeneralSettingsPage-ConnectivitySettings.png|link=]] | ||
| + | * '''Is Shadow Application - This application is linked to another application''' - Checking this box indicates that this UTA is a [[Creating and Enabling a Shadow Application|Shadow Application]], and will expose '''Shadow Application Settings''' section at the bottom of the page. | ||
| + | * '''Enable Data Exchange - Share application information with other instances of SmartSimple''' - Checking this box indicates that this UTA will permit transferring information between individual instances using SmartSimple's [[UTA Data Exchange|Data Exchange]] functionality. | ||
| + | * '''Enable UTA Connection as Receiver - UTAs can be linked to other UTAs''' - Checking this box indicates that this UTA is a [[Configuring UTA Provider/Receiver (Consumer) Relationships|Receiver]] for information held in another UTA, and will expose the '''UTA Connection Roles''' hyperlink. | ||
| + | * '''Enable UTA Connection as Provider - UTAs can be linked to other UTAs''' - Checking this box indicates that this UTA is a [[Configuring UTA Provider/Receiver (Consumer) Relationships|Provider]] of information to another UTA, and will expose the Shadow L1 Connection Settings and Shadow L2 Connection Settings hyperlinks. | ||
| + | * '''UTA Connection Roles - Configure Grant connection roles''' - Can now define a Role for Consumer/Provider relationships, including the ability to have role-based custom fields to track attributes of the association between specific consumer and provider records. | ||
| + | * '''L1 Provider Connection Settings - Configure L1 Provider UTA connection settings''' - Used to link level 1s in the Provider UTA to the Consumer UTA based upon the status(es), template(s) and the ID field required. | ||
| + | * '''L2 Provider Connection Settings - Configure L2 Provider UTA connection settings''' - Used to link level 2s in the Provider UTA to the Consumer UTA based upon the status(es), template(s) and the ID field required. | ||
| + | * '''UTA Provider Level 1 List View from Provider - Create and manage list view for UTA provider level 1''' - configure the list view for how the Level 1 Provider information will be presented on the Consumer UTA. This is configured against the Consumer UTA. | ||
| + | * '''UTA Provider Level 2 List View from Provider - Create and manage list view for UTA provider level 2''' - configure the list view for how the Level 2 Provider information will be presented on the Consumer UTA. This is configured against the Consumer UTA. | ||
| + | * '''UTA Consumer Level 1 List View from Consumer - Create and manage list view for UTA consumer level 1''' - configure the list view for how the Level 1 Consumer information will be presented on the Provider UTA. This is configured against the Provider UTA. | ||
| + | * '''UTA Consumer Level 2 List View from Consumer - Create and manage list view for UTA consumer level 2''' - configure the list view for how the Level 2 Consumer information will be presented on the Provider UTA. This is configured against the Provider UTA. | ||
| + | |||
| + | ==Security Settings== | ||
| + | * '''Access Role Setting''' - Controls who sees the UTA. If access isn't set, the label won't appear on the menu navigation and / or you may receive an access denied message. | ||
| + | |||
| + | ==See Also== | ||
| + | {{UTASettingsLinks}} | ||
| + | |||
| + | [[Category:UTA Settings]] | ||
| + | |||
| + | |||
| + | {| cellpadding="5" style="background-color:#F0F0F0;border-style: solid; border-width: 2px" | ||
| + | | [[Image:Previous.png|link=Entity and Instance]] [[Entity and Instance]] | ||
| + | | | ||
| + | | [[Level 1 and Level 2 Entity Settings]] [[Image:Next.png|link=Level 1 and Level 2 Entity Settings]] | ||
| + | |} | ||
| − | |||
| − | |||
| − | |||
[[Category:Universal Tracking Application]][[Category:Applications]] | [[Category:Universal Tracking Application]][[Category:Applications]] | ||
Latest revision as of 12:33, 27 July 2016
In this article, you will start to create a Contract Tracking application. Initially, this application will use Level 1 items only.
1. Click the Configuration, Tracking Applications menu.
The Tracking Applications window is displayed. Currently there are no applications created.
Generally, this list will display the name of the application, the name as it appears in the menu bar, and the description that you define for the application.
2. Click the New Application tab.
The New Application window is displayed.
This page is used to set many characteristics for the new application and is divided into ten sections.
- Application Settings – Controls the overall functioning of the application.
- Level 1 Item Settings – Defines the attributes of the Level 1 Entity. You will need to save the application at least once to see these settings.
- Level 2 Activity Settings – Defines the attributes of the Level 2 Entity. You will need to activate Level 2 to see these settings.
- Access Role Settings – Defines the roles of the user that can access the application.
- Contact Assignment Role Settings – Determines the roles that contacts can “play’ in a specific Level 1 Entity.
- Account Assignment Role Settings – Determines the roles that organisations can “play” in a specific Level 1 Entity.
- Account and Contact Settings – Defines the relationship between Level 1 and Level 2 items in other parts of SmartSimple, such as the account screen and the contact screen.
- Publication Service Settings – Connects Level 2 items to external web services, such as publication databases.
- Terminology Settings – Defines the object names to be used throughout the application for Level 1, 2 and 3 entities.
- Field Settings – Defines the display of activities in the workflow list and the calendar.
Contents
Terminology Settings
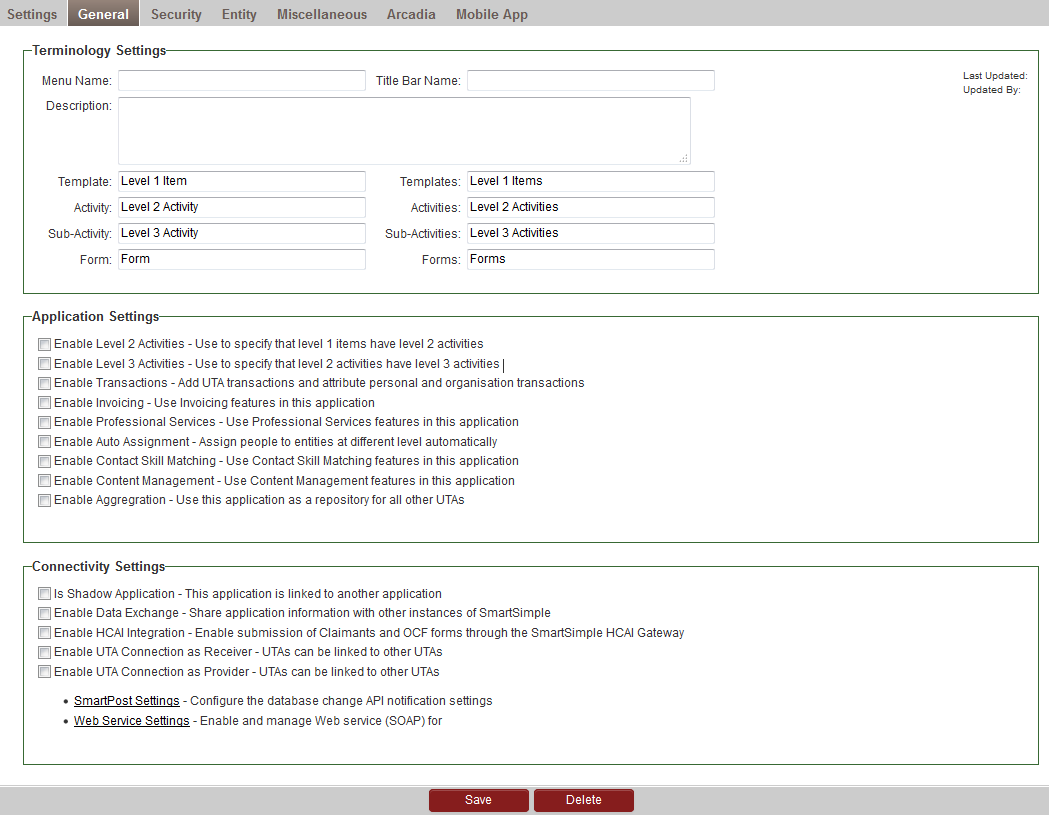
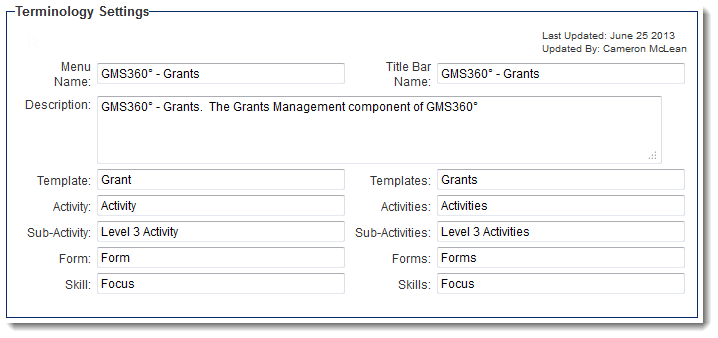
Terminology Settings allow you to personalize the terminology used by your copy of SmartSimple.
- Menu Name: The application name that will display on the left navigation bar.
- Title Bar Name: The name that will display at the top Title Bar when application is open.
- Description: Text that allows you to describe your application.
- Template/Templates: Nomenclature for singular and plural references to Level 1s.
- Activity/Activities: Nomenclature for singular and plural references to Level 2s.
- Sub-Activity/Sub-Activities: Nomenclature for singular and plural references to Level 3s.
- Form/Forms: Nomenclature for singular and plural references to Forms.
- Skill/Skills: Nomenclature for singular and plural references to skills. This option only appears when the Skill Settings is turned on within the UTA.
Changing the terminology in this section will change the captions of various settings and objects throughout the administration and user interfaces.
Application Settings
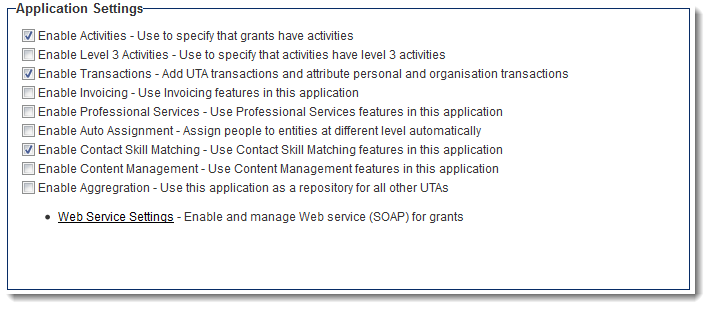
- Enable Activities - Use to specify that grants have activities - Enables Level 2s to be used in this application. Once this option has been selected, the configuration options for Level 2s will be visible.
- Enable Level 3 Activities - Use to specify that activities have level 3 activities - Enables Level 3s to be used in this application. Once this option has been selected, the configuration options for Level 3s will be visible.
- Enable Transactions - Add UTA transactions and attribute personal and organisation transactions - Enables transactions to be used in this application. Once this option has been selected, the configuration options for transactions will be visible, including the Transaction tab on the UTA Settings Page.
- Enable Invoicing - Use Invoicing features in this application - Enables invoices to be used in this application. Once this option has been selected, the configuration options for invoices will be visible, including the Invoice tab on the UTA Settings Page. Mutually exclusive with the Enable Professional Services option.
- Enable Professional Services - Use Professional Services features in this application - Enables Professional Services to be used in this application.
- Enable Auto Assignment - Assign people to entities at different level automatically - Enables Auto Assignments to be used in this application. Once this option has been selected, the Auto Assignment Settings section becomes visible.
- Enable Contact Skill Matching - Use Contact Skill Matching features in this application - Enables Skill Settings to be used in this application. Once this option has been selected, the Skill Settings section becomes visible.
- Enable Content Management - Use Content Management features in this application -
- Enable Aggregration - Use this application as a repository for all other UTAs - Enabling this will turn the UTA into an Aggregation UTA, allowing the definition of the association between equivalent fields in each UTA.
- Auto Assignment Settings - Settings for people assignment at different levels - Hyperlink appears when Enable Auto Assignment is checked. Used to define rules for automatically assigning contacts to Level 1 and Level 2 entities (see Auto Assignments for further details).
- Web Service Settings - Enable and manage Web service (SOAP) for grants - allows the posting of data to another system, outside of SmartSimple, and the storing of results into a custom field on the object against which the Workflow was triggered. See Web Services for additional information.
- Enabling the Level 2 activities changes the Configuration screen layout and adds a section for defining these activities.
Once you save these basic settings the configuration page will display the Level 1, Level 2 (and Level 3, if enabled) entity settings.
Connectivity Settings
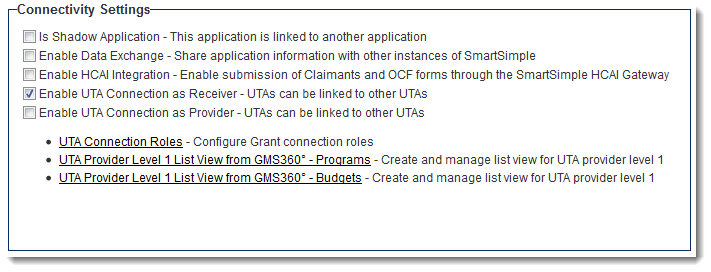
- Is Shadow Application - This application is linked to another application - Checking this box indicates that this UTA is a Shadow Application, and will expose Shadow Application Settings section at the bottom of the page.
- Enable Data Exchange - Share application information with other instances of SmartSimple - Checking this box indicates that this UTA will permit transferring information between individual instances using SmartSimple's Data Exchange functionality.
- Enable UTA Connection as Receiver - UTAs can be linked to other UTAs - Checking this box indicates that this UTA is a Receiver for information held in another UTA, and will expose the UTA Connection Roles hyperlink.
- Enable UTA Connection as Provider - UTAs can be linked to other UTAs - Checking this box indicates that this UTA is a Provider of information to another UTA, and will expose the Shadow L1 Connection Settings and Shadow L2 Connection Settings hyperlinks.
- UTA Connection Roles - Configure Grant connection roles - Can now define a Role for Consumer/Provider relationships, including the ability to have role-based custom fields to track attributes of the association between specific consumer and provider records.
- L1 Provider Connection Settings - Configure L1 Provider UTA connection settings - Used to link level 1s in the Provider UTA to the Consumer UTA based upon the status(es), template(s) and the ID field required.
- L2 Provider Connection Settings - Configure L2 Provider UTA connection settings - Used to link level 2s in the Provider UTA to the Consumer UTA based upon the status(es), template(s) and the ID field required.
- UTA Provider Level 1 List View from Provider - Create and manage list view for UTA provider level 1 - configure the list view for how the Level 1 Provider information will be presented on the Consumer UTA. This is configured against the Consumer UTA.
- UTA Provider Level 2 List View from Provider - Create and manage list view for UTA provider level 2 - configure the list view for how the Level 2 Provider information will be presented on the Consumer UTA. This is configured against the Consumer UTA.
- UTA Consumer Level 1 List View from Consumer - Create and manage list view for UTA consumer level 1 - configure the list view for how the Level 1 Consumer information will be presented on the Provider UTA. This is configured against the Provider UTA.
- UTA Consumer Level 2 List View from Consumer - Create and manage list view for UTA consumer level 2 - configure the list view for how the Level 2 Consumer information will be presented on the Provider UTA. This is configured against the Provider UTA.
Security Settings
- Access Role Setting - Controls who sees the UTA. If access isn't set, the label won't appear on the menu navigation and / or you may receive an access denied message.
See Also
- Accessing the UTA Settings Tab
- UTA Settings Page
- UTA Settings - Settings
- UTA Settings - General
- UTA Settings - Security
- UTA Settings - Entity
- UTA Settings - Miscellaneous
- UTA Settings - Transaction
- UTA Settings - Invoice
- UTA Settings - Time and Expense
| |
Level 1 and Level 2 Entity Settings |


