Difference between revisions of "Contact Sign-Up Page Settings"
(→Contact Sign up – New User Email Template) |
|||
| Line 108: | Line 108: | ||
* This feature requires the [[Smart Folder|SmartFolders]] application to be enabled. You specify the [[Smart Folder]] directory where the [[User|user]] directories will be created and the [[Internal|internal]] role that will share access to the folder along with the [[User|user]]. | * This feature requires the [[Smart Folder|SmartFolders]] application to be enabled. You specify the [[Smart Folder]] directory where the [[User|user]] directories will be created and the [[Internal|internal]] role that will share access to the folder along with the [[User|user]]. | ||
* The folder will be named in the format '''firstname_lastname''' where first name and last name are the contacts first and last name. | * The folder will be named in the format '''firstname_lastname''' where first name and last name are the contacts first and last name. | ||
| + | |||
==Contact Sign up – Page Templates== | ==Contact Sign up – Page Templates== | ||
| Line 117: | Line 118: | ||
* '''Confirmation page template''' defines the HTML content for the confirmation page. You can click Standard template to add the standard HMTL format or you can customised your own. | * '''Confirmation page template''' defines the HTML content for the confirmation page. You can click Standard template to add the standard HMTL format or you can customised your own. | ||
| + | |||
==Contact Sign up – New User Email Template== | ==Contact Sign up – New User Email Template== | ||
| Line 128: | Line 130: | ||
Care should be taken to ensure that these instructions are meaningful and that the [[URL]] is the correct [[URL]] based on the user’s access level. | Care should be taken to ensure that these instructions are meaningful and that the [[URL]] is the correct [[URL]] based on the user’s access level. | ||
| + | |||
==See Also== | ==See Also== | ||
Revision as of 08:25, 23 June 2016

|
This article will explain how you can implement this feature for use on your SmartSimple system. |
Contents
- 1 Disambiguation - Contact vs. Company Sign-Up Pages
- 2 Configuration
- 3 Contact Sign up – General Settings
- 4 Contact Sign up – Page URLs
- 5 Contact Sign up – Field Settings
- 6 Contact Sign up – Role Settings
- 7 Contact Sign up – Folder Settings
- 8 Contact Sign up – Page Templates
- 9 Contact Sign up – New User Email Template
- 10 See Also
Disambiguation - Contact vs. Company Sign-Up Pages
A contact sign up page is very similar to a company sign up page with the following differences.
| Contact Sign-Up | Company Sign-Up |
| Contact standard fields displayed | Company standard fields displayed |
| Role used to specify the type of contact and custom fields required | Category used to specify the type of contact and custom fields required |
| Enables login | Not applicable |
| Optionally provides on-line folder for the user | Not applicable |
| Email welcome message | Not applicable |
| Enables contact as Applicant (in the Applicant Tracking System) | Not applicable |
Configuration
1. Click the Sign Up Organisation link.
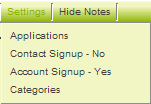
2. Click the Settings menu.
The menu now indicates that a company sign up exists.
3. Click the Contact Signup – No menu.
The Contact sign up page for this organisation is displayed.
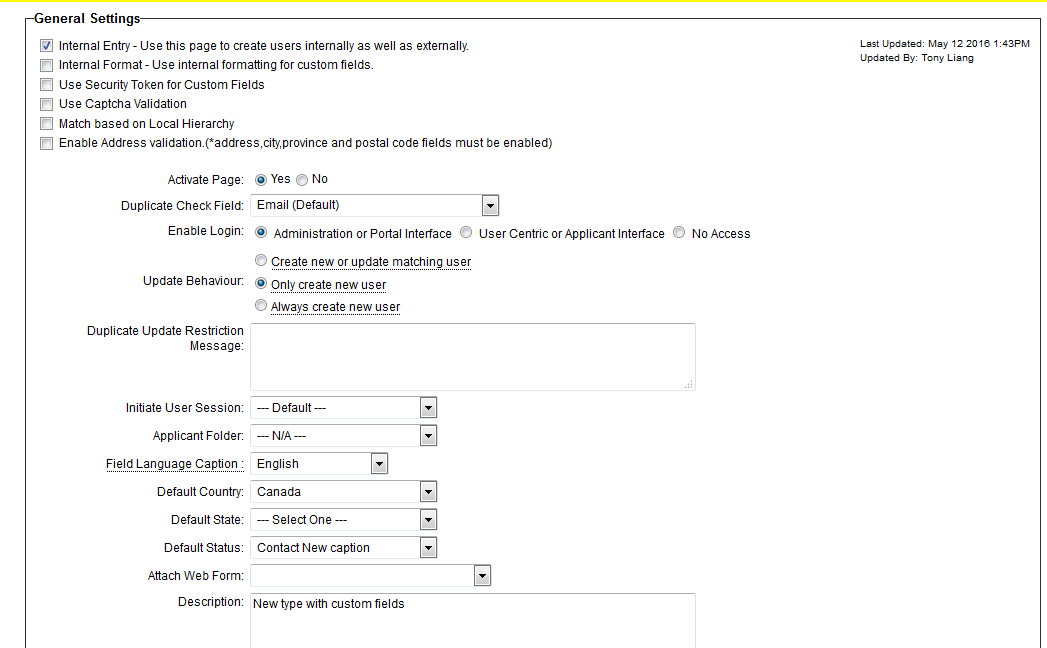
This page consists of the following sections:
Contact Sign up – General Settings
- Internal Entry – use this page when someone internally wishes to create a contact. Generally, this is not set.
- Internal Format - overrides default signup page format and uses internal formatting for custom fields, including having any hidden header fields present on the page.
- Use Security Token for Custom Fields - enhances security of external sign-up and template pages by validating the fields that are submitted with expected values.
- Use Captcha Validation - enables CAPTCHA validation on sign-up page.
- Match based on Local Hierarchy - Duplicate Check performed on new contact record only checks against contact records under new contact’s organization in the organizational hierarchy.
- Enable Address validation - Address, City, State/Province and Postal Code fields must be enabled.
- Activate Page – controls if the sign up page is active.
- Enable Login – defines if the contact will be able to log into the system after registration. There are three options available:
- Administrative or Portal Interface - Provides access to the system to the extent permitted through the user's membership of specific roles.
- User Centric or Applicant Interface – Only provides access through the User Centric Interface and Applicant Tracking “career sites”.
- No Access – Contact cannot log into the system.
- If you specify User Centric Or Applicant Interface AND enable login you will need to specific the URL of the login page to be used by the contact. They will not be able to log in though the standard entry point.
- Email Check
- Update profile for existing user - The system will check the contact email address and if it exists the contact profile will be updated.
- Do not update profile for existing user - The system will not update profiles of existing users. When this option is selected then a a new Update Restriction Message section is exposed. If this Update Restriction Message is left blank the it should not block registration, only prevent updating the existing details in the system. If this Update Restriction Message is populated then it should block registration, with end user presented with a pop-up displaying the contents of the restriction message field.
- Create new profile at all times - Has potential of creating duplicate records in system.
- Initiate User Session - If you have enabled the user to login with either the Administration or Portal Interface or User Centric Interface this determines whether or not they will be logged into the system when they have registered.
- Note: The user will always be shown the confirmation page after registration. If you want them to enter their portal/user centric interface you should create a redirect from the confirmation page.
- Applicant Folder – adds the contact to an applicant folder in the Applicant Tracking Application Candidate.
- Default Country – controls the default country displayed in the country combo box. It also controls if States (United States) or Provinces (Canada) should be displayed first in the State/Province combo box.
- Attach Web Form – indicates the name of a SmartSimple web form that the user completes after completing the sign up page.
- Description – describes the purpose of the sign up page.
- Attach Workflow - enables a Workflow to be triggered off of a Company/User registration page
Contact Sign up – Page URLs
There are two URLs associated with each sign up page.
- Standard URL – the address of the sign up page. You use this link to access the page directly or embed the link within your web site. Use this page when updating roles on a contact profile. e.g. unsubscribing from newsletters
- Email Broadcast URL –used in conjunction with the Email Broadcast application to display a contact details, and allow the contact to update their profile – without logging into the system. You cannot use this page to update roles, or unsubscribe.
Contact Sign up – Field Settings
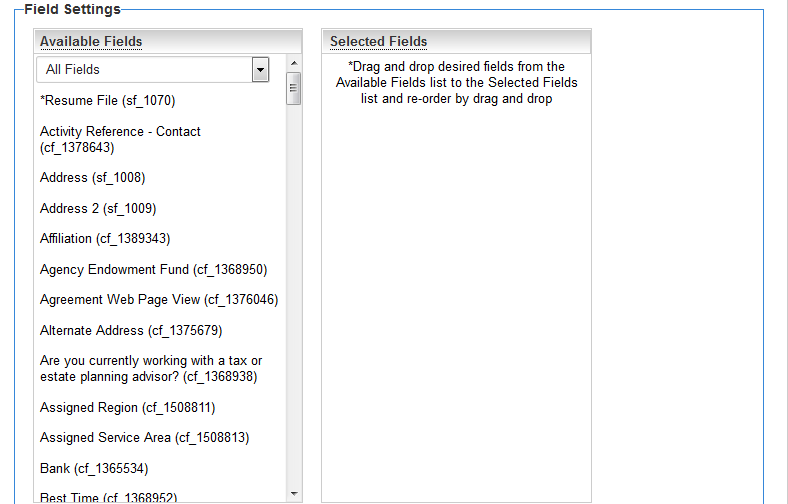
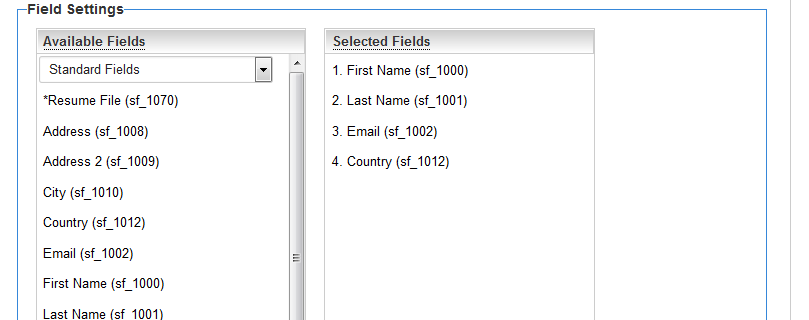
The Field Settings section of the sign-up page allows you to define the fields to display on the Signup page, as well as the order that they should appear.
The left hand side of the screen provides the fields that can be used.
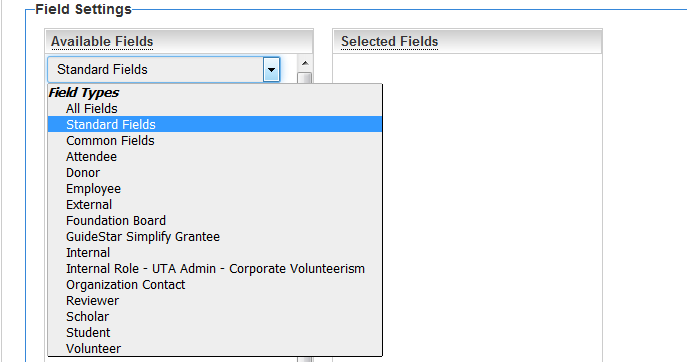
The user can click on the drop-down to view the fields by category, based on whether they are standard fields, custom fields or role specific fields.
The user can drag the fields from the left hand side over to the right hand side. Fields listed on the right hand side appear on the Signup page in the order that they are listed.
The user can drag the fields up and down to change the order, and can bring their mopuse over the field and click on the small x, to the right of the field name, if they wish to remove the field from the right hand side.
Contact Sign up – Role Settings
You associate the contact sign up page one or more contact roles.
The roles displayed in this section will vary depending on the roles that you have set in your instance.
- Add User Roles: You select the roles that you wish to associate with users who sign-up to the system using the current page.
- Remove User Roles: You select the roles that you wish to remove from any existing users who sign-up to the system using the current page.
Contacts registering through this page will be either associated or disassociated with the selected roles.
Contact Sign up – Folder Settings
- If you need the registered contact to store files within the system, then you can enable the Create Folder for User check box.
- This feature requires the SmartFolders application to be enabled. You specify the Smart Folder directory where the user directories will be created and the internal role that will share access to the folder along with the user.
- The folder will be named in the format firstname_lastname where first name and last name are the contacts first and last name.
Contact Sign up – Page Templates
There are two HTML templates associated with the sign up page. You will need HTML skills to format these pages if you do not use the standard templates.
- Sign up page Template: defines the HTML content for the sign up page. You can click Standard template to add the standard HMTL format or you can customise your own.
- Confirmation page template defines the HTML content for the confirmation page. You can click Standard template to add the standard HMTL format or you can customised your own.
Contact Sign up – New User Email Template
If the sign up page is being used to provide the user with access to the system, then you will need to set the New User Email Template.
- From Address – the email address that the email should come from.
- Email Subject – subject for the welcome email to be sent to the user.
- Email Body – the body for the welcome email to be sent to the user.
Care should be taken to ensure that these instructions are meaningful and that the URL is the correct URL based on the user’s access level.
See Also

|
Click here to learn why this feature is a benefit to your organization. |
