Difference between revisions of "UTA Settings - Settings"
(→Email Settings) |
|||
| Line 108: | Line 108: | ||
| − | '''Note:''' Other sections will be visible on this page when various options are enabled on other Settings Pages. (For example, [[Exchange Settings]], [[Skill Settings]]). | + | '''Note:''' Other sections will be visible on this page when various options are enabled on other Settings Pages. |
| + | (For example, [[Exchange Settings]], [[Skill Settings]]). | ||
==See Also== | ==See Also== | ||
{{UTASettingsLinks}} | {{UTASettingsLinks}} | ||
Revision as of 08:53, 27 June 2013
The main Settings page of the UTA consists of several sections.
Contents
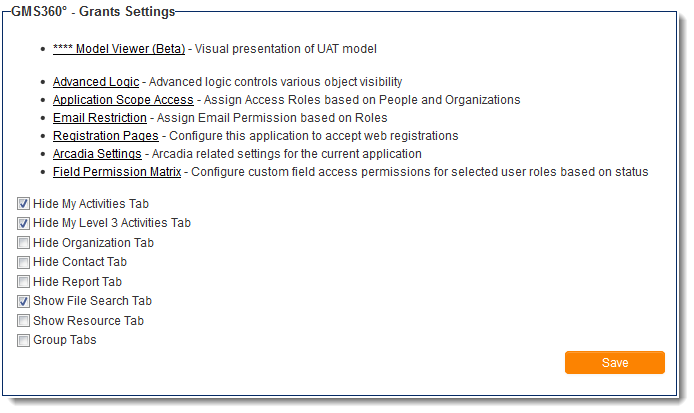
[hide]The sections will be named differently than the examples below in your copy of SmartSimple, depending on the naming convention the system administrator has defined on the Terminology Settings on the General Settings page. In the following examples, the UTA has been named "GMS360° - Grants," Level 1s are referred to as "Grants," Level 2s as Activities and Level 3s as Sub-Activities.
UTA Settings
The UTA Settings section contains links to the following pages:
- Model Viewer - Visual presentation of UAT model.
- Advanced Logic - Controls object visibility for this UTA only. See the Advanced Logic page for more information.
- Application Scope Access - See Application Scope Access page for more information.
- Email Restriction - See Email restriction page for more information.
- Registration Pages - See UTA Registration Pages for more information.
- Arcadia Settings - See Arcadia Settings for more information.
- Field Permission Matrix - See Field Permission Matrix for more information.
The UTA Settings section also contains the following configuration options:
- The following five settings will hide the relevant tabs from all users from the Menu Bar Tab:
- Hide My Activities Tab
- Hide My Sub-Activities Tab
- Hide Organization Tab
- Hide Contact Tab
- Hide Report Tab
- The following two settings will show the relevant tabs for all users on the Menu Bar Tab:
- Show File Search Tab
- Show Resource Tab
- Group Tabs - See the Group Tabs page for more information.
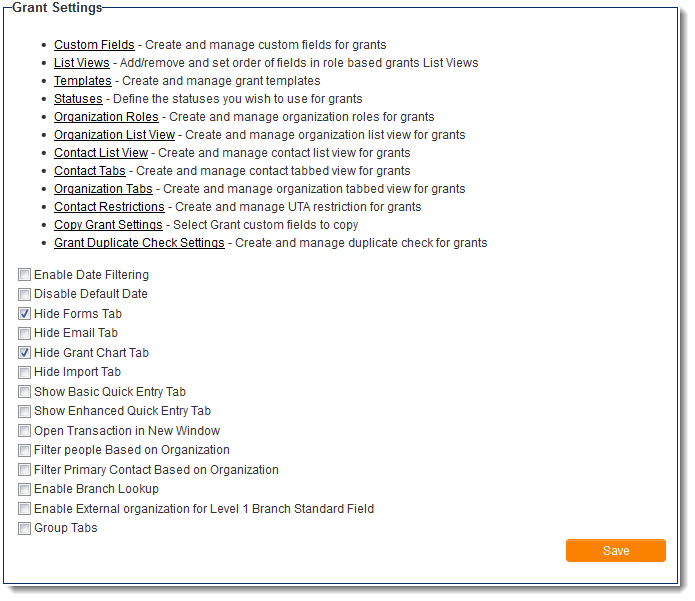
Level 1 Settings

The Level 1 settings section will be captioned with the terminology the system administrator has defined on the General Settings page. In the above example, Level 1s have been named "Grants."
The Level 1 Settings section contains links to the following pages:
- Custom Fields - Create and manage custom fields for grants - A list of all baseline custom fields for your Level 1 entity. See Adding a Custom Field to a Level 1 for details on adding custom fields.
- List Views - Add/remove and set order of fields in role based grants List Views - The list views that pertain to lists of Level 1s in this UTA. See Configuring List Views for instructions on adding list views.
- Templates - Create and manage grant templates - The page for managing your Level 1 Templates.
- Statuses - Define the statuses you wish to use for grants - The page for managing your Level 1 Statuses.
- Organization Roles - Create and manage organization roles for grants - Roles that can be assigned to organizations associated with Level 1s. System-wide company roles can be configured on the Roles & Permissions page.
- Organization List View - Create and manage organization list view for grants - The list views that pertain to lists of organizations in this UTA. See Configuring List Views for instructions on adding list views.
- Contact List View - Create and manage contact list view for grants - The list views that pertain to lists of contacts in this UTA. See Configuring List Views for instructions on adding list views.
- Contact Tabs - Create and manage contact tabbed view for grants - Allows system administrators to break groups of contacts into separate tabs by UTA role.
- Organization Tabs - Create and manage organization tabbed view for grants -
- Contact Restrictions - Create and manage UTA restriction for grants -
- Copy Level 1 Settings - Select Level 1 custom fields to copy - This page defines the custom and standard fields that will be copied to the new record when the Copy button is used on a Level 1.
- Grant Duplicate Check Settings - Create and manage duplicate check for grants - See Duplicate Check page for instructions on configuration.
The Level 1 Settings section also contains the following configuration options:
- Enable Date Filtering - When this option is selected, users will have the option to filter records in the Level 1 list view by Start Date and End Date from the Basic Search Panel. The Start Date and End Date standard fields must be enabled for this configuration to have effect.
- Disable Default Date - When this option is selected, the Start Date will no longer default to the current date upon new record creation.
- The following four settings will hide the relevant tabs from all users from the Navigation Bar Tab on Level 1 records:
- Hide Forms Tab
- Hide Email Tab
- Hide Level 1 Chart Tab
- Hide Import Tab
- The following two settings will show the relevant Quick Entry options on the New button on the Navigation Bar Tab on Level 1 records:
- Show Basic Quick Entry Tab - See Basic Quick Entry page for more information.
- Show Enhanced Quick Entry Tab - See Enhanced Quick Entry page for more information.
- Open Transaction in New Window - Transactions will open a pop-up window when this option is enabled.
- Filter Person Based on Organization - See Filter Person Based on Customer page for more information.
- Filter Owner Based on Organization - See Filter Owner Based on Organization page for more information.
- Enable Branch Lookup - See Enable Branch Lookup for more information.
- Enable External organization for Level 1 Branch Standard Field - Allows external organizations to be assigned as branches on the Level 1 Branch standard field.
- Group Tabs - See the Group Tabs page for more information.
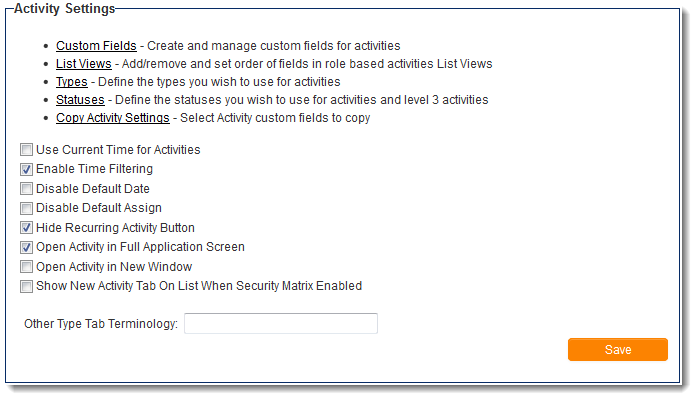
Level 2 Settings
The Level 2 Settings section contains links to the following pages:
- Custom Fields - Create and manage custom fields for activities - A list of all baseline custom fields for your Level 2 entity. See Adding a Custom Field to a Level 2 for details on adding custom fields.
- List Views - Add/remove and set order of fields in role based activities List Views - The list views that pertain to lists of Level 2s in this UTA. See Configuring List Views for instructions on adding list views.
- Types - Define the types you wish to use for activities - The page for managing your Level 2 Types.
- Statuses - Define the statuses you wish to use for activities and sub-activities - The page for managing your Level 2 Statuses.
- Copy Activity Settings - Select Activity custom fields to copy - This page defines the custom and standard fields that will be copied to the new record when the Copy button is used on a Level 2.
The Level 1 Settings section also contains the following configuration options:
- Use Current Time for Activities -
- Enable Time Filtering -
- Disable Default Date -
- Disable Default Assign -
- Hide Recurring Activity Button -
- Open Activity in Full Application Screen -
- Open Activity in New Window -
- Show New Activity Tab On List When Security Matrix Enabled -
- Other Type Tab Terminology -
Level 3 Settings
The Level 3 Settings section contains links to the following pages:
- Custom Fields - Create and manage custom fields for Sub-Activities - A list of all baseline custom fields for your Level 3 entity. See Adding a Custom Field to a Level 3 for details on adding custom fields.
- List Views - Add/remove and set order of fields in role based Sub-Activities List Views - The list views that pertain to lists of Level 3s in this UTA. See Configuring List Views for instructions on adding list views.
- Types - Define the types you wish to use for Sub-Activities - The page for managing your Level 3 Types.
- Copy Sub-Activity Settings - Select Sub-Activity custom fields to copy - This page defines the custom and standard fields that will be copied to the new record when the Copy button is used on a Level 3.
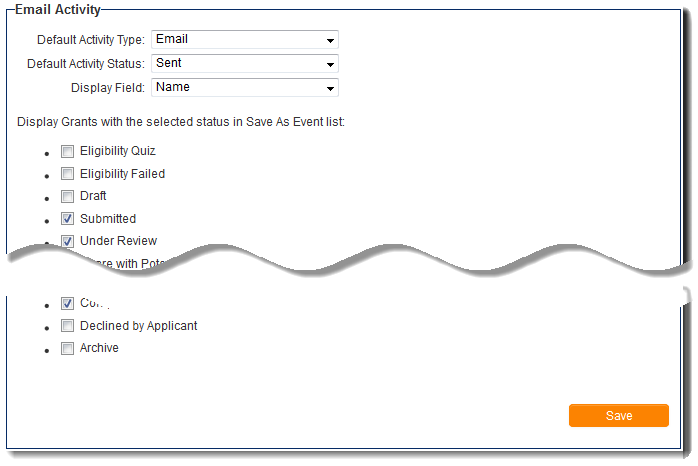
Email Settings
- See Integrating Email with the UTA for instructions on configuration.
Note: Other sections will be visible on this page when various options are enabled on other Settings Pages.
(For example, Exchange Settings, Skill Settings).


