Import multiple contact/companies to uta objects
The main UTA Settings page includes sections specific to the Level 1, Level 2 and Level 3 records. Each of these sections includes options for importing contact and company records using an import wizard.
Contents
Import Process Overview
The import process consists of six steps:
1. Navigate into the Import option for the UTA level you are interested in.
2. Copy / format the data to be imported.
3. Paste the information into the SmartSimple Import Window.
4. Map the fields in the pasted data to the system data. This must include mappings to
- identify the contact or organization to be imported
- the role or category they are to be imported as
- mappings to identify the individual record (level 1, 2, or 3) that the data is to be imported against.
5. Validate the information mapping before uploading.
6. Upload the data to SmartSimple.
Each step of this process is described in detail below.
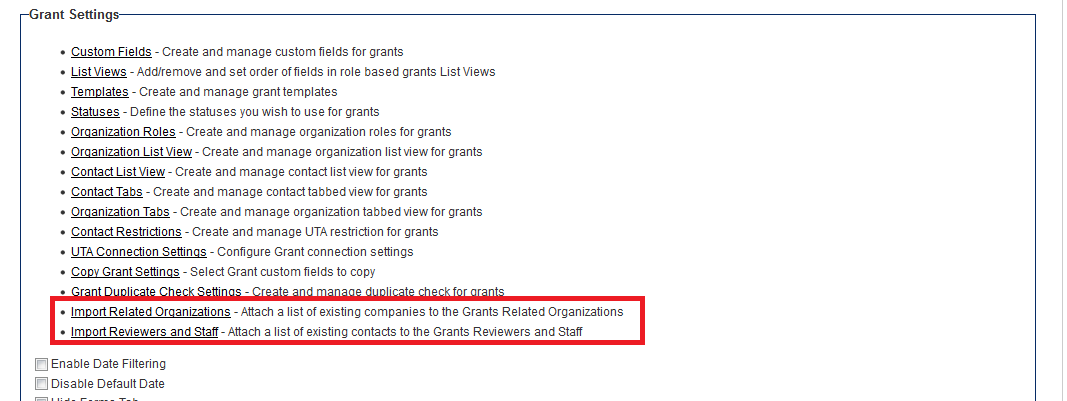
1. Go to the Settings page for the UTA that the data will be imported against.
2. Scroll down to the Settings section for the level you wish to import the data against.
3. Click on the import option for the type of data you intend to import
- Import Organizations - Associate existing organizations in your system with existing Level 1 objects.
- Import Contacts - Associate existing contacts in your system with existing Level 1 objects.
Copy/format the data
If you wish to import contact details then ensure . . .
- You have selected at least one field from the Users and one field from the entity (level 1, 2 or 3) for matching
- You have included the user role name you want to import contacts as
- ALL standard fields are set before the custom fields and in the same order as the field selection list
If you wish to import organization details then ensure . . .
- You have selected at least one field from the Companies and one field from the entity (level 1, 2 or 3) for matching
- You have included the company role name you want to import companies as
- ALL standard fields are set before the custom fields and in the same order as the field selection list
Paste information into Import Window
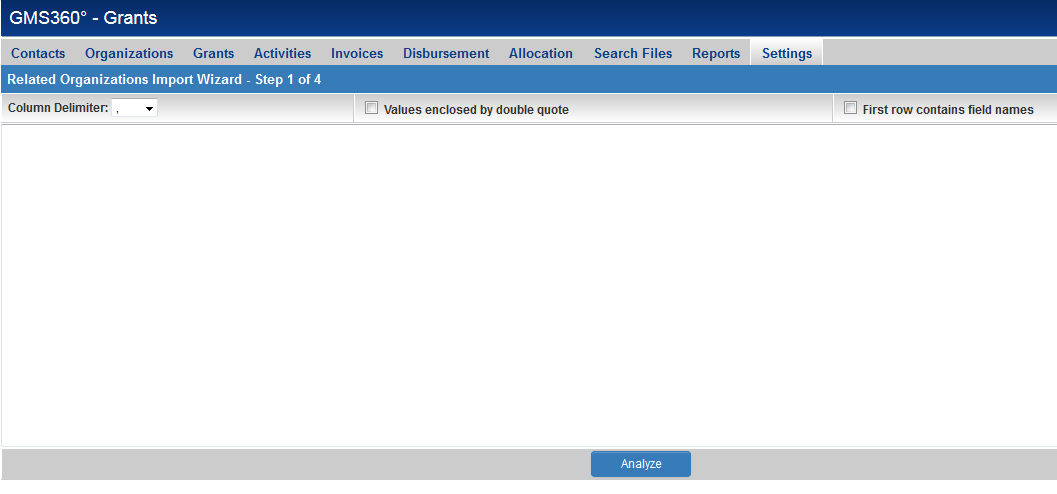
Once you click on the import option then you will be presented with the relevant Import Wizard for the type of data to be imported.
1. Click the mouse in the import text box.
2. Select the Edit Paste menu or press Control + V.
The data is added to the text box.
3. Set the Column delimiter as required.
4. Click the First row contains field names check box if the first row is column headers rather than real data.
5. Click the Analyze button.
Validate the information
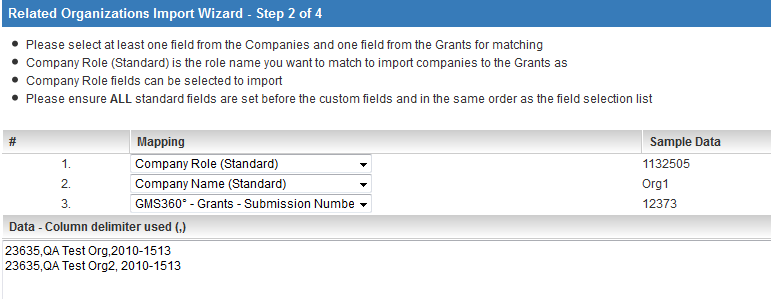
1. Map the fields, ensuring that . . .
- You have selected at least one field from the Company / Contact and one field from the entity (level 1, 2 or 3) for matching
- You have included the company / contact role name you want to import companies as
- ALL standard fields are set before the custom fields and in the same order as the field selection list
2. Click the Parse Branch button.
3. The analyzed data is displayed.
4. Click the Upload button. The records are uploaded.


