Difference between revisions of "Submit & Save Buttons"
(→Creating a Submit Button) |
(→Tips) |
||
| Line 44: | Line 44: | ||
==Tips== | ==Tips== | ||
| − | You can use '''URL''' to display a [[Custom_Field_Type:_Display_Only_–_Web_Page_View|Web Page View]] as a confirmation page. Use the following syntax: @custom field name.value@ | + | You can use '''URL''' to display a [[Custom_Field_Type:_Display_Only_–_Web_Page_View|Web Page View]] as a confirmation page. Use the following syntax: @''custom field name''.value@ |
==See Also== | ==See Also== | ||
Revision as of 11:54, 4 December 2014
Contents
SmartSimple offers the ability to define multiple submit buttons against individual statuses within a UTA.
The buttons can also be configured so that they are presented to subsets of users, perform certain validation checks and can push the event to a specific status.
Creating a Submit Button
To access the Submit Button feature:
1) Click the Settings tab within the UTA, then on the Statuses link in either the Level 1 settings section, or Level 2 settings section.
2) The Submit Button tab is displayed next to the Status Trigger tab.

3) Click on the Submit button tab or scroll down to the Submit Buttons section. Then click on the New tab to begin the process of adding a new Submit button.

4) You will be presented with a new window in which to configure the submit button.
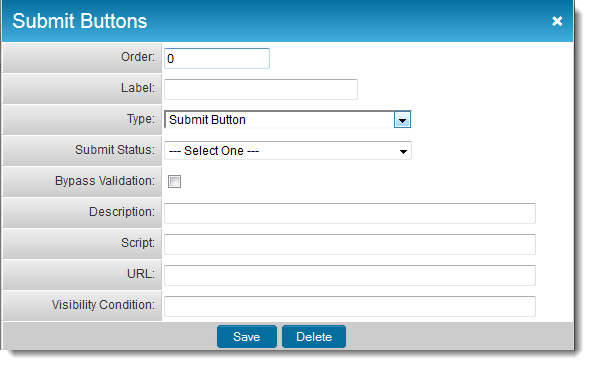
This window includes the following settings:
- Order - the order in which the button will appear on the screen, with lower numbers appearing further to the left of the screen.
- Type - Options are Submit Button, Save Button and Save Draft Button. See Submit Logic on Save or Save Draft Buttons for further information.
- Label - the text that will appear on the button when exposed to end users.
- Submit Status - the status that the entity should be updated to after clicking on the button.
- Bypass validation - flag to indicate that the status should change without the system performing all field validations. The Submit Logic on the button itself will still be validated.
- Description - descriptive text.
- Script - call to any scripts that should be run in conjunction with this button. The system will check if the script is present before trying to run it. Submit button script must be formatted as functionName(this.form). Spaces are not permitted. Script should return either true or false.
- Important: If a Submit Button Script has been defined the Submit button will run that function, and will NOT ensure that mandatory fields are completed.
- URL - specify the URL the user should be redirected to following successful submission. NOTE: Redirects must be relative path (e.g. /wiki/index.php) rather than an absolute path (e.g. http://www.smartsimple.org/wiki/index.php).
- Visibility Condition - any conditions used to control when the button is exposed.
- Type Field Permissions - used to control the templates/types for which the button is visible or hidden.
5) Click Save once you have configured the Submit button.
6) The Submit button will be listed in the Submit Buttons section.

7) You can now add Submit Logic against the individual buttons, tying specific submission rules to individual buttons and status changes.
Tips
You can use URL to display a Web Page View as a confirmation page. Use the following syntax: @custom field name.value@
See Also
- Submit Logic
- Status
- Template / Type Formula - for more examples of syntax to be used
- savefunc or sbfunc
- Obtain Server Date and Time
- Custom Save and Save Draft Buttons