Password Policy
Contents
SmartSimple uses the SHA-256 algorithm, combined with salt hashing, in order to encrypt passwords.
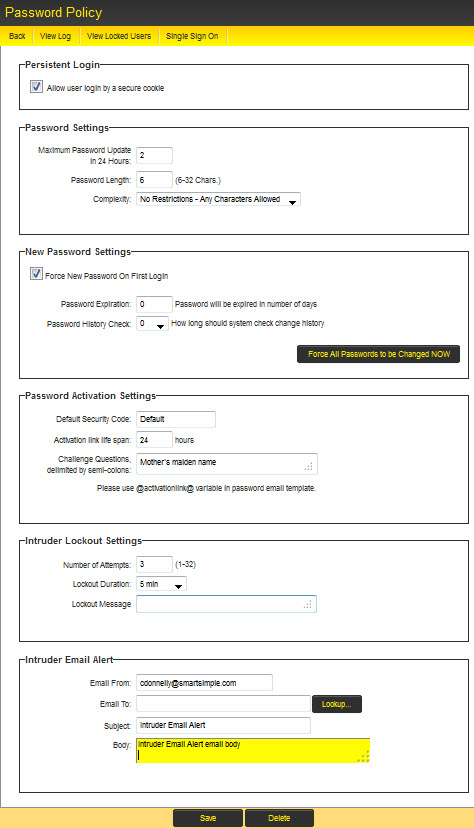
Password Policy is used to control the length and complexity of passwords, password expiration and history, the number of retries that the user is allowed, and the lockout time for the account if they exceed the number of retries.
Password Length and Complexity
Maximum Password Update in 24 Hours – The maximum number of password changes a user can make within a 24 hour period can be defined. This is to prevent users bypassing the password history restriction by changing their password repeatedly to return to a previously used password. This setting only pertains to password changes by use of "Update Password" by user, not to the "Forgot Password" link or system administrators using "Set Password."
Password length – the minimum length allowed for a password, between 6 and 32 characters.
Complexity – the level of complexity required in the password, the options are:
- No Restriction – any character can be used. This is the default.
- Alpha Only – only letters can be used.
- Alpha & Numeric – letters and numbers must be used in the password.
- Alpha & Numeric & Special characters – letters, numbers and special characters must be used.
- Custom Policy - a password policy can be custom defined.
Custom Policy
- The Compose Custom Password Policy table allows you to define the custom password policy by enabling each character set desired (upper case, lower case, numeric and/or symbols) and specifying the minimum number of characters required for that character set.
- The system code used to enforce your selection will appear in the Custom Password Policy field. You can also write your own code and paste it into this field if desired.
- The Validate Pattern button will open a window where you can test various passwords against the policy to see if they will pass or fail.
- The value in the Custom Password Policy Description field will be displayed to users when setting/changing their password. You can use plain text or html in this field (For example, to insert a line break use <br>)
- Note: See also Custom Password Policy Examples

Important: When defining a custom password policy be sure to provide a detailed description of the policy in the Custom Password Policy Description field so that users are aware of the minimum requirement to enable them to create a valid password.
If you need to translate the Custom Password Policy Description message you can use sslogic. It is often easiest to use System Variables for these. Example:
<!--@sslogic('@langid@'='2')--><br>@system.Password Policy - French@<!--@else--><br>@system.Password Policy@<!--@end-->
Hierarchical Password Policy
When viewing a company in your hierarchy, select Settings > Password Policy to define.
A different password policy can be defined for each company within the system.
If there are password policies defined for a company then it will automatically apply to all sub-companies in the hierarchy, unless those sub-companies have defined their own password policy.
If there are no password policies defined for a company, then the system will look at the companies above it in the hierarchy, and if one of these parent companies have a password policy set then it will use these settings.
If there are no password policies defined for a company, or any of the companies above it in the hierarchy, then the password policy set in Global Settings will apply.
New Password Settings
- Force New Password on First Login - Ensures that the user selects a password of their own choosing the first time they log into SmartSimple.
(Does not count towards Maximum Password Update in 24 Hours setting.)
- Password Expiration - Each user will be forced to change their password once the selected number of days has passed. Any number of days can be set.
- Password History Check - You can set the number of previous passwords (to a maximum of 32) that the system will remember for each user. When changing their password, users will not be permitted to re-use a previous password until the specified number of unique passwords have been used.
Password Activation Settings
Password Activation Settings can be set to add an extra layer of security to the system. These settings pertain to users who use the "Forgot Password" link on the login page.

- Default Security Code - A hard-coded value to be entered when users request new passwords.
- Activation link life span - Works with the @activationlink@ password variable. If the http://@url@@activationlink@ syntax is used in the Request Password section of User Email Templates, this setting sets the duration that the activation link will be valid.
- Challenge Questions, delimited by semi-colons - You can set a series of challenge questions, all users will be prompted to select a Challenge Question on next login. Their answer will be stored and they will be prompted to enter this answer if they forget their password and click the activation link in the "Forgot password" email template.
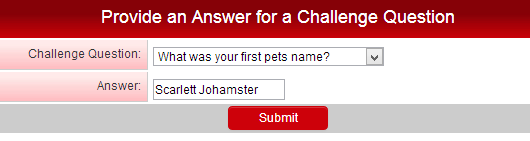
- Note: An example of a good challenge question would be something that is simple, memorable, can't be guessed easily, and won't change over time.
Rules for Password Activation Settings
The following rules apply to the above settings when users request new passwords:
- If a default security code has been entered and no challenge questions have been entered, the user will be prompted to enter the default security code.
- If a default security code has been entered and challenge questions have been entered, the user will only be prompted to answer a challenge question.
- If neither a default security code nor challenge questions have been entered, the user will be presented with CAPTCHA validation.
After successful completion of Password Activation, the user will be logged in and their new password will be active.
Intruder Lockout Settings
These settings determine the actions that should be taken if someone attempts to log into your copy of SmartSimple.
- Number of Attempts – the number of attempts to log in with an account before the account is locked.
- Lockout Duration – the duration of the account lockout. The user will not be able to log in during this period. Period can be set to 5 minutes, 15 minutes, 30 minutes, 1 hour, 3 hours, 12 hours, 24 hours or forever (until unlocked by administrator).
- Lockout Message - a custom message to display to users when a user is locked out due to too many failed login attempts. This message will only display when a user has been locked out, and attempts to log in again with the correct password. Therefore, no information will be divulged to users that fail their login.
- The View Locked Users tab will display all users that have had their account locked.
- If a user is locked, you can click on the Set Password button on the View Locked Users tab to reactivate the account and send the user a new password.
- Once an account has been locked for exceeding the number of permitted login attempts it will remain on the "locked users" list until the correct password is entered. This allows the administrator to see which users have been unable to log in, even if the configured lockout duration has passed and the account is no longer technically locked.
- When an account has been locked for exceeding the allotted number of attempts, after the lockout time has passed they are permitted only one attempt at the correct password. A single incorrect password at this point will re-lock the account for the configured lockout duration. In other words, once someone is on the "locked user" list they are only permitted a single wrong attempt and they will be locked for the lockout duration again. This prevents would-be intruders from having multiple attempts to guess the password each time the lockout duration has passed.
Intruder Email Alert
These settings define who should be informed by email if an intruder alert is detected.
- Email From – the “from” address for the email. If you do not set this value, the address: support@smartsimple.com will be used.
- Email To – select the internal people to receive the email.
- Subject – the subject of the email. See below for the variables that you can use in the subject.
- Body – the body of the alert email. See below for the variables that you can use in the body.
Intruder Alert Email Variables – because the user is not logged into the system, the amount of information available is limited to IP Address @ip@, the attempted username @username@ and date/time @now@ of the attempted login.
Intruder Log
The View Log tab is used to access the Intruder Alert log.

- The list can be sorted by clicking the column title.
- You can filter the list by username, year, and month.
View Locked Users
The View Locked Users tab will display all users that have had their account locked.
- Once an account has been locked for exceeding the number of permitted login attempts it will remain on the "locked users" list until the correct password is entered. This allows the administrator to see which users have been unable to log in, even if the configured lockout duration has passed and the account is no longer technically locked.
- When an account has been locked for exceeding the alloted number of attempts, after the lockout time has passed they are permitted only one attempt at the correct password. A single incorrect password at this point will re-lock the account for the configured lockout duration. In other words, once someone is on the "locked user" list they are only permitted a single wrong attempt and they will be locked for the lockout duration again. This prevent would-be intruders from having multiple attempts to guess the password each time the lockout duration has passed.
- If a user is locked, you can click on the Set Password button to reactivate the account and send the user a new password.
Single Sign-On
For information on the Single Sign-On settings and functionality, please refer to the Single Sign-On page.