List View Overview
Contents
Overview
List views are the part of the SmartSimple interface that combine similar records in a vertically scrolling list. The List View allows you to define which standard fields and custom fields are displayed when viewing a list of records. List views are configurable, so that you can define and customize such factors like the sequence in which records are displayed, the colour formatting of certain records, the number of records that are displayed, and more.
Features of List Views:
- Up to 30 columns of records
- Dynamic Filters — create and combine filters, narrow down by type or status, control date/time options, etc
- Download Files option — download all records from a list view, including attachments
- SmartCard Indicator — collect groups of objects into different SmartCard that can be easily shared with other users
- Group Email — send a group email; for example, mass email a list of applicants from approved applications from a previous year
- Formatting Options — drag and drop sequence of records, format colour and text boldness, group fields to display in a single cell, etc
- Multiple View Options — change list views into dashboards, interactive charts, graphs, etc
- Export to Excel — easily export list views to Excel for record-keeping sheets
- Portal Shortcuts — use list view aggregations to display on your Portal as a shortcut
- Batch Updates — enable a Batch Updates button to modify all records in a list view at once
... and much more!
For first-time users, it is highly recommended to test List View modification on the Backup Server first.
Configuration—Essentials
A typical external user is unable to edit list views, although they may select between varying list views to change their screen. Only users with the role of System Administrator are able to edit list views.
Note: A Default List View should always remain in the system as a generic list of basic details, with no filter assigned to allow free searching.
Example of List Views
For example, clicking on Organizations from the main menu will display a list view of organization records in your SmartSimple system:

In the above example, the following fields have been selected for display:
- Organization Name, Address, City, State, Phone Number, Primary Contact, Website, and Status (inactive/active)
Each field in this list is able to be sorted differently (default, ascending, descending) by changing the value of the Sort By dropdown box to the right of each field.

The list can also be filtered by using the Basic Search panel which is at the right of the list view, or the Advanced Search panel which, when selected, will open as a modal window where you can customize your search.

Note: List views will default to the last set of search criteria used. For example, if you perform a search within People for contacts with the last name "Smith," the next you log back in and view your contacts list, SmartSimple will remember your search and present the last set of search criteria, in the same sort order.
A user can modify their current list view by selecting the List View Options icon on the top right.
This will open a modal window that allows the user to select or de-select certain fields to be shown in their current list view. The benefit of this feature is that each list view can display a different combination of fields, both standard and custom.

System Views and Personal Views
There are two types of list views:
| System Views | |
| Personal Views |
|
To toggle between differing Lists Views, including between System and Personal List Views, simply select the list chart icon above your list view. A drop down list will appear that has both the available System and Personal List Views for each user. Each List View is labelled by the user who originally created them.
To edit these List Views, simply select the wrench icon on the left. The details of that list view will be displayed.

Configuring List Views
The menu for configuring list views is displayed at the top of the page with different tabs:

Each tab allows different editing functions. Each tab and its functions will be explained in detail below.
Properties

Functions of Properties:
| Feature | Description |
| View Name | The name of the list view is editable. Give your list view a distinct name that you will be able to remember and associate with that list view. |
| Display Order |
Enter a display order. This will define which list view will be the default for users who possess multiple roles. List views with lower display order numbers will be displayed before those with higher display orders. Ex: If you want your Default List View to show up first on the list of list view options, you could set its display order to 1 (or any other amount that is lower than all other list view display orders). |
| Role Permission | Set which roles you want to have access to this list view. Setting roles is helpful if you know that multiple users will access what you're creating a list view of - for example, you can select Everyone, or Employees only. If it is a list view containing information only pertinent for System Administrators, for example, then you can set that role and restrict this view from others. |
| Filter Option | Select which Filter you want to set on this list view. Filters can be saved and stored through Advanced Search, and are labelled by their creators. They can be used as System Filters or Personal Filters. |
| View Style |
List - The typical list view display, where records are displayed horizontally by their associated details and vertically to each other Grid - Records are displayed in a grid-like style, with each record displayed in a square. Ideal for records with uploaded images. Tree - Records are displayed in a hierarchical manner where associations between each other are displayed
|
| Card View Style (Mobile/Grid) |
Note: This feature should only be used if you have enabled the Grid View Style Choose to display uploaded images on each record as Full, Large, or Small and/or Above, Left, or Right of text Tip: Ensure that there is a sufficient amount of images uploaded for the records in order for the Card View Style to look reasonable; otherwise, records without images will show up as a blank square. |
| Manifest as Tab |
Different list views will appear as a separate tab that can be toggled back and forth, rather than the user having to select the specific List View from a drop down list. Note: This option is not always recommended because of its overuse of screen real estate. |
| Hide Filter Search Text | This option will not display the Filter Search Text in a list view; for example, if a System Administrator sets a specific Filter on a list view but does not want users to know what that filter is, you may select this option. |
| Default Buttons |
Useful for lists where you would need to do a lot of batch updates. Buttons available are under the Feature Options heading. |
| Feature Options: |
Open in Edit Mode: When records are opened, they will default into Edit Mode as opposed to View Mode. Enable Quick Edit: List View will be configured with the Quick Edit feature enabled; fields of records can be edited directly from their List View. Enable Row Clickable: Each row will act as a clickable button to open the referenced record easily. Enable File Download: Displays a download option to allow downloading of files from single file or multiple file fields on the selected records.
Enable Map Panel: Takes each record on a list and plugs in the associated contact's address to create a geographical visual of where the clients are. Marked as Configuration Only: Will go into configuration mode automatically rather than show up in a List View. |
| Translated Data Language | Select which language you would like the records' data to show up in. |

Columns

The Columns tab allows you to visually configure the available columns to a List View. The standard and custom fields that you want to be displayed in your list view are defined here. The maximum is 30 columns to a list view, but best practice is to only display up to 10 columns, as otherwise the user will have to scroll back and forth horizontally and it is a less presentable record. You may Drag and Drop columns to reorder them, and by clicking the X on the top right of each column you can delete them from the List View. List views are highly configurable: you may bring in fields from different areas such as Applicant Fields, Organization Fields, and so on. They will all be displayed underneath the Fields heading and can be scrolled through. By clicking into a cell, you will see the configuration options below. In this example, clicking into the Organization cell will highlight the Organization standard field and open up configurable options for the user to fill in.

| Column Configuration Option | Description |
| Header Caption | This will appear as the column's label. |
| Content Template |
This displays the variables for each column's information. Note that multiple standard fields can be added in a single column; the content template will reflect how many fields are in a single column by including the variable for each added field. Tip: Do not enter HTML into the content template as that it is a security risk. |
| Text Align | You may choose whether you want the text in a column to align on the Left, Right, or Center. |
| Font Colour | Select which font colour you want the column's information to appear in. This is helpful for columns where you would like to draw the user's attention to, such as the amount requested in a grant, or the status of an application |
| Bold Text |
Allow the column's information to appear bold. |
| Show Total |
Toggle on this option for numerical information in which the column should display a total amount. |
| Show Open Button |
This will enable an open button in that column so that the user can open into that record.
|
Multiple values can be added in each column. Once you click a field, a new left arrow icon will appear on the right of the other standard fields. To add another field into one column, select that icon.
In this example, the Primary Contact is added to the same column as the Organization name, so that they will appear together in the List View.

On the right, you will see that the variable for the Primary Contact will show up in the Content Template box. To make the Primary Contact information appear below the Organization name, simply format the Content Template that way.

To clear a column with multiple values, click the X button on the top right of the column box. To remove a single field from a column with multiple values, select the left arrow icon on the right side of that field from within the Fields list.
Once you are done configuring your List View, you can select the Copy button at the bottom of the page in order to copy the List View as a System or Personal View. It is best practice to begin by making a copy, particularly if working from the Default List View, in order to not lose changes and to leave the original view as is.
- Remember, making your list view a System List View will allow other users in your SmartSimple copy to use this list view. Making it a Personal List View will mean that only you have access to it, although you can choose to make it public so that others can view it; further functions, however, cannot be undergone even with a Personal List View that is made public.

Sort Order
-
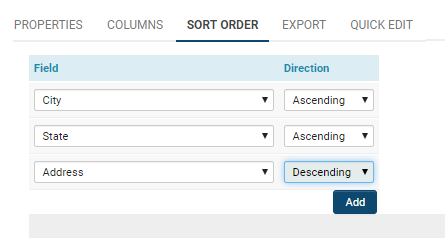
- 1. Click the Add button to add rows to the Sort Order.
- 2. Choose a field that the list view should be sorted by, by default.
- 3. Choose the Direction in which the sort should occur:
-
-
- Ascending will sort the selection from A to Z alphabetically or 0 to 9 numerically.
- Descending will sort the selection from Z to A alphabetically or 9 to 0 numerically.

Note: The Sort Order options only define the default sort order for the list view. The list view can always be re-sorted by using the Sort By feature within the list view.
Export
The Export tab will display all the functions and options available to users for exporting their list views. A user is able to export a list view with the Export button on the top right of their list view.

Enabling the Export button will allow you to export into Excel, the default exporting program.
If you want to export into an Internet-specific folder, such as a Configuration or SmartFolder, you can select that from the drop down menu. You can look up specific folders that currently exist in your SmartSimple system by selecting the Binoculars icon.
-
-
- Update Status After Export: Each exported record will be updated to the specific status.
- Trigger Workflow After Export: Each exported record will trigger the specified workflow.
- For more information: Workflows Overview


In the next sections of the Export page, you can customize the settings for exporting to Excel.
Tip: The default settings in the system are normally sufficient.
Note: Excel exportation will not maintain personalized formatting done on the Columns tab, including for instance colour formatting, line breaks where different fields have been included in one cell, and so on. However, once you have exported to Excel, users can freely pivot and customize the formatting on the Excel records.
- If you would like more information on MS Excel Settings, see Positioning Exported List View Results in your Excel Spreadsheet
- MS Word Settings: Enter semicolon-delimited list of MS Word Merge field names (fieldname1;fieldname2;fieldname3)
Custom Export Settings:
| Custom Export Setting | Description |
| Header | Define the text and column settings that will appear above the main body of the exported list view |
| Record Template | Define the columns from within the list view that are to be exported |
| Footer Template | Define the text that will appear below the main body of the exported list view |
| Default Filename | Define the name of the exported file |
| Export Values Only | Will strip out any formatting (ex: commas, currency, decimal places) associated with the selected field |
Quick Edit
The quick edit tab allows you to enable particular fields for Quick Edit, allowing users using the list view to edit fields on a record directly.

Configuration - Advanced
Batch Update Buttons
For more information on Batch Update Buttons, see Batch Update.
On list views related to Universal Tracking Applications (that is - not Organizations or Contacts List Views, like those we have been working with), Batch Update Buttons can be enabled. Once you are in configuration mode for a List View, you will see a fifth tab on the menu that will allow you to create Batch Update Buttons. Clicking on this menu will open up a list of available Batch Update buttons. To create a new button, click the + icon.

The criteria to define for each button is explained below:
| Display Order | This determines the position at which the Batch Update button will display in the drop down list of available Batch Update buttons. A lower numerical amount (ex: 1) will ensure that this specific Batch Update button appears first on the list. |
| Button Type |
Batch Update - This will enable an edit to mass update to all selected records at once. Copy - This will create a duplicate copy of the information of selected records. |
| Button Name | Provide a name for your button. Ex: The name for a button that changes the status for grant applications from submitted to approved can be appropriately named Approved. |
| Button Label | Provide a label for your button; typically, it is the same as the name. |
| Icon | An icon is extremely useful to draw attention to the button and to communicate its use to users. Ex: A dollar sign icon for an Approved button for grant applications. |
| Description | Always write a brief description so that other System Administrators and users can understand the functionality of the button. |
| View Roles | This criteria is particularly important as it will determine who is able to access this button when on the specified List View. Clicking into the text box for View Roles will allow you to select which roles would be able to view the Batch Update button. |
| Option | Select from a number of types of what you want your button to perform. A common use case is for the Option function to depend on Status - for example, on a List View of grant applications, this Batch Update button will change the status of all selected records at once. |
| Value | The value corresponding to the option that you have chosen for your Batch Update button. For example, if your Option function was Status, then your Value would be chosen from a list of available statuses in your system, such as Approved, Declined, Submitted, and more. |
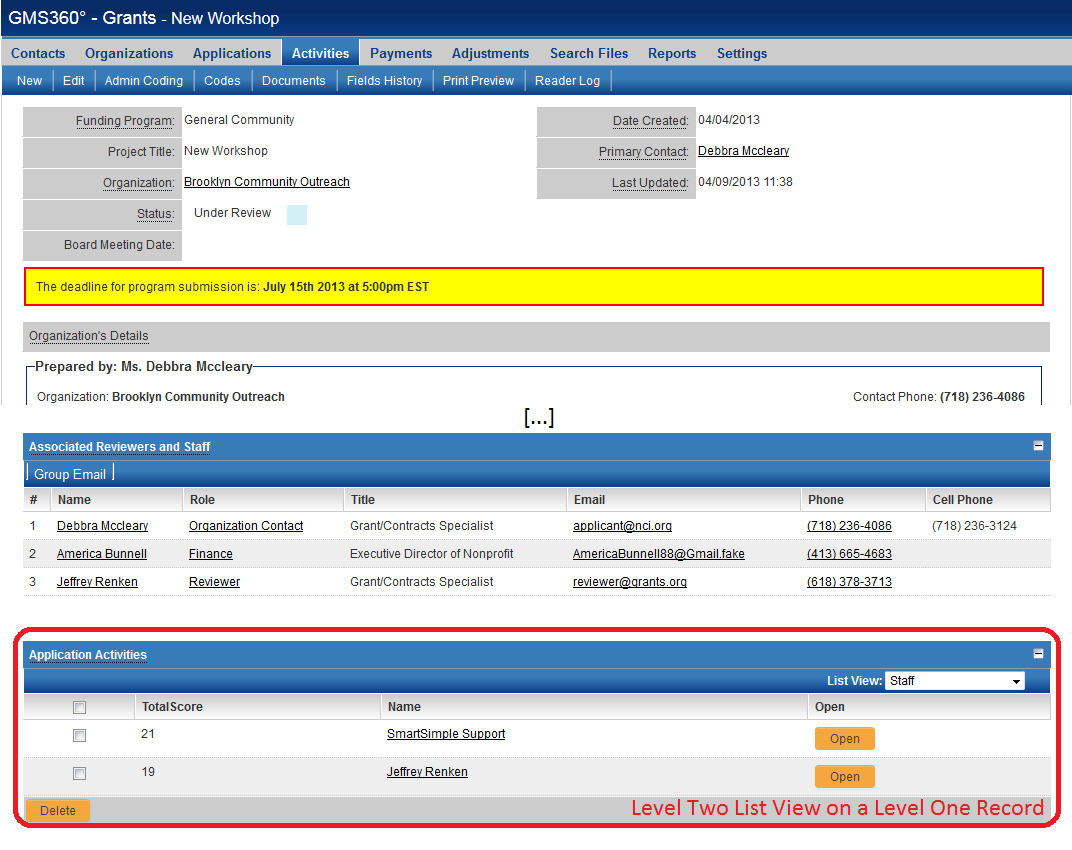
On other list views (such as for Organizations and Contacts, rather than Universal Tracking Applications, you will see an icon to the top right of the list view that enables Batch Updates.

Contact and Company List Views
The screenshot above is an example of a Contacts list view. List views can also be configured for Company and Account records. These list views are configured on the Global Settings page under [[bs://User User & Contact Settings ]] and [[bs://Company Company & Account Settings]], respectively.
Within each separate application, the Account and Contact list views can be independently configured to display different fields. See this page for information on accessing the list view configuration pages for specific entities.
List Views in a Universal Tracking Application
- Within the Universal Tracking Application, the Settings page allows you to define the list view for Level 1, Level 2 and Level 3 records, as well as the Accounts and/or Contacts sections on the Level 1 records (if the Contacts/Accounts Standard Fields have been enabled).
- The List View defined for Level 2 will apply both to the list view on the Level 2 tab, and the list of associated Level 2s at the bottom of a Level 1 record, if shown.
- Similarly the Level 3 list view applies also to the Level 3s listed at the bottom of a Level 2 record.
If Display as Tab has been enabled for a Level 2 Type you can personalize the List View for the items listed on that tab If you use the same Tab Label for more than one Level 2 Type (thus grouping multiple Types onto the same Tab) it will also use the List View configured on the Settings page the same List View as the Other Level 2 Types tab Within most other Applications you can set the List View via the Settings page Some list views contain special items and cannot be configured such as the list of Applicants on an Opportunity within Sales Tracking When viewing the list of Contacts you can set the List View by clicking on the Edit View tab br Image Editviewimage png Note changes here will affect the Contacts List View throughout SmartSimple (UTA Contacts Tab Search People Sales Tracking etc ) as well as the Accounts and or Contacts sections on the Level 1 records (if the Contacts Accounts Standard Fields have been enabled)
See Also
- List View Overview
- Accessing the List View Configuration Page
- Configuring List Views
- Setting the Sort Order on a List View
- Exporting List View Results to Microsoft Excel
- Exporting List View Results to Microsoft Word
- Download files from List View
- Preparing Existing Word Template for List View Export
- Quick Edit
- Historic List View
- Configuring Interactive List View Charts
Using Reports vs List Views
| Determining the Application Tabs Displayed to the User |