Difference between revisions of "Arcadia Settings"
| (87 intermediate revisions by 5 users not shown) | |||
| Line 1: | Line 1: | ||
| − | Arcadia | + | =Overview= |
| + | Once Arcadia has been [[Arcadia Permissions|enabled]], then you are able to configure the Arcadia settings specific to each {{UTA}} in your [[SmartSimple]] [[instance]], including the ability to have cross-tabbed standard views with drill-down options and [[KPI]]s for simplified presentation of important metrics. | ||
| − | + | =Configuration - Essentials= | |
| + | ==Accessing Arcadia Settings== | ||
| + | To access Arcadia settings for a specific UTA, follow the steps below: | ||
| − | + | 1. Click on the 9-square menu icon on the top right of your page. | |
| − | + | :: {{Icon-Menu}} | |
| + | 2. Under the heading '''Applications''', select the relevant UTA. | ||
| − | + | 3. Click on the '''gear icon''' underneath the application name to go into '''Configuration Mode'''. | |
| − | + | 4. Under the '''General Settings''' tab is a subsection titled '''Arcadia Interface Options'''. | |
| − | + | :: [[File:Arcadia interface options.png|600px|border]] | |
| − | + | You are able to configure these additional options and expose them to the end-user based on their [[User Role|role]] within the instance. | |
| − | |||
| − | |||
| − | |||
| − | + | {| class="wikitable" | |
| − | + | |- | |
| − | + | !|Arcadia Interface Option | |
| + | !|Function and Features | ||
| + | |- | ||
| + | ||'''Summary and [[List View Overview|List View]] Options''' | ||
| + | ||Determine which [[User Role|user roles]] will have the ability to see summaries (for example, of {{L1}} grants in a grant-based [[UTA]] or of {{L2}}/{{L3}} activities associated with that UTA); determine which users will have [[KPI]] functionality, [[Reports]] as a tab view, and the [[Advanced Search]] feature within the UTA. | ||
| + | |- | ||
| + | ||'''[[KPI]] Settings''' | ||
| + | ||Determine how the [[KPI]]s for that UTA will be displayed, and create new KPIs if applicable. | ||
| + | |} | ||
| + | ===Summary and List View Options=== | ||
| + | The '''Summary and List View Options '''under '''Arcadia Interface Options '''in a specific UTA allows you to configure the summary and list view options for the Arcadia [[:Category:Interface|interface]] under that UTA. | ||
| − | * | + | <pre>Please note that the terminology associated with your Arcadia settings will be UTA-specific and may change based on your organization terminology. </pre> |
| + | * See [[Organization hierarchy#Organization Terminology|General Terminology]] | ||
| − | + | :: [[File:Arcadia settings list view options 2019.png|thumb|none|655px|Settings available for Summary and List View Options.]] | |
| + | {| class="wikitable" | ||
| + | |- | ||
| + | !|Subsection of Settings | ||
| + | !|Descriptions of Settings | ||
| + | |- | ||
| + | ||'''General''' | ||
| + | || | ||
| + | '''Enable [[Advanced Search]] - '''Select which [[User Role|user roles]] will have the Advanced Search capability in this UTA, where they can filter [[List View Overview|list view results]] by [[Status]], [[Type]], etc, as well as customize and save their [[Filters]]. | ||
| + | '''Enable KPI - ''' | ||
| − | + | '''Enable Reports tab -''' | |
| − | + | |- | |
| + | ||'''L1 Summary''' | ||
| + | || | ||
| + | '''Enable Summary View - ''' | ||
| − | + | '''View Grant Group Status - ''' | |
| + | '''Grant Type to Omit for Summary - ''' | ||
| − | + | '''Grant Status to Omit for Summary - ''' | |
| − | + | '''Grant Summary Options: ''' | |
| + | * Application Type | ||
| + | * Branch | ||
| + | * Organization | ||
| + | * Applicant | ||
| + | * Grant Staff | ||
| − | + | |- | |
| + | ||'''L2 Summary''' | ||
| + | || | ||
| + | '''Enable Summary View - ''' | ||
| − | + | '''View Activity Group Status - ''' | |
| + | '''Activity Type to Omit for Summary - ''' | ||
| − | + | '''Activity Status to Omit for Summary - ''' | |
| − | + | |} | |
| + | A number of additional options can be configured and exposed to the end-user based on role: | ||
| − | * | + | * Summary and List View Options |
| + | ** Configure Summary and List View Options for Arcadia interface | ||
| + | * [[Arcadia - KPI Settings|KPI Settings]] | ||
| + | ** Configure KPI (Key Performance Index) for Arcadia | ||
| − | [[Image: | + | [[Image:Grant_summary_settings.png|link=|border]] |
| + | [[Image:Activity_summary.png|link=]] | ||
| − | + | [[Image:Arcadia_tab_settings.png|link=]] | |
| − | [[ | + | ==See Also== |
| + | ** [[Enabling Arcadia]] | ||
| + | [[Category:Global Settings]][[Category:Interface]][[Category:Arcadia]] | ||
Latest revision as of 15:25, 15 July 2019
Contents
Overview
Once Arcadia has been enabled, then you are able to configure the Arcadia settings specific to each in your SmartSimple instance, including the ability to have cross-tabbed standard views with drill-down options and KPIs for simplified presentation of important metrics.
Configuration - Essentials
Accessing Arcadia Settings
To access Arcadia settings for a specific UTA, follow the steps below:
1. Click on the 9-square menu icon on the top right of your page.

2. Under the heading Applications, select the relevant UTA.
3. Click on the gear icon underneath the application name to go into Configuration Mode.
4. Under the General Settings tab is a subsection titled Arcadia Interface Options.

You are able to configure these additional options and expose them to the end-user based on their role within the instance.
| Arcadia Interface Option | Function and Features |
|---|---|
| Summary and List View Options | Determine which user roles will have the ability to see summaries (for example, of Level 1 grants in a grant-based UTA or of Level 2/Level 3 activities associated with that UTA); determine which users will have KPI functionality, Reports as a tab view, and the Advanced Search feature within the UTA. |
| KPI Settings | Determine how the KPIs for that UTA will be displayed, and create new KPIs if applicable. |
Summary and List View Options
The Summary and List View Options under Arcadia Interface Options in a specific UTA allows you to configure the summary and list view options for the Arcadia interface under that UTA.
Please note that the terminology associated with your Arcadia settings will be UTA-specific and may change based on your organization terminology.

| Subsection of Settings | Descriptions of Settings |
|---|---|
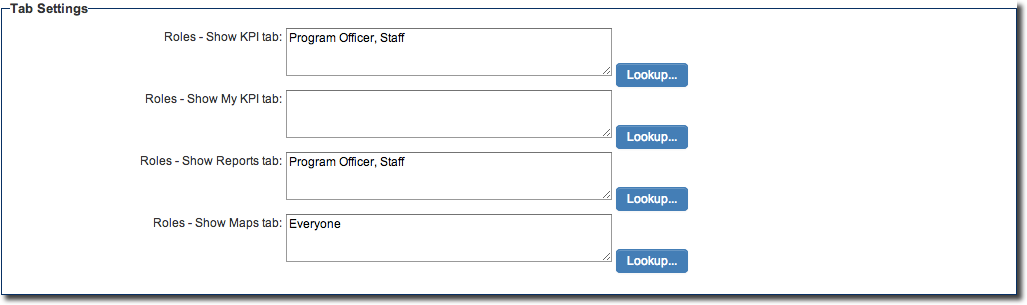
| General |
Enable Advanced Search - Select which user roles will have the Advanced Search capability in this UTA, where they can filter list view results by Status, Type, etc, as well as customize and save their Filters. Enable KPI - Enable Reports tab - |
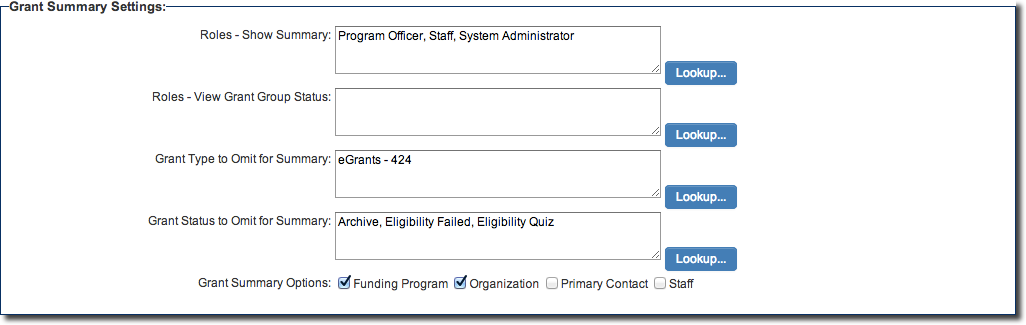
| L1 Summary |
Enable Summary View - View Grant Group Status - Grant Type to Omit for Summary - Grant Status to Omit for Summary - Grant Summary Options:
|
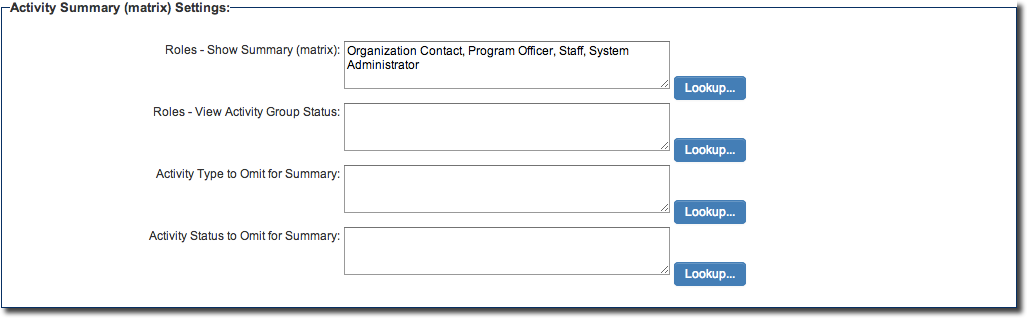
| L2 Summary |
Enable Summary View - View Activity Group Status - Activity Type to Omit for Summary - Activity Status to Omit for Summary - |
A number of additional options can be configured and exposed to the end-user based on role:
- Summary and List View Options
- Configure Summary and List View Options for Arcadia interface
- KPI Settings
- Configure KPI (Key Performance Index) for Arcadia