Difference between revisions of "Translation Import/Export"
(→Creating Translation File - Arcadia) |
(→Creating Translation File - Arcadia) |
||
| Line 14: | Line 14: | ||
[[File:Translationfile3.PNG|750px|http://wiki.smartsimple.com/wiki/File:Translationfile3.PNG]]<br /> | [[File:Translationfile3.PNG|750px|http://wiki.smartsimple.com/wiki/File:Translationfile3.PNG]]<br /> | ||
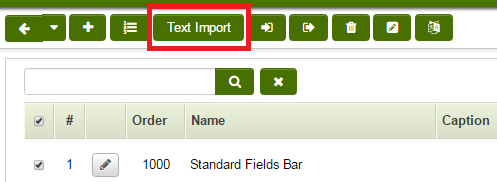
9. Go back to the Custom Field page and click the "Text Import" button at the top.<br /> | 9. Go back to the Custom Field page and click the "Text Import" button at the top.<br /> | ||
| − | [[File:Translationfile4.PNG| | + | [[File:Translationfile4.PNG|750px|http://wiki.smartsimple.com/wiki/File:Translationfile4.PNG]]<br /> |
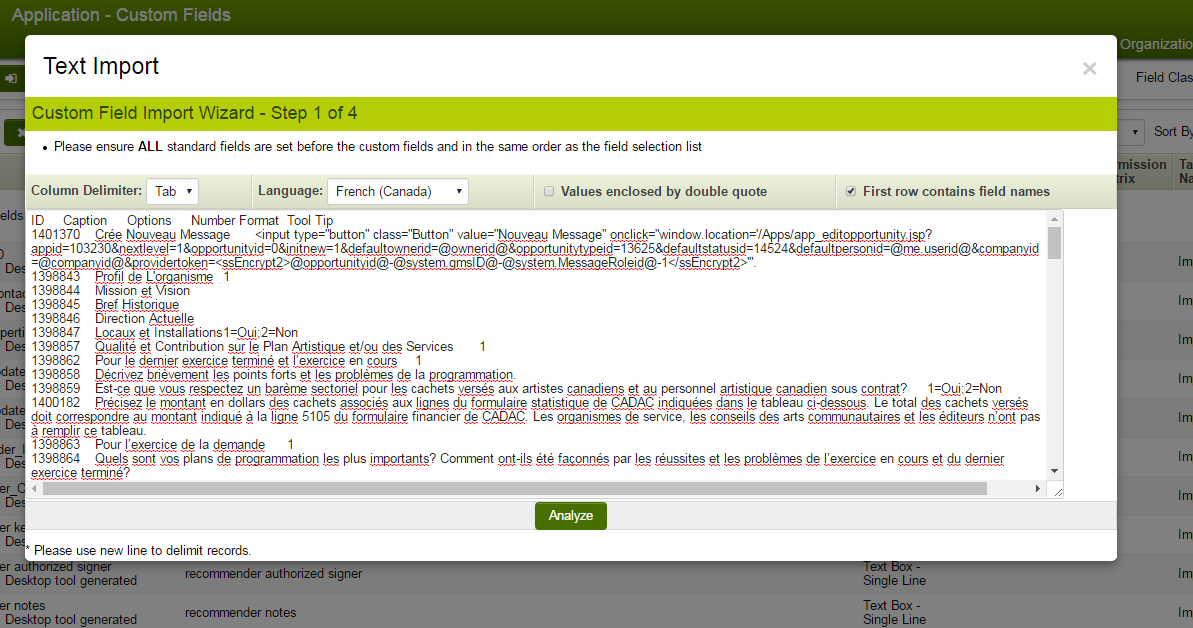
10. Paste the data from above in the box shown. Make sure to select the Column Delimiter, we will select the Tab in this case. Select the appropriate options in the box and click the "Analyze" button.<br /> | 10. Paste the data from above in the box shown. Make sure to select the Column Delimiter, we will select the Tab in this case. Select the appropriate options in the box and click the "Analyze" button.<br /> | ||
[[File:Translationfile5.PNG|1000px|http://wiki.smartsimple.com/wiki/File:Translationfile5.PNG]]<br /> | [[File:Translationfile5.PNG|1000px|http://wiki.smartsimple.com/wiki/File:Translationfile5.PNG]]<br /> | ||
Revision as of 14:50, 21 July 2016
System Administrators are able to export custom field translation settings as XML files and import custom field translation setting files that are XML. The Translation Import and Translation Export tabs are available within any Custom Fields Settings page.
Contents
Creating Translation File - Arcadia
1. Go to the UTA, in this case we will go to the Submission Manager
2. Go to Configuration Settings
3. Go to Level 1 Custom Fields
4. We want to Create a Translation File for all custom fields in this UTA.
5. Select the check box at the top to Select All custom fields.
6. Click the "Create Translation File" button at the top.
7. Select the file format, for this case we will use Excel 2010.
8. Delete the first column of each Setting/Property as the second (duplicate) column will be what the translation will be, followed by copying all in the excel sheet.
9. Go back to the Custom Field page and click the "Text Import" button at the top.
10. Paste the data from above in the box shown. Make sure to select the Column Delimiter, we will select the Tab in this case. Select the appropriate options in the box and click the "Analyze" button.
11. Map the columns to match the columns in the excel sheet followed by clicking the "Parse Data" button.
12. This window will make sure that the fields are mapped correctly, if there seems to be an error in any of these, it will not be parsed into the instance. Once checked, click the "Upload" button, it will then show if the fields Successful or Failed.
Accessing the Translation Import/Export Tabs - Classic
- Go to Global Settings
- Under System Variables and Custom Fields, click on the hyperlink for Custom Fields
- Using the left menu, select the Custom Fields you would like to translate. The associated custom fields will load within the main window once selected.
- Above the list of custom fields you will see a language dropdown selection field. Use this to select the language you wish to add translations for.
- With a language other than English (Default) selected you will notice the Import and Export tabs have now changed to Translation Import and Translation Export. These tabs provide you the ability to export the existing field translation settings for the selected language in XML format, or import XML-formatted field translation settings.
Translation XML Sample Breakdown
The following are samples of Translation XML files and how to update the data.
<customfield>
            <language>14</language>
            <id>1234567</id>
            <caption><span style="color:red">Are you a charitable organization?</span></caption>
            <captiontranslation><span style="color:red">¿Eres una organización de caridad registrada?</span></captiontranslation>
            <formatxml>
                        <audit>1</audit>
                        <maxp>0</maxp>
                        <searchable>0</searchable>
                        <wvp>,</wvp>
            </formatxml>
            <formatxmltranslation>
                        <audit>1</audit>
                        <maxp>0</maxp>
                        <searchable>0</searchable>
                        <wvp>,</wvp>
            </formatxmltranslation>
            <options>No;Yes</options>
            <optionstranslation>No;Sí</optionstranslation>
            <numberformat></numberformat>
            <numberformattranslation></numberformattranslation>
            <tabname></tabname>
            <tabnametranslation></tabnametranslation>
</customfield>
Translations for the above field are contained within the following XML tags:
- <captiontranslation> </captiontranslation>
- <formatxmltranslation> </formatxmltranslation>
- <optionstranslation> </optionstranslation>
- <numberformattranslation> </numberformattranslation>
- <tabnametranslation> </tabnametranslation>
- <language>14</language>
- This tag contains the language ID. See the Language page for a list of language IDs.
- <id>1234567</id>
- This tag contains the Custom Field ID. This is used for matching when importing the file and must remain exactly as exported.
- <captiontranslation> </captiontranslation>
- These tags contain the translated caption as will be visible to the end user with the matching language ID settings.
- <optionstranslation> </optionstranslation>
- Should the field be a checkbox or combo box field, you will be provided with this tag in which to enter the translations for the options.
- <tabnametranslation></tabnametranslation>
- This tag controls the translation of the tab in which the field exists.


