Difference between revisions of "System Settings"
| Line 64: | Line 64: | ||
You can clear this setting by clicking the '''Clear''' button. | You can clear this setting by clicking the '''Clear''' button. | ||
| − | <u>'''Wireless Settings'''</u> | + | <!--<u>'''Wireless Settings'''</u> |
[[Image:Ps13.png]] | [[Image:Ps13.png]] | ||
* '''Wireless Login ID''' - the pass code you must use to access [[SmartSimple]] using your cell phone or other wireless devices. | * '''Wireless Login ID''' - the pass code you must use to access [[SmartSimple]] using your cell phone or other wireless devices. | ||
| − | * To access SmartSimple via your web enabled cell phone or personal digital assistant go to the following [[URL]]: '''http://youralias.smartsimple.com/wml/''' | + | * To access SmartSimple via your web enabled cell phone or personal digital assistant go to the following [[URL]]: '''http://youralias.smartsimple.com/wml/'''--> |
Revision as of 12:36, 26 August 2013
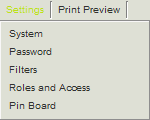
A user's System Settings are access through the Settings tab on the user's profile:
- Under the Configuration heading of the left menu bar, click on Personal Settings, or click on your name in the top left corner of the screen.
- From this page, select Settings > System from the menu bar.
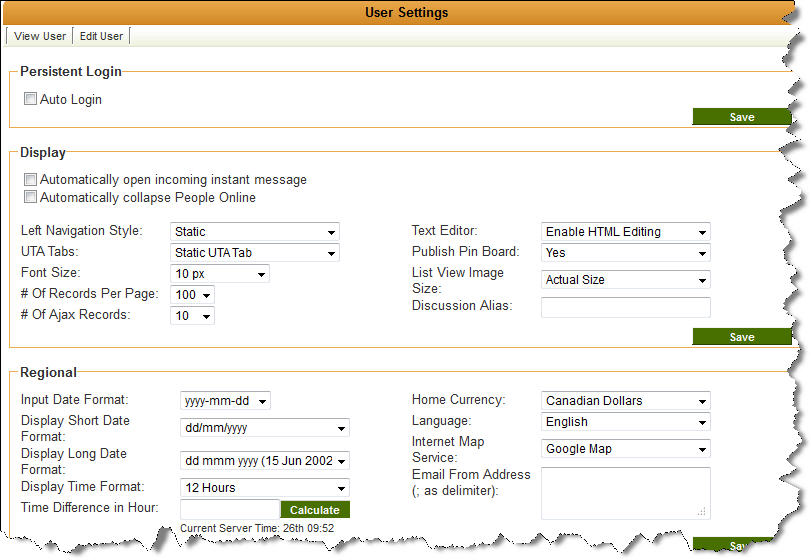
The User Settings page is displayed.
Use this page to set the following values:
User Settings – Persistent Login
Rather than having to log in to SmartSimple each time you open your web browser, a "cookie" can be installed on your computer that will automatically authenticate you, allowing you to bypass the login screen. (This setting can be enabled or disabled by your system administrator). In order for this feature to work, you must have the user's browser enabled to accept persistent cookies.
User Settings – Display Options
- Automatically open incoming instant messages – opens the quick message window whenever a message is received.
- Automatically collapse People Online – displays the people online collapsed.
- Left Navigation Style' – choose Static for menus that don’t expand or Dynamic for menus that open and close.
- Number of Records Per page – defines the number of records per page you wish to see when information is displayed as a list. You can choose 5, 10, 15, 20, 30, 40, 60, 80 or 100.
- Text Editor – enables and disables the HTML Editor.
- Publish Pin board – make your personal Pin board visible to other people.
- List View Image Size – determines the size of images in reports and list views.
- Discussion Alias – an anonymous name you wish to use when posting to SmartSimple discussions that are enabled for public access.
User Settings – Regional Options
These options determine your regional settings.
- Input Date Format – the individual user's preferred entry format for date time values.
- Input Short Date Time Format – the individual user's preferred short display format for date time values.
- Input Long Date Time Format – the individual user's preferred link format for date time values.
- Regardless of the date time format selected, the date and time will be shown to other user's in their own preferred settings.
- Time Difference (in hours) – used to set your local time.
- Home Currency – the default currency for this user. This currency will be referenced in applications such as Sales Tracking and Expense Tracking. This currency will be assumed to be the default currency for this user in these applications.
- Language – the language that you wish to use.
- Internet Map Service – determines the Internet service you wish to use when displaying maps.
- If you enable the Internet Map feature, then the Map icon will be displayed next to each address.

User Setting – New User Default Settings
The next set of options is used to control how the system should handle new contacts that you add to the system.
- Company – determines the company to which individual contacts should be added – if you do not select a company before creating the new contact. Generally, you will create a new company named “general contacts” and set this as the default company in this field.
- Role – determines the “type” of contact that you most frequently will be adding to the system. This feature ensures that the correct fields are displayed for a new contact specific to your needs.
- Default ATS Folder – determines which folder to use for new applicants – only used in conjunction with the Applicant Tracking System.
Cache
When you work with calendar pop-ups you can drag the calendar to any location on the screen and the system will remember that location. So the next time you access a pop-up calendar it will be displayed in the same location.
You can clear this setting by clicking the Clear button.


