Difference between revisions of "Address Types"
| (3 intermediate revisions by the same user not shown) | |||
| Line 164: | Line 164: | ||
===Enabling Multiple Address Types=== | ===Enabling Multiple Address Types=== | ||
| + | Enabling multiple address types will allow multiple addresses for the same organization. To add the multiple addresses, this is configured on the '''Custom Field: Address Type '''for that organization. This is a useful feature when you would like, for example, to associate one organization with numerous addresses that might respectively correspond to Office, Primary, Alternate, etc. '''<br />''' | ||
| + | |||
| + | To enable Multiple Address Types, follow these steps: | ||
| + | |||
| + | 1. Click on the 9-square menu icon on the top right of your page. | ||
| + | |||
| + | :: {{Icon-Menu}} | ||
| + | 2. Under the heading '''Configuration, '''select '''Global Settings. ''' | ||
| + | |||
| + | 3. On the first tab, scroll down until the subheading '''System Options '''and toggle on the '''Enable Multiple Addresses '''feature. | ||
| + | |||
| + | :: [[File:Address type enable multiple address.png|450px|border]] | ||
| + | |||
| + | 4. Press '''Save''' at the bottom of the page. | ||
| + | |||
| + | Once you have toggled on this option and saved your change, you have the ability to associate organizations and users to multiple addresses. | ||
| + | |||
===Referencing Address Types=== | ===Referencing Address Types=== | ||
:* The @primaryaddress@ and @addressbook@ variables can be used to reference addresses when multiple address types are enabled. See [[Address Book Template]] for more information. | :* The @primaryaddress@ and @addressbook@ variables can be used to reference addresses when multiple address types are enabled. See [[Address Book Template]] for more information. | ||
:* Individual Address Type values can be referenced using the [[Web_Page_View_Field_Variables#To_Display_a_List_of_Activities.2C_Notes.2C_Transactions.2C_Contacts.2C_Companies.2C_Consumers.2C_Providers|list syntax]] [#(?object=address) ... #] under a user or company. | :* Individual Address Type values can be referenced using the [[Web_Page_View_Field_Variables#To_Display_a_List_of_Activities.2C_Notes.2C_Transactions.2C_Contacts.2C_Companies.2C_Consumers.2C_Providers|list syntax]] [#(?object=address) ... #] under a user or company. | ||
| + | |||
| + | ===Troubleshooting Address Types=== | ||
| + | The two key issues that we experience with users needing troubleshooting for Address Types is that they have not enabled '''Multiple Address''' function from the '''Global Settings''' page, or they have not made one of the Address Types in their system a '''Default''' for either Users or Organizations, a function which can be modified directly in that Address Type's page. | ||
| + | |||
| + | If you have other problems with Address Types and would like more hands-on support, please feel free to contact our [[How the SmartSimple Support Desk Works|Support Desk]], which provides 24-5 support for all of our clients. | ||
==See Also== | ==See Also== | ||
:* [[Viewing Address Types]] | :* [[Viewing Address Types]] | ||
| − | |||
:* [[Address Book Template]] | :* [[Address Book Template]] | ||
:* [[Importing Address]] | :* [[Importing Address]] | ||
[[Category:Global Settings]][[Category:Contacts]] | [[Category:Global Settings]][[Category:Contacts]] | ||
Latest revision as of 14:17, 17 June 2019
Overview
The Address Types setting allows you to define a number of different address types to be used elsewhere in the system.
Configuration - Essentials
Example of Address Type
Address Types are available to a user with a role that an Address Type has been made available to; similarly, they are available to an organization with a category that an Address Type has been made available to.
When accessing the profile of a user or organization, viewing their address details will reveal the relevant Address Type. If you are in the System Administrator role, you will also have the ability to modify the Address Type from the profile by editing the existing address or adding new addresses.
Accessing Address Types
In order to use this feature, follow these steps:
1. Click on the 9-square menu icon on the top right of your page.
2. Under the heading Configuration, select Global Settings.
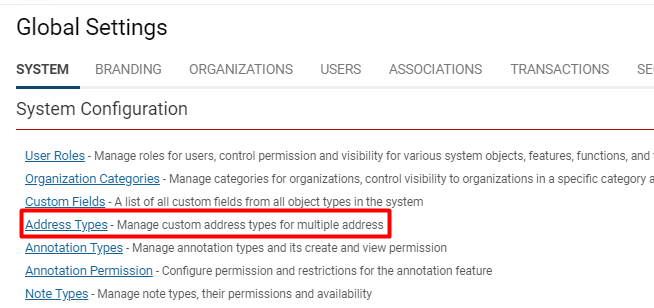
3. Under the first tab, select Address Types.
The list of available Address Types will be displayed. If there are none in the system, this page will be blank. You can create and configure new Address Types by selecting the + icon on the top left of your page. You can edit existing Address Types by selecting the pencil icon on the left of each Type name.
Manually Creating a New Address Type
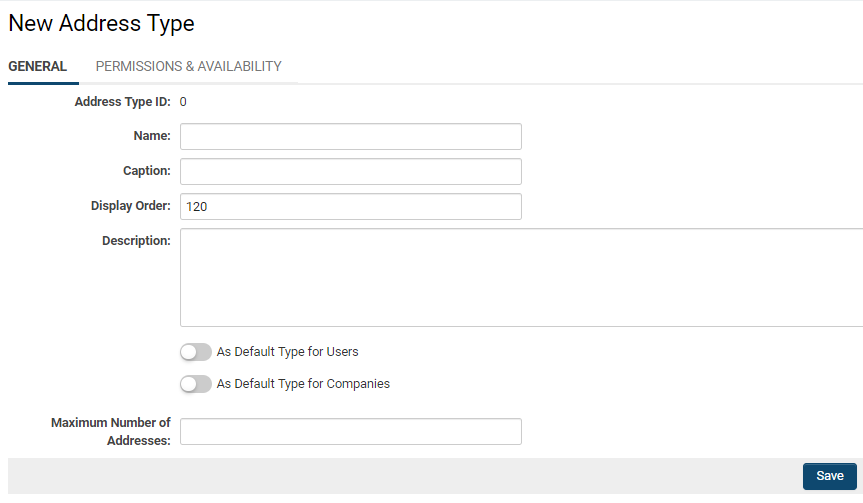
To create a new Address Type manually, after clicking the + icon from the Address Types page, you must fill in the fields for the new type.
| Name | Text used to identify an address type |
| Caption | Normally the same as Name, unless you want to add a label for the address type that is different |
| Display Order | Address types will be displayed in the drop-down with regards to the display order, with the lowest value of display order appearing first in the drop-down list. |
| Description | A general description for the address type |
| Colour Code | An optional colour code for the address type when displayed |
| Default Type |
In order to use the Multiple Addresses feature, a default address must be selected.
Note: Enabling either of these will make all roles (for Users) and all categories (for Companies) have access to this Address Type. |
| Maximum Number of Addresses | The maximum quantity of this specific type of address allowed. |
If a Default Type is not set on an Address Type - either for Users or Companies - the combo box for Address Types will not be displayed when adding/editing an address record.
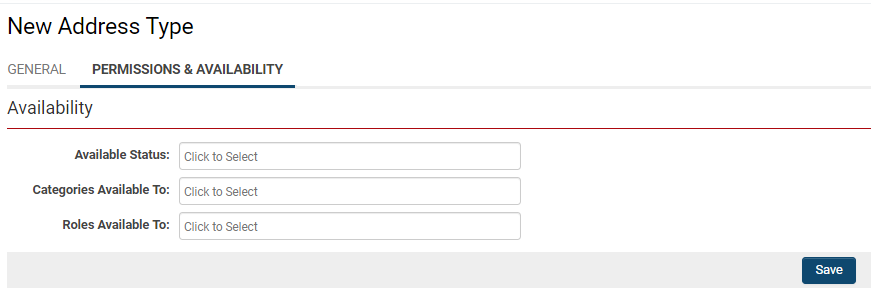
Click Save once you are done filling out the fields, and click onto the second tab, Permissions and Availability.
Click into each text box to select which statuses, roles, and categories will have access to this Address Type from within their user or company profile. Depending on whether you have enabled the Address Type as a default for Users or Categories, you will not have the option to select specific roles or categories - instead, the default function makes this Address Type available to all.
Once the fields are populated as required, click Save.
The details of the new Address Type will display on a new page, indicating that it is now available on the list of Address Types available in your SmartSimple instance.
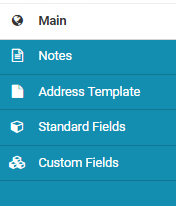
On the left hand side, the menu items related to Address Types will be displayed:
| Main |
The General tab displays the descriptive information related to the Address Type:
The second Permissions & Availability tab denotes the roles, statuses, and categories able to access this Address Type. |
| Notes | You can create, edit and view notes attached to this Address Type. |
| Address Template | You can create, edit and view the address template associated with this Address Type. The address template is a feature used to personalize the block of text that is returned when using the @addressbobok@ variable. See the Address Book Template page for configuration instructions. |
| Standard Fields | Learn how to add Standard Fields to Address Type. |
| Custom Fields | Learn how to add Custom Fields to Address Type. |
Importing Address Types
On the main Address Types page, you have the options to either import new records as Address Types into the system, or export the existing Address Types.
Exporting Address Types
In order to use this feature, you must first go to Global Settings > System and check off the "Enable Multiple Address" option.
- IMPORTANT: when enabling you must follow the instructions on the Importing Address Wiki article to ensure the existing addresses are retained. If the Enable Multiple Address option is turned on without importing addresses from existing profiles or loading a new set of addresses, whenever a new address is added to a profile, the original data stored in the profile address will be lost
Configuration - Advanced
Add Custom Fields to Address Type
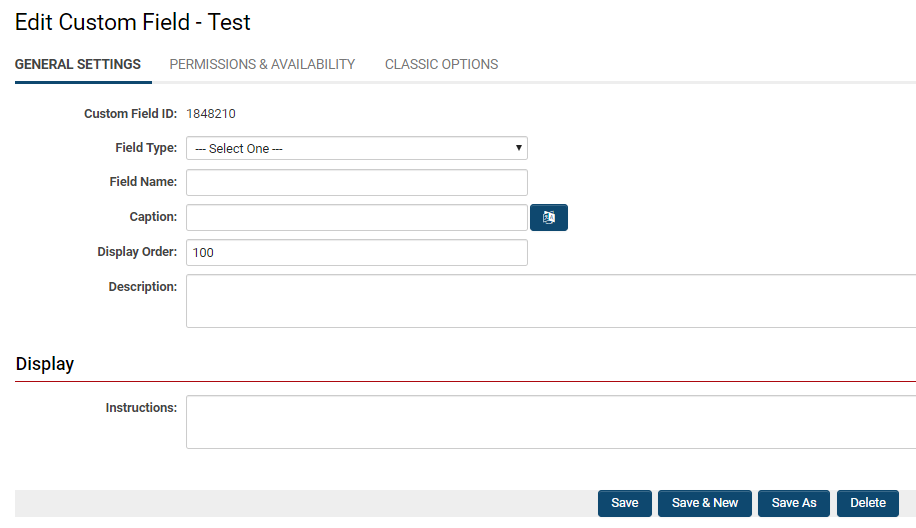
After clicking into the specific Address Type you want to configure, go to the left-hand menu and select Custom Fields.
Once the custom fields page is open, click the + icon on the top right above the Custom Fields list to create a new Custom Field.
The New Custom Field window is displayed, with existing options for configuring required custom fields.
See Custom Fields - General Information for further details about configuring custom fields.
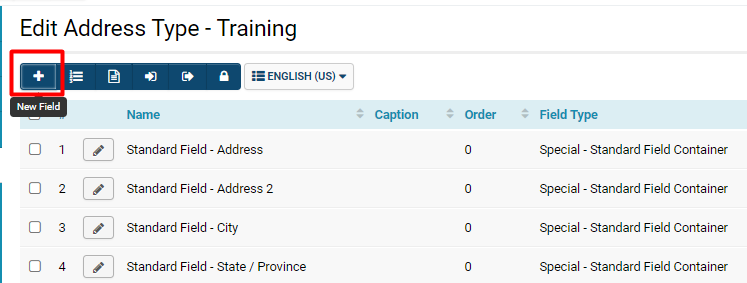
Add Standard Fields to Address Type
On the Address Type list page, click on the pencil icon to the left of the Address Type you want to add and configure Standard Fields to.
On the left hand menu of that Address Type page, select the Standard Fields tab.
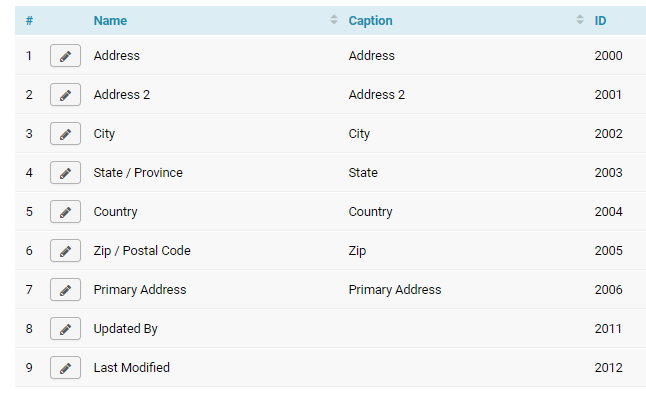
A list of the available Standard Fields associated with Address Type will appear.
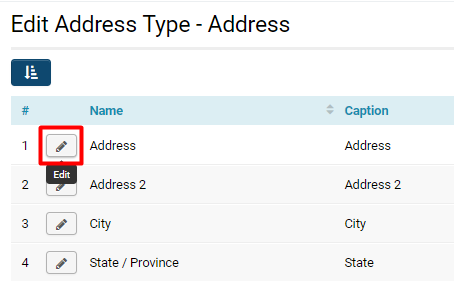
Click on the pencil icon next to the Standard Field that you want to add and configure.
The Standard Field configuration window will open, allowing you to configure the visibility and validation that you wish to apply for this specific field.
See the Standard Fields page if you require more information about Standard Fields.
Address Template
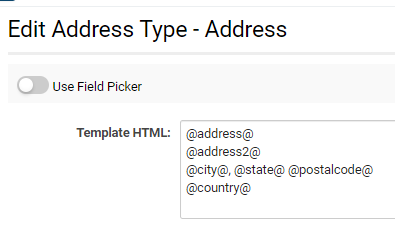
The Address Template feature, found as a tab on the left hand menu when opening an Address Type's details, allows users to modify and configure how the Address Type is displayed and what it displays.
There are two options to configuring the Address Template: through HTML or through the Field Picker, which allows more accessible and easy drag-and-drop functionality for configuration.
To toggle from HTML template configuration to the Field Picker, toggle on the Use Field Picker option at the top of the Address Template page.
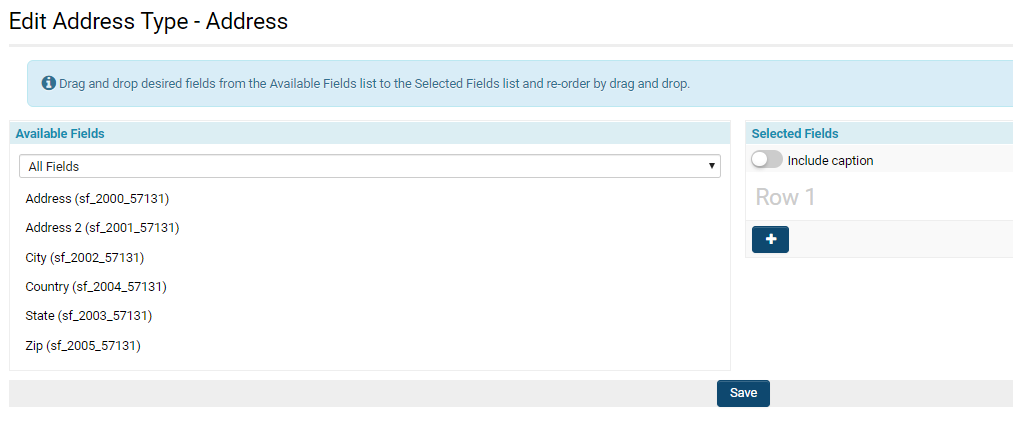
The Field Picker feature will allow you to drag and drop available fields to customize the display that you want to appear for that Address Type.
Add different variables together in one column; for example, you might want to combine both Address lines together. If you would like labelled captions above each row, toggle on Include Caption. When you want to add a new row, click the + icon located on the right side of the page, underneath the Selected Fields square.
Click Save when the Address Template is complete.
Enabling Multiple Address Types
Enabling multiple address types will allow multiple addresses for the same organization. To add the multiple addresses, this is configured on the Custom Field: Address Type for that organization. This is a useful feature when you would like, for example, to associate one organization with numerous addresses that might respectively correspond to Office, Primary, Alternate, etc.
To enable Multiple Address Types, follow these steps:
1. Click on the 9-square menu icon on the top right of your page.
2. Under the heading Configuration, select Global Settings.
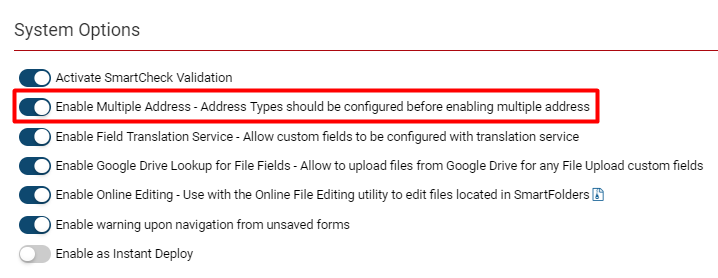
3. On the first tab, scroll down until the subheading System Options and toggle on the Enable Multiple Addresses feature.
4. Press Save at the bottom of the page.
Once you have toggled on this option and saved your change, you have the ability to associate organizations and users to multiple addresses.
Referencing Address Types
- The @primaryaddress@ and @addressbook@ variables can be used to reference addresses when multiple address types are enabled. See Address Book Template for more information.
- Individual Address Type values can be referenced using the list syntax [#(?object=address) ... #] under a user or company.
Troubleshooting Address Types
The two key issues that we experience with users needing troubleshooting for Address Types is that they have not enabled Multiple Address function from the Global Settings page, or they have not made one of the Address Types in their system a Default for either Users or Organizations, a function which can be modified directly in that Address Type's page.
If you have other problems with Address Types and would like more hands-on support, please feel free to contact our Support Desk, which provides 24-5 support for all of our clients.
