Difference between revisions of "Adding Standard and Custom Fields to Level 1"
Julia Decker (talk | contribs) (→Custom Fields UTA Status Permissions) |
Julia Decker (talk | contribs) (→Level 1 Standard Field Features) |
||
| Line 37: | Line 37: | ||
* '''Mandatory''' check box will make the field mandatory before the record can be saved. This validation can be bypassed when saving the item as a draft by using the Save Draft button. | * '''Mandatory''' check box will make the field mandatory before the record can be saved. This validation can be bypassed when saving the item as a draft by using the Save Draft button. | ||
* '''Read Only''' check box restricts the field from being changed by the user. The field can still be updated programmatically through the use of a template formula. | * '''Read Only''' check box restricts the field from being changed by the user. The field can still be updated programmatically through the use of a template formula. | ||
| − | * '''Track Changes''' check box tracks any changes made to the | + | * '''Track Changes''' check box tracks any changes made to the standard field. |
* '''Label''' text box is used to adding and renaming a field. | * '''Label''' text box is used to adding and renaming a field. | ||
* '''Instruction''' text box is used to provide mouse over help on a field. Type the help in the instruction box to the right of the label box. | * '''Instruction''' text box is used to provide mouse over help on a field. Type the help in the instruction box to the right of the label box. | ||
Revision as of 14:38, 10 September 2007
Contents
[hide]Adding the Standard fields for Level 1
In this article, you will choose from the built-in field lists for Level 1 and then add custom fields to complete the Level 1 Entity.
As standard fields can only be added through the Configuration page you need to access this page before you begin. There are a number of methods to access the Configuration page.
1. Click Configuration, Tracking Applications.
2. Click the Edit button for the Contract Tracking application.
Alternatively, you can access the Configuration page from the application.
3. Click the Application name in the Application menu.
4. Click the Settings tab.
5. Click the Application Configuration link.
The Application Configuration page is displayed.
6. Click Contract Settings, Standard Fields link.
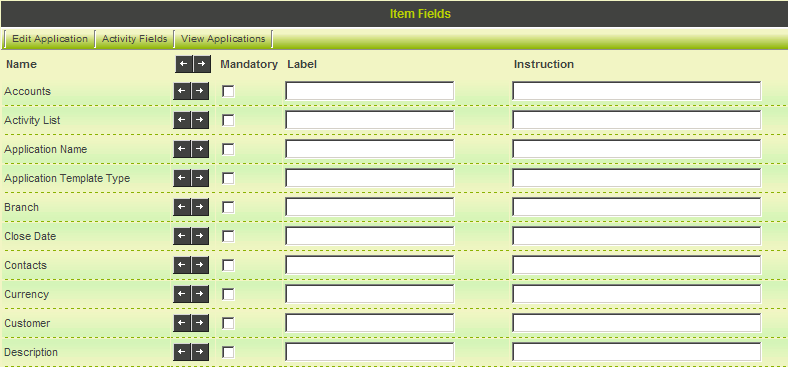
The Standard field list is displayed.
This page is used to determine which standard Level 1 Entity fields you wish to use in your application.
Level 1 Standard Field Features
- Adding a field – Click the right arrow next to the field name and the field name will be copied to the label box.
- Removing a field – Click the left arrow next to the field name or select and delete the field name from the label box.
- Mandatory check box will make the field mandatory before the record can be saved. This validation can be bypassed when saving the item as a draft by using the Save Draft button.
- Read Only check box restricts the field from being changed by the user. The field can still be updated programmatically through the use of a template formula.
- Track Changes check box tracks any changes made to the standard field.
- Label text box is used to adding and renaming a field.
- Instruction text box is used to provide mouse over help on a field. Type the help in the instruction box to the right of the label box.
- Validation Message text box is used to control the message that is displayed when the user enters an invalid entry and attempts to save the items.
Standard Level 1 Field List
The following standard fields are available at Level 1. The captions of some of these fields such as companies, offices, branches, etc, are based on the global terminology defined through the Configuration, Global Settings menu.
- Accounts - Provides the ability to add multiple accounts to the Level 1 item. This field is used when you need to associate multiple organisations with a single Level 1 item. Each account will be associated with the Level 1 item through the company role.
- Activity List - The list of Level 2 items associated with a Level 1 item. This list will be displayed at the bottom of the Level 1 item page. This field is always required if your application has Level 2 items.
- Application Name - A name for the Level 1 item – if required. If used, this name will be displayed in the title bar for that item.
- Application Template Type - A combo box displaying all the Level 1 templates that you define. You will always use this field if you have more than one type of Level 1 item.
- Branch - Links the Level 1 item to the internal company hierarchy using a combo box. If you want to associate a Level 1 item with specific internal locations use this field.
- Close Date - Milestone date. You can use this for any date you need by setting the caption.
- Contacts - The ability to add multiple contacts to the Level 1 item. This field is used when you need to associate multiple organisations with a single Level 1 item. Each contact will be associated with the Level 1 item through the contact assignment role.
- Currency - Used in conjunction with amount field to control currency conversion.
- Customer - A company lookup field to link the Level 1 item to one specific company.
- Description - Narrative description text box.
- End Date - Milestone date – initially set to current date.
- End Time - Milestone time – initially set to current time.
- Folders - Provides the ability to link the Level 1 item to a Smart Folder.
- Modified Date - Date that the Level 1 item was last modified.
- Owner - Initially a link to user that entered the Level 1 item. If you have enabled the Application Configuration Setting - Allow External Owner this field will allow an external contact to be designated as the owner of the item.
- Probability - This field is only required when building a custom sales tracking application and you wish to track the probability of winning an opportunity (Level 1 item).
- Requirement - Narrative description text box.
- Revenue - Associates a monetary amount with the Level 1 Entity.
- Start Date - Milestone date – initially set to current date.
- Start Time - Milestone time – initially set to current time.
- Status - Status setting for the Level 1 item.
- Workflow - Provides ability to attach a workflow to the Level 1 item.
Selecting the Standard Fields for the Contract Entity
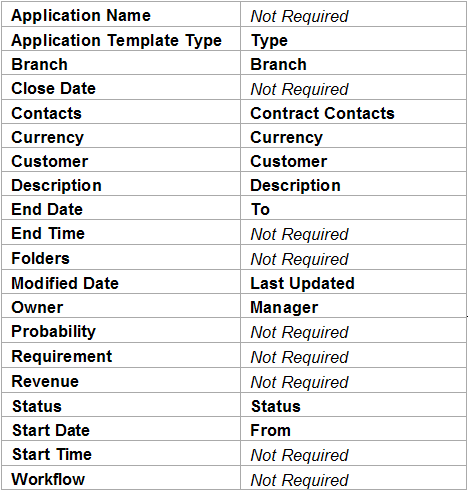
Next you will select and rename the standard fields that you will need to use for the Contract Tracking applications.
1. Set the standard fields as follows:
All other fields will be added as custom fields.
2. Click the Save button.
The standard fields required for Level 1 are now complete.
Adding Custom Fields to the Level 1 Entity
SmartSimple supports over 40 custom field types, which can be added to any entity within the system. For a full description of each field type see the SmartSimple Wiki.
1. Click the Settings tab.
2. Click the Custom Fields link.
The custom field window is displayed.
Custom Fields UTA Status Permissions
When you use custom fields in conjunction with the UTA an additional set of permissions are available. These permissions control the visibility and modifiability of the field at different statuses.
There are four options:
- Allow View Field - Defines the level 1 statuses at which the field can be viewed.
- Allow Modify Field - Defines the level 1 statuses at which the field can be modified.
- Deny View Field - Defines the level 1 statuses at which the field cannot be viewed.
- Deny Modify Field - Defines the level 1 statuses at which the field cannot be modified.
- These permissions are used in conjunction with the standard role based permissions. So you must be in role to see a field AND the field needs to be visible at that status.
- If no UTA status permissions are set then the fields are only through the role permissions.
- This feature is available for all custom fields at levels 1, 2 and 3 in the UTA.
1. Click the Settings tab.
2. Click the Custom Fields link.
The custom field window is displayed.
Adding Custom fields to the Contract Entity
1. Add the following fields:
Once complete, the field list will look as follows:
These fields will be associated with all Level 1 items that you create in this application.


