Difference between revisions of "List View Overview"
| Line 1: | Line 1: | ||
{{ListViewHeader}} | {{ListViewHeader}} | ||
| − | + | ==Introduction== | |
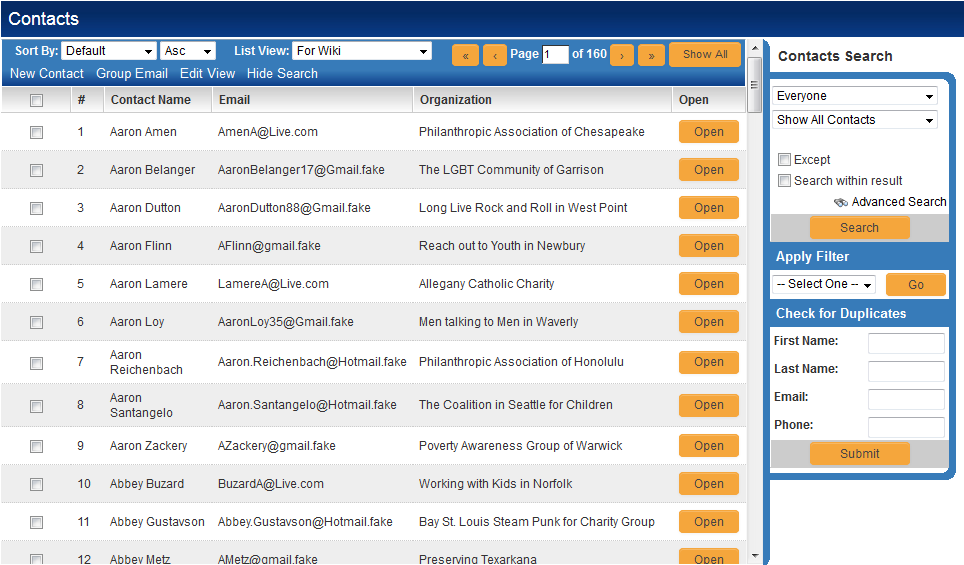
| − | + | List views are the part of the SmartSimple [[Interfaces|interface]] that combine similar [[Entity|entities]] in a vertically scrolling list. For example, clicking on the Contacts hyperlink in the [[Administration Interface|administration interface]] displays a list view of contact records in your SmartSimple database: | |
| + | [[Image: listview1.png]] | ||
| + | * This list can be sorted by the values in most columns by changing the value of the “Sort By” dropdown box above the list view. | ||
| + | * The list can also be filtered by using the [[Search Panel|basic search panel]] which is at the right of the list view (shown below), or the [[Advanced Search]] panel, which, when selected, appears above the list view. | ||
| + | * Multiple list views can be configured, and are selectable by changing the value in the “List View” drop box above the list view. The benefit of this feature is that each list view can display a different combination of [[fields]]. | ||
| + | ==System Views and Personal Views== | ||
| + | There are two types of List Views: System Views and Personal Views. | ||
| + | * System Views belong to a specific [[role]]. All users in that role will have the option to select this List View. <!--There can only be one System View assigned to each role. [CHANGED PER TICKET 18863 - List View Enhancements WITH MARCH 14, 2013 UPGRADE]--> Multiple System Views can be defined for each role. | ||
| + | * Personal Views are only visible to the user who creates them. Multiple Personal Views can be defined for each user. | ||
| + | ==Contact and Company List Views== | ||
| + | The screenshot above is an example of a Contacts list view. List views can also be configured for Company and Account records. These list views are [[Configuring List Views|configured]] on the [[Global Settings]] page under [[User & Contact Settings ]] and [[Company & Account Settings]], respectively. | ||
| + | Within each separate [[UTA|application]], the Account and Contact list views can be independently configured to display different fields. | ||
| + | ==List Views in a Universal Tracking Application== | ||
* Within the [[Universal Tracking Application]] the '''Settings''' page allows you to define the list view for Level 1, Level 2 and Level 3 as well as the Accounts and/or Contacts sections on the Level 1 records (if the Contacts/Accounts Standard Fields have been enabled). | * Within the [[Universal Tracking Application]] the '''Settings''' page allows you to define the list view for Level 1, Level 2 and Level 3 as well as the Accounts and/or Contacts sections on the Level 1 records (if the Contacts/Accounts Standard Fields have been enabled). | ||
::* ''The '''List View''' defined for Level 2 will apply both to the list view on the Level 2 tab, and the list of associated Level 2s at the bottom of a Level 1 record, if shown. Similarly the Level 3 list view applies also to the Level 3s listed at the bottom of a Level 2 record.'' | ::* ''The '''List View''' defined for Level 2 will apply both to the list view on the Level 2 tab, and the list of associated Level 2s at the bottom of a Level 1 record, if shown. Similarly the Level 3 list view applies also to the Level 3s listed at the bottom of a Level 2 record.'' | ||
| Line 12: | Line 24: | ||
::[[Image:Editviewimage.png]] | ::[[Image:Editviewimage.png]] | ||
:'''Note:''' changes here will affect the Contacts List View throughout [[SmartSimple]] (UTA Contacts Tab, Search People, Sales Tracking, etc.) | :'''Note:''' changes here will affect the Contacts List View throughout [[SmartSimple]] (UTA Contacts Tab, Search People, Sales Tracking, etc.) | ||
| − | |||
| − | |||
| − | |||
| − | |||
| − | |||
| − | |||
| − | |||
| − | |||
| − | |||
| − | |||
| − | |||
| − | |||
| − | |||
| − | |||
| − | |||
| − | |||
| − | |||
| − | |||
| − | |||
| − | |||
| − | |||
| − | |||
| − | |||
| − | |||
| − | |||
| − | |||
| − | |||
| − | |||
| − | |||
| − | |||
| − | |||
==See Also== | ==See Also== | ||
Revision as of 13:26, 9 April 2013
 Click here to watch a video on creating and editing List Views.
Contents
Introduction
List views are the part of the SmartSimple interface that combine similar entities in a vertically scrolling list. For example, clicking on the Contacts hyperlink in the administration interface displays a list view of contact records in your SmartSimple database:

- This list can be sorted by the values in most columns by changing the value of the “Sort By” dropdown box above the list view.
- The list can also be filtered by using the basic search panel which is at the right of the list view (shown below), or the Advanced Search panel, which, when selected, appears above the list view.
- Multiple list views can be configured, and are selectable by changing the value in the “List View” drop box above the list view. The benefit of this feature is that each list view can display a different combination of fields.
System Views and Personal Views
There are two types of List Views: System Views and Personal Views.
- System Views belong to a specific role. All users in that role will have the option to select this List View. Multiple System Views can be defined for each role.
- Personal Views are only visible to the user who creates them. Multiple Personal Views can be defined for each user.
Contact and Company List Views
The screenshot above is an example of a Contacts list view. List views can also be configured for Company and Account records. These list views are configured on the Global Settings page under User & Contact Settings and Company & Account Settings, respectively. Within each separate application, the Account and Contact list views can be independently configured to display different fields.
List Views in a Universal Tracking Application
- Within the Universal Tracking Application the Settings page allows you to define the list view for Level 1, Level 2 and Level 3 as well as the Accounts and/or Contacts sections on the Level 1 records (if the Contacts/Accounts Standard Fields have been enabled).
- The List View defined for Level 2 will apply both to the list view on the Level 2 tab, and the list of associated Level 2s at the bottom of a Level 1 record, if shown. Similarly the Level 3 list view applies also to the Level 3s listed at the bottom of a Level 2 record.
- If Display as Tab has been enabled for a Level 2 Type you can customize the List View for the items listed on that tab.
- If you use the same Tab Label for more than one Level 2 Type (thus grouping multiple Types onto the same Tab) it will also use the List View configured on the Settings page, the same List View as the Other Level 2 Types tab.
- Within most other Applications you can set the List View via the Settings page.
- Some list views contain special items and cannot be configured, such as the list of Applicants on an Opportunity within Sales Tracking.
- When viewing the list of Contacts you can set the List View by clicking on the Edit View tab:
- Note: changes here will affect the Contacts List View throughout SmartSimple (UTA Contacts Tab, Search People, Sales Tracking, etc.)
