Universal Tracking Application – Registration Page Feature
Contents
[hide]Universal Tracking Application – Registration Feature
The (UTA) registration feature is designed to provide specific functionality when configuring a UTA as a registration system.
This article assumes you are familiar with the – If not you should carefully review the UTA in the SmartSimple wiki.
General Application Configuration
When configuring a UTA for use as a registration system, all three UTA levels are required and must be structured in a specific manner as outlined below.
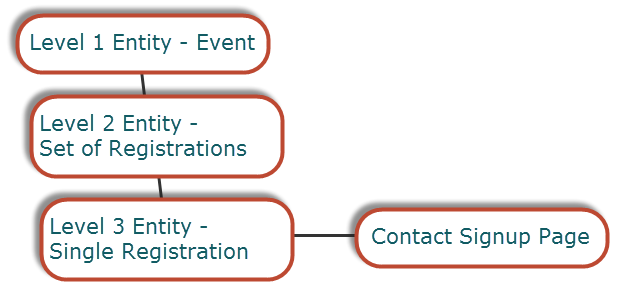
Level 1 Attributes
- Level 1 Entity represents the event entity.
- Level 1 Templates represent types of events. For example: breakfast meeting, lunch meeting type events.
- Level 1 Status represents the status of the event. For example: tentative, confirmed, completed or cancelled.
Level 2 Attributes
- Level 2 Entity represents a set of registrations. When exposed externally this level can gather information about a specific group of people that will be registered at the same time.
- You can consider this entity to be a transaction “wrapper” around the actual registrations.
- If the registration process is configured to support credit card transactions (not currently available) this level is used to process a single transaction for a set of registrations done in a single session.
Level 3 Attributes
- Level 3 Entity represents a single registration.
Use of a Contact Signup Page
In addition to the three levels of the UTA, you also need to create or use an existing contact signup page.
This page provides two functions within the registration process.
- If the contact does not exist, they are added to the database and associated with the registration.
- If the contact exists, then they are associated with the registration.
Registration Set-up Details
These instructions assume you have a registration application established. If you need to get access to a pre-built application for testing please contact SmartSimple Support (support@smartsimple.com).
1. Click the Settings tab.

2. Click the Registration Pages link.
3. Click the New Registration Page link.
The New Registration page is displayed.

This page consists of the following fields.
- Name - Narrative name of the page
- Date Format - Defines the presentation format for date fields in the page
- Maximum Participants Per Registration - Determines the maximum number of people that can be registered as a group.
- Maximum Total Participants - Determines the maximum number of people that can be registered for the event.
- Use Online Payment - Provides for integration of an online payment system such as Paymentech – currently this feature is not supported.
- URL - The external link to registration page. This is the link that you would connect to a website.
- HTML Template List Template - Controls the formatting and fields displayed in the list view of events.
- HTML Template Details Template - Controls the formatting and fields displayed in the detail view of an event selected from the list view.
- HTML Template Confirmation Template - Controls the formatting and fields displayed in the confirmation view once a registration is complete.
Sample HTML Templates
The following Sample templates can be used to create a simple registration page.

E.g.
List Template:
<html>

<h2>Welcome to the Event Registration</h2>
<hr>

@navbar@

<body>
<table>
[#
<tr><td>@button@</td>
<td class=@statusclass@>@name@ |</td><td>@type@ |</td><td>@description@</td></tr>
#]
</table>

</body>
</html>
Details Template:
<html>

<body>
<b>Name of event:</b> @name@<br>
<b>Description:</b> @description@<br><br>
@button@

</body>
</html>
Events Posted on This Page
The bottom section of the page controls when events are posted to the page, the level 2 and 3 type plus the People Signup page to be used.
- Event Type - Controls the level 1 templates that are available for display in the list view template of the page. In the example above the level 1 templates are; All Day Conference, Breakfast Meeting and Dinner Meeting.
- Event Show Status - Determines when level 1 events should be displayed. Displaying an event does not necessarily mean that people can actually register for the event as you may wish to show an event in the future before actually enabling registration for that event.
- Event Active Status - Determines which events people can actually register for. When an event is at this status a register button is displayed.
- Initial Level 2 Type - Determines the Level 2 Entity to be associated with a group of registrations.
- Initial level 3 Type - Determines the Level 3 Entity to be associated with a single registration.
- People Signup used - Determines the contact signup page to be used for each registration.
Sample Page

In the example shown above:
- All event types will be displayed in the list view but only when at the statuses: tentative and confirmed.
- Only events with the status Confirmed can actually be booked.
- The level 2 type is set to Web Group.
- The level 3 type is set to Contact Registration.
- The People Signup Used is set to Event Registration.
Registration Page in Action
The following screen shots illustrate the registration page in action.
List View

- The details link is displayed to the left of the event title.
Details View

- The selected fields are displayed in the format defined by the Details template.
- The Register button is displayed if the event is at a status indicated that people can register for the event.
Registration Page

- The registration page displays fields from the level 2 item.
- The number of participants for this specific registration are selected from the Number of Participants combo box.
- The maximum number of registrations in this combo box is set to the Maximum Participants Per Registration settings.
Setting the Number of Registrations
The number of signup pages displayed is determined by the number of participants selected.

Once complete, select the Submit button to complete the registration process.
Each contract will be created or updated as required.