Invoice UTA
Contents
- 1 Configuring SmartSimple Invoice Application
- 2 Field Mappings
- 3 Invoice Number
- 4 Invoice Auto Number
- 5 Invoice Company
- 6 Invoice Number
- 7 Invoice Date
- 8 Invoice Company
- 9 Invoice Access Role
- 10 Invoice Item Settings
- 11 Invoice Item Field Mapping
- 12 Invoice Item Terminology
- 13 Item Type Filtering
- 14 Item Status Filtering
- 15 Creating an Invoice
- 16 See Also
Configuring SmartSimple Invoice Application
The SmartSimple Invoice Application works in conjunction with your Universal Tracking Application to enable the creation of invoices for either level 2 or level 3 activities.
To configure the Invoice UTA, do the following:
1. Click on the Settings Tab.
2. Click on the General Tab.

3. Scroll down to the "Application Settings" section.
4. Check Enable Invoicing.
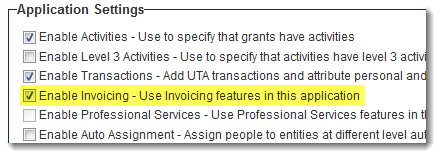
5. Click Save.
6. The Invoice tab will appear. Click on the Invoice tab.
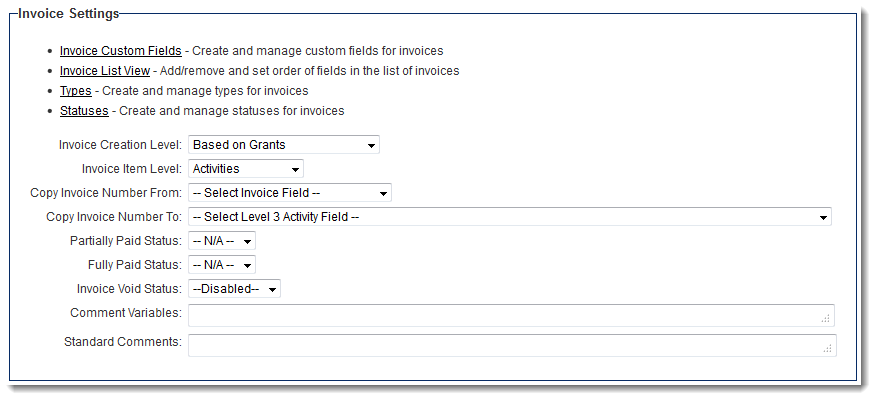
7. Configure additional Custom Fields for Invoice such as OCF-21 and OCF-22 questions.
8. Configure Invoice List View.
9. Configure Invoice Statuses, such as Paid, Void, Part Paid, etc.
10. Set Invoice Level (One or Two).
- Invoice at Level One: Invoice will be created at level one for level two activities.
- Invoice at Level Two: Invoice will be created at level two for level three activities.
Field Mappings
Next, map fields from the application to the invoice module.
Invoice Number
Enter starting invoice number.
Invoice Auto Number
Enter starting auto-generated invoice number.
Invoice Company
Enter client company field.

Invoice Number
Enter preferred label for invoice number as you would like it to appear on screen.
Invoice Date
Enter preferred label for invoice date as you would like it to appear on screen.
Invoice Company
Enter preferred label for invoice company as you would like it to appear on screen.

Invoice Access Role
Check the roles that can access the invoice application.

Invoice Item Settings
Create custom fields as needed for the invoice line items. These are the level 2 or level 3 activities that are to be billed.
Configure the List View for the invoice line items.
Set the Change Item Status to a status that will show that the item has been invoiced.

Invoice Item Field Mapping
Item Detail
Enter the level 2 or level 3 service description field that is to be billed.
Item Quantity
Enter the level 2 or level 3 quantity field that is to be billed.
Item Amount
Enter the level 2 or level 3 amount field that is to be billed.
Item Tax (PST, GST, HST)
Enter the level 2 or level 3 tax field that is to be billed.
Item Tax 2 (PST, GST, HST)
Enter the level 2 or level 3 tax field that is to be billed.

Invoice Item Terminology
Item Detail
Enter preferred label for item detail as you would like it to appear on screen.
Item Quantity
Enter preferred label for item quantity as you would like it to appear on screen.
Item Amount
Enter preferred label for item amount as you would like it to appear on screen.
Item Full Amount
Enter preferred label for item full amount as you would like it to appear on screen. This is the calculated amount including applicable tax(es).
Item Tax
Enter preferred label for item tax as you would like it to appear on screen.
Item Tax 2
Enter preferred label for a second item tax as you would like it to appear on screen.

Item Type Filtering
Select level two or level three types that can be invoiced.

Item Status Filtering
Select the level two or level three status to invoice. Only items set to the checked status will be invoiced.

Creating an Invoice
This example demonstrates how to create an invoice for level 3 activities. The procedure is the same for level 2 activities.
1. Open level 2 item to be invoiced.
2. Create level 3 (billing) activities.
3. Set level 3 status to filtered status (e.g Approved).
4. Click on Back to go back to level 2.
5. Click on Invoices tab in the level 2.
6. Click on New Invoice tab.
7. All items with status filtered status for the level 2 item will be shown.
8. Select either individual or all items to invoice by clicking in the check box.
9. Click Invoice.
10. Click OK to accept Warning.
11. The Invoice is created within SmartSimple
You will also need to create either a Web Page View or MS Word Merge document that can be used to generate a physical invoice document.