Difference between revisions of "UTA Security Matrix"
(→Role Engagement) |
|||
| Line 13: | Line 13: | ||
The '''Security Matrix''' setting is displayed in the '''Security Settings'''. | The '''Security Matrix''' setting is displayed in the '''Security Settings'''. | ||
| − | [[Image: | + | [[Image:SecurityMatrixSetting.png|link=]] |
3. Click the '''Enable Security Matrix''' check box. | 3. Click the '''Enable Security Matrix''' check box. | ||
| Line 20: | Line 20: | ||
The '''Security Matrix''' link is added to the top of the ''''Security Settings''' window. | The '''Security Matrix''' link is added to the top of the ''''Security Settings''' window. | ||
| − | |||
| − | |||
As soon as the security matrix is enabled, all [[User|users]] will lose all access to data within the application until the permissions are established. | As soon as the security matrix is enabled, all [[User|users]] will lose all access to data within the application until the permissions are established. | ||
| Line 29: | Line 27: | ||
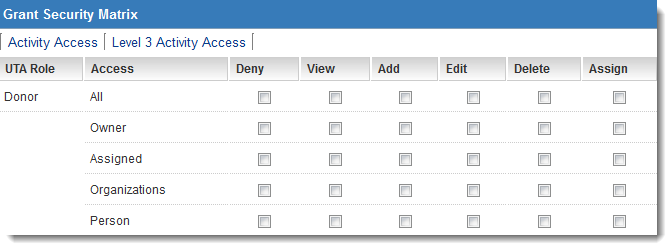
The Security Matrix window is displayed. | The Security Matrix window is displayed. | ||
| − | [[Image: | + | [[Image:SecurityMatrix.png|link=]] |
==How the Security Matrix works== | ==How the Security Matrix works== | ||
| − | * The current view is for security associated with the | + | * The current view is for security associated with the Grant level ({{l1}}). |
| − | * '''Two additional tabs''' are used to control security associated with the | + | * '''Two additional tabs''' are used to control security associated with the Activity ({{l2}}) and Level 3 Activity levels. |
| − | For each [[Role|role]] that you have permissioned to access the [[ | + | For each [[Role|role]] that you have permissioned to access the application in the "[[UTA_Settings_-_Security#Access_Role_Settings|Access Role Settings]]," the same set of options will be displayed at each level. |
==Role Engagement== | ==Role Engagement== | ||
| Line 49: | Line 47: | ||
==Permission Types== | ==Permission Types== | ||
| − | The following | + | The following six permission types are available: |
| + | * '''Deny''' - Users in this role are denied access to this item. | ||
* '''View''' – View the item. | * '''View''' – View the item. | ||
* '''Add''' – Create a new item. | * '''Add''' – Create a new item. | ||
| Line 69: | Line 68: | ||
3. Click the '''Activity Access''' tab. | 3. Click the '''Activity Access''' tab. | ||
| − | The same set of [[Role|roles]] and permissions are displayed, but this time for the | + | The same set of [[Role|roles]] and permissions are displayed, but this time for the {{l2}} items. |
[[Image:Uta139.png]] | [[Image:Uta139.png]] | ||
| Line 77: | Line 76: | ||
5. Click the '''Save''' button. | 5. Click the '''Save''' button. | ||
| − | 6. Repeat this process for '''Level 3 | + | 6. Repeat this process for '''Level 3 Activities'''. |
Revision as of 09:58, 1 October 2013
Contents
Enabling the Security Matrix
Once you have created your Universal Tracking Application you may want to restrict interaction with the application and the associated entities. In order to do this you will need to enable the Security Matrix feature.
You should only enable this feature when you have completed the entire application, as it may become very difficult to work with the application once this security is switched on.
The Security Matrix is configured from the Configuration page.
1. Click the Settings tab.
2. Click the Security tab.
The Security Matrix setting is displayed in the Security Settings.

3. Click the Enable Security Matrix check box.
4. Click the Save button.
The Security Matrix link is added to the top of the 'Security Settings window.
As soon as the security matrix is enabled, all users will lose all access to data within the application until the permissions are established.
5. Click the Security Matrix link.
The Security Matrix window is displayed.
How the Security Matrix works
- The current view is for security associated with the Grant level (Level 1).
- Two additional tabs are used to control security associated with the Activity (Level 2) and Level 3 Activity levels.
For each role that you have permissioned to access the application in the "Access Role Settings," the same set of options will be displayed at each level.
Role Engagement
All access is role based. Each set of access permissions can be set based on the following role engagement:
- All – All users in this role can perform the permissioned actions.
- Owner – Only a user in this role associated through the "Owner" standard field can perform the permissioned actions.
- Assigned – Only users in this role that are assigned to the item - either in the "Assigned" standard field or assigned as a contact - can perform the permissioned actions.
- Accounts – Only users in this role that are associated with organisations assigned to this item can perform the permissioned actions. This is an indirect permission. For example, if you were to associate a company with a project and use this permission, then someone from that company with this role would be able to perform the permissioned actions.
Permission Types
The following six permission types are available:
- Deny - Users in this role are denied access to this item.
- View – View the item.
- Add – Create a new item.
- Edit – Edit an existing item.
- Delete – Delete an existing item.
- Assign – Assign other contacts to the item.
Setting the Security Matrix
1. Set the permissions as shown below:

- All employees can view all items.
- Only the owner can view, add, edit, delete and assign other people.
2. Click the Save button.
3. Click the Activity Access tab.
The same set of roles and permissions are displayed, but this time for the Level 2 items.

4. Set the permissions the same as for the Level 1 items.
5. Click the Save button.
6. Repeat this process for Level 3 Activities.