Difference between revisions of "Notes Overview"
| (29 intermediate revisions by one other user not shown) | |||
| Line 1: | Line 1: | ||
{{Banner-UnderConstruction}} | {{Banner-UnderConstruction}} | ||
| + | |||
| + | |||
| + | <span style="background-color: #ffddcc;">__TOC__</span> | ||
==Overview== | ==Overview== | ||
'''Notes '''are a built-in feature into SmartSimple's platform, available in every [[instance]], that enables users to annotate records with comments and instructions. | '''Notes '''are a built-in feature into SmartSimple's platform, available in every [[instance]], that enables users to annotate records with comments and instructions. | ||
| − | ::: [[Image: | + | Notes will give you, your internal team, your external applicants, claimants, reviewers, and board members an increased level of communication right in your system without needing an outside email program or extra custom fields. Not only can an infinite number of notes be created, but you can also configure notes to have differing levels of visibility for [[User role|roles]], pre-created text options, and even triggers for [[Workflows]]. The benefits of Notes will go as far as you want to utilize and configure them. |
| + | |||
| + | ::: [[Image:Notesdisplay.JPG|link=|750px|border]] | ||
'''Features of Notes: ''' | '''Features of Notes: ''' | ||
| Line 24: | Line 29: | ||
When you click into any record, the '''Notes '''tab on the left side menu will appear with a number of the notes available. | When you click into any record, the '''Notes '''tab on the left side menu will appear with a number of the notes available. | ||
| − | :: [[File:Notes left hand menu.png| | + | :: [[File:Notes left hand menu notif.png|350px|border]] |
| + | Clicking on the '''Notes '''tab from the left side menu will open a list of available notes on that record. | ||
| + | |||
| + | :: [[File:Edit and add new notes.png|1200px|border]] | ||
| + | On this Notes page, many options are available: | ||
| + | |||
| + | * Pressing the '''+ '''icon on the top right will allow you to create a '''New Note''' | ||
| + | * Pressing the '''printer '''icon next to it will allow you to generate a print preview of '''all Notes '''on that page | ||
| + | * Underneath those two icons, you will see the available '''Search Options, '''which can be filtered by either or both '''Note Type '''and '''From/To '''Dates | ||
| + | |||
| + | ===Contents of Notes=== | ||
| + | Each note will appear in its own box, with the following details: | ||
| − | + | * Date and time stamps | |
| + | * Username of user who created the note | ||
| + | * The type of Note | ||
| + | * The content of the note | ||
| + | * A count of this note among the list of available notes (changing in real time as notes are added and deleted) | ||
| + | * An '''Edit Notes '''icon on the left ([[Image:EditNoteIcon.png|link=]]) | ||
| − | + | <pre> For security purposes, no user can edit another user's Notes.</pre> | |
| + | ====Sticky/Hi-Vis Notes==== | ||
| + | There is a specific '''Note Type '''called '''Sticky Note '''that, when chosen, will enable the content of the note you create to be flagged as high-visibility on the record. Rather than appearing only on th '''Notes '''tab, it will appear directly on the main page of the record when it is opened, above the record details, and highlighted in yellow. | ||
| − | :: [[ | + | :: [[File:Stick note.png|1000px|border]] |
| + | It will feature a '''caution icon, '''the name and content of the note, the name of the note creator, and the date and time stamp of when the note was created. The user can choose to close the note by clicking on the '''x '''icon on the top right of the note box, but regardless, flagging your note as a '''Sticky Note '''will ensure that it is easily seen. This is best used for important/urgent notifications, such as a '''Don't Fund '''note that other program managers should see, or a '''Missing Requirement '''note that an applicant should see as the deadline for an application approaches. | ||
| − | Notes | + | ===Role-Based Permissions for Notes=== |
| + | General access to the Notes feature is controlled through [[User role|role]]-based permissions. You will need to set these permissions before a user is able to access notes on any record. | ||
| − | Notes can be | + | Notes can then further be made available against the individual entities (e.g. [[UTA]]s, organizations, [[User|users]], calendars etc) in the system using [[Advanced Logic]]. |
| + | |||
| + | ====Creating a New Note Type==== | ||
| + | Before permissioning notes by roles, you must create a new Note Type and permission that Type specifically. | ||
| + | |||
| + | 1. Click the 9-square menu icon on the top right of your page. | ||
| + | |||
| + | :: {{Icon-Menu}} | ||
| + | 2. Under the heading '''Configuration, '''select '''Global Settings.''' | ||
| + | |||
| + | 3. On the first tab, under the subheading '''System Configuration, '''click on '''Note Types.''' | ||
| + | |||
| + | :: [[File:Note types.png|500px|border]] | ||
| + | The Notes list view is displayed. | ||
| + | |||
| + | 4. Click the '''+ '''icon on the top left to create a new Note Type. | ||
| + | |||
| + | 5. The New Note Type details will be displayed. | ||
| + | |||
| + | :: [[File:New notes type form.png|600px|border]] | ||
| + | {| class="wikitable" | ||
| + | |- | ||
| + | ||'''Name''' | ||
| + | ||The name for the notes falling under this Note Type. This name will also function as the Caption, unless the Caption is set differently. | ||
| + | |- | ||
| + | ||'''Caption''' | ||
| + | ||The label for the notes - normally the same as Name, although this can be labelled differently if you want. | ||
| + | |- | ||
| + | ||'''Display Order''' | ||
| + | ||Determines the order in which the notes are displayed in the '''Notes '''drop-down list, according to typical [[Display order|display order]] rules. | ||
| + | |- | ||
| + | ||'''Description''' | ||
| + | || | ||
| + | Any comments or notes you wish to include. | ||
| − | The | + | '''Note: '''The content falling under the '''Description '''field will not manifest anywhere except on this page; it is best practice to always put a description when you are creating or modifying a function in a SmartSimple system so that other [[Global User Administrator|System Administrators]], [[How the SmartSimple Support Desk Works|SmartSimple Support]], and users will be able to understand the use of that function. |
| − | + | |- | |
| + | ||'''Color Code''' | ||
| + | || | ||
| + | An optional color code that will appear for this Note Type when it is displayed. | ||
| + | '''Tip: '''Setting a color code is a good idea as it can help you keep track of which users are leaving notes, and what types of notes are being left. | ||
| − | + | |- | |
| + | ||'''Lock on Type''' | ||
| + | ||Toggling on this option will make the note that is created under this type become locked under this type; its Note Type cannot be changed. | ||
| + | |- | ||
| + | ||'''High Visibility''' | ||
| + | ||The high visibility feature allows the note created under this Note Type to always appear at the top of a record's main page in yellow; this ensures that the content of the note will be seen and addressed by the user. The high visibility feature is particularly useful for issues of urgency - e.g. ''DO NOT FUND''. | ||
| + | |} | ||
| − | + | After filling in the fields for the general information of the new Note Type, click '''Save.''' | |
| − | The | + | ====Setting Permissions of a Note Type==== |
| + | The second tab titled '''Permissions and Availability''' will allow you to permission the Note Type so that is available, viewable, and editable only by certain roles that you choose. | ||
| + | :: [[File:Note types permissions.png|600px|border]] | ||
{| class="wikitable" | {| class="wikitable" | ||
|- | |- | ||
| − | ||[[ | + | ||'''View & Create''' |
| − | || | + | ||Select which [[User role|user roles]] will have the ability to both view and create this Note Type. |
| + | |- | ||
| + | ||'''View Only''' | ||
| + | ||Select which role(s) will have the ability to ''only'' view this Note Type - this role should be those who are most appropriate to be the receivers of this kind of note. | ||
| + | |- | ||
| + | ||'''Deny View & Create''' | ||
| + | || | ||
| + | Select which role(s) will be denied the ability to either view or create this Note Type. This role should be those who will never need to see this kind of note. | ||
| + | |||
| + | '''Remember: '''Do not put the same role in both '''View & Create '''and '''Deny View & Create. '''The system will default to the minimum level of access, therefore denying this role any ability to either view or create this Note Type. | ||
| + | |||
| + | |- | ||
| + | ||'''Note Type Change''' | ||
| + | || | ||
| + | |- | ||
| + | ||'''Entity Restriction''' | ||
| + | ||Select from the drop-down if you would like to restrict this Note Type ''by entity ''- that is, a Level 1, 2, or 3 Entity of a specific [[UTA]] in your [[instance]]. | ||
|} | |} | ||
| − | [[ | + | ==Configuration - Advanced== |
| + | <pre> You must toggle on Advanced Options on the top right of your Note Type page in order for the Process and Classic tab to appear. </pre> | ||
| + | :: [[File:Advanced options1.png|border]] | ||
| + | ===Configuring Workflows on Note Types=== | ||
| + | The tab labelled '''Process '''will always show you whether or not there is a [[Workflows Overview|workflow]] in place with this note type. | ||
| + | |||
| + | :: [[File:Note type workflow process.png|600px|border]] | ||
| + | Clicking into the field labelled '''Workflow '''will enable a drop-down to appear with all the available Workflows associated with this note type. Here, you can switch between Workflows, or you can select the '''right arrow icon '''on the right of the field in order to edit the specific Workflow chosen. | ||
| + | |||
| + | Clicking on the '''Workflow Settings '''button will open a modal window that allows you to edit the details related to that Workflow. | ||
| + | |||
| + | :: [[File:Edit workflow settings.png|700px|border]] | ||
| + | : | ||
| + | :* If you want to associate a Workflow that is not yet created for a Note Type, please see [[Workflows Overview#Create Workflow|how to create a workflow]]. You just need to ensure that the '''Workflow Type''' is set to '''Notes''' in order for the created workflow to appear as an option under a Note Type's '''Process''' tab. | ||
| + | |||
| + | ===Pre-created Notes Options=== | ||
| + | When you create a note, you can choose to configure '''pre-created Notes Options. '''The impact is that the user who sees this note can select initial content for the note instead of manually and personally typing in the content. After the content is selected from the options, it can then be edited. The options are displayed only when a note is first created; after saving, they are no longer available. | ||
| + | |||
| + | <pre> The pre-created Options are a good method of enforcing a standardized Templates for your Notes feature. </pre> | ||
| + | To define pre-created notes options, go to the '''Classic Options '''tab that is available when you first create a '''Note Type '''from '''Global Settings.''' | ||
| + | |||
| + | ::: [[File:Classic options new notes type.png|600px|border]] | ||
| + | Each option that you want to add should be '''delimited by semicolon, '''without spaces between. | ||
| + | |||
| + | In some application cases, there may only be a certain amount of responses a person could theoretically answer. The pre-created Notes Options helps to efficiently streamline the process in these situations. For instance, the Yes/No/Maybe options that are shown in the above screenshot, or a Don't fund/Fund option for grant applications would both be appropriate use cases. | ||
| + | |||
| + | =See Also= | ||
| + | * [[Field Revision Annotations]] | ||
| + | |||
| + | [[Category:Notes]] | ||
Latest revision as of 12:46, 27 February 2023
Overview
Notes are a built-in feature into SmartSimple's platform, available in every instance, that enables users to annotate records with comments and instructions.
Notes will give you, your internal team, your external applicants, claimants, reviewers, and board members an increased level of communication right in your system without needing an outside email program or extra custom fields. Not only can an infinite number of notes be created, but you can also configure notes to have differing levels of visibility for roles, pre-created text options, and even triggers for Workflows. The benefits of Notes will go as far as you want to utilize and configure them.
Features of Notes:
- They can be added to the following: UTA records, Contact and company profiles, calendar events, SmartFolders, Invoices, Transactions and more.
- System Administrators can even add notes to individual Custom Fields, templates, and statuses in order to document processes and maintain a change log.
- System Administrators can create different types of Notes and set role-based permissions for editing and viewing each specific Note type.
- See Notes Permissions for additional information.
- Note types can be created that have sets of pre-populated text for selection by the end user.
- See Notes Options for additional information.
- Workflows can be configured that notify users by email that a new note has been created. These workflow-generated emails can contain variables, including the text in the body of the note.
- See Pulling Variables in Notes Workflow for more information.
Configuration - Essentials
Using Notes
Notes are available to records in both View Mode and Edit Mode. The View Mode will allow read-only access to Notes (therefore without modification ability), while the Edit Mode allows users to make changes or delete the note.
When Notes are visible on a record, the panel can be efficiently expanded or hidden by clicking on the vertical Notes tab.
When you click into any record, the Notes tab on the left side menu will appear with a number of the notes available.

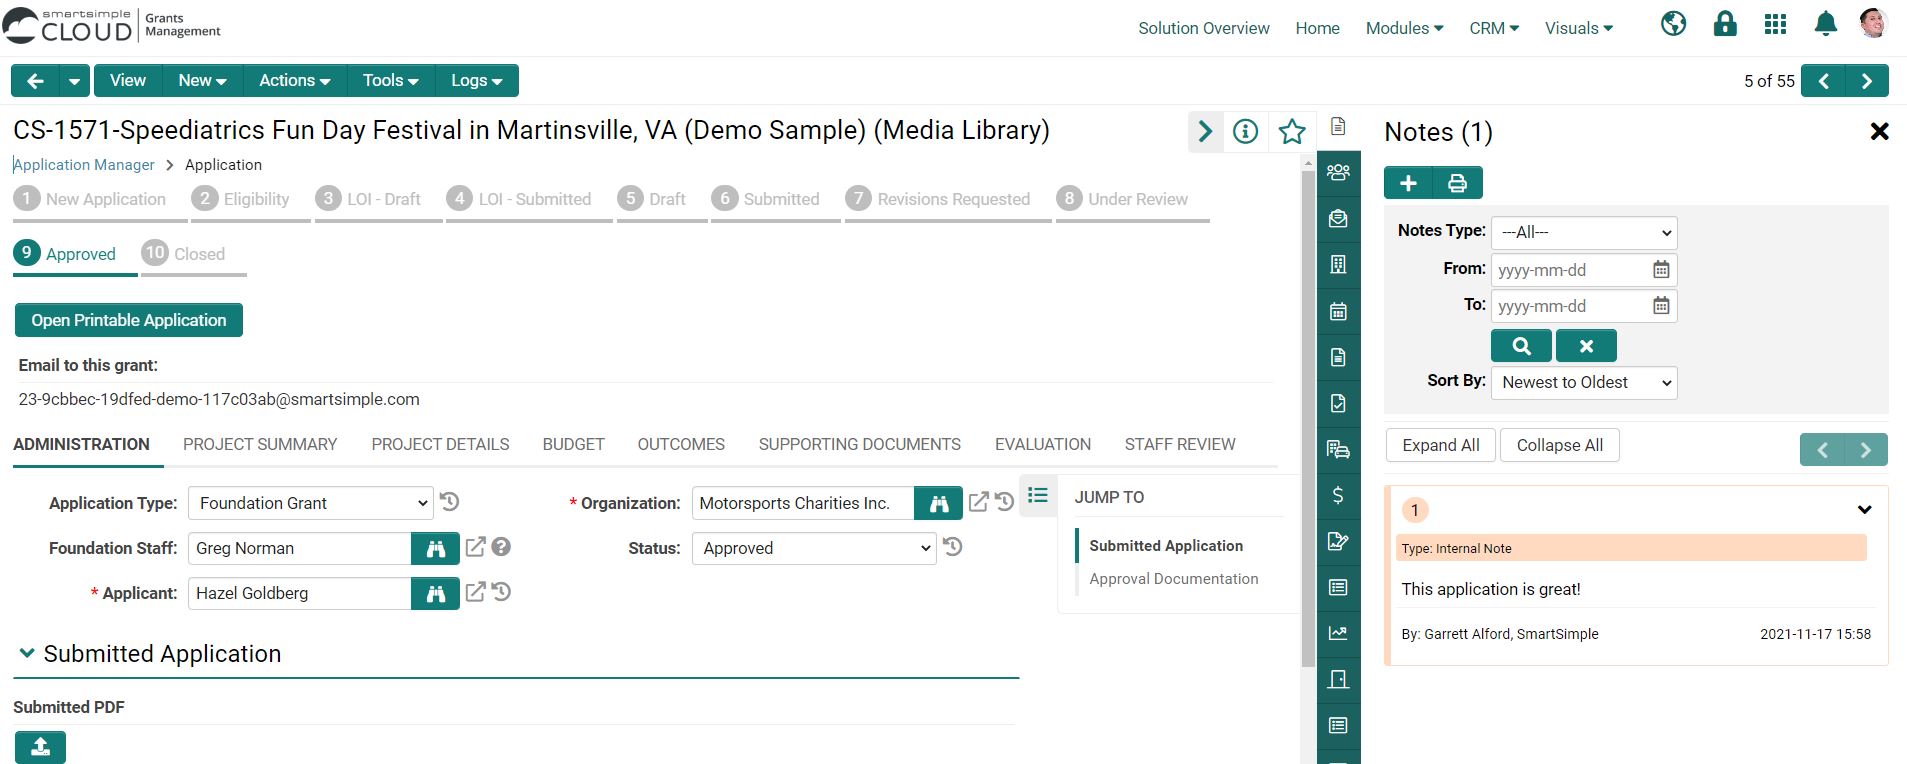
Clicking on the Notes tab from the left side menu will open a list of available notes on that record.

On this Notes page, many options are available:
- Pressing the + icon on the top right will allow you to create a New Note
- Pressing the printer icon next to it will allow you to generate a print preview of all Notes on that page
- Underneath those two icons, you will see the available Search Options, which can be filtered by either or both Note Type and From/To Dates
Contents of Notes
Each note will appear in its own box, with the following details:
- Date and time stamps
- Username of user who created the note
- The type of Note
- The content of the note
- A count of this note among the list of available notes (changing in real time as notes are added and deleted)
- An Edit Notes icon on the left (
 )
)
For security purposes, no user can edit another user's Notes.
Sticky/Hi-Vis Notes
There is a specific Note Type called Sticky Note that, when chosen, will enable the content of the note you create to be flagged as high-visibility on the record. Rather than appearing only on th Notes tab, it will appear directly on the main page of the record when it is opened, above the record details, and highlighted in yellow.

It will feature a caution icon, the name and content of the note, the name of the note creator, and the date and time stamp of when the note was created. The user can choose to close the note by clicking on the x icon on the top right of the note box, but regardless, flagging your note as a Sticky Note will ensure that it is easily seen. This is best used for important/urgent notifications, such as a Don't Fund note that other program managers should see, or a Missing Requirement note that an applicant should see as the deadline for an application approaches.
Role-Based Permissions for Notes
General access to the Notes feature is controlled through role-based permissions. You will need to set these permissions before a user is able to access notes on any record.
Notes can then further be made available against the individual entities (e.g. UTAs, organizations, users, calendars etc) in the system using Advanced Logic.
Creating a New Note Type
Before permissioning notes by roles, you must create a new Note Type and permission that Type specifically.
1. Click the 9-square menu icon on the top right of your page.

2. Under the heading Configuration, select Global Settings.
3. On the first tab, under the subheading System Configuration, click on Note Types.

The Notes list view is displayed.
4. Click the + icon on the top left to create a new Note Type.
5. The New Note Type details will be displayed.

| Name | The name for the notes falling under this Note Type. This name will also function as the Caption, unless the Caption is set differently. |
| Caption | The label for the notes - normally the same as Name, although this can be labelled differently if you want. |
| Display Order | Determines the order in which the notes are displayed in the Notes drop-down list, according to typical display order rules. |
| Description |
Any comments or notes you wish to include. Note: The content falling under the Description field will not manifest anywhere except on this page; it is best practice to always put a description when you are creating or modifying a function in a SmartSimple system so that other System Administrators, SmartSimple Support, and users will be able to understand the use of that function. |
| Color Code |
An optional color code that will appear for this Note Type when it is displayed. Tip: Setting a color code is a good idea as it can help you keep track of which users are leaving notes, and what types of notes are being left. |
| Lock on Type | Toggling on this option will make the note that is created under this type become locked under this type; its Note Type cannot be changed. |
| High Visibility | The high visibility feature allows the note created under this Note Type to always appear at the top of a record's main page in yellow; this ensures that the content of the note will be seen and addressed by the user. The high visibility feature is particularly useful for issues of urgency - e.g. DO NOT FUND. |
After filling in the fields for the general information of the new Note Type, click Save.
Setting Permissions of a Note Type
The second tab titled Permissions and Availability will allow you to permission the Note Type so that is available, viewable, and editable only by certain roles that you choose.

| View & Create | Select which user roles will have the ability to both view and create this Note Type. |
| View Only | Select which role(s) will have the ability to only view this Note Type - this role should be those who are most appropriate to be the receivers of this kind of note. |
| Deny View & Create |
Select which role(s) will be denied the ability to either view or create this Note Type. This role should be those who will never need to see this kind of note. Remember: Do not put the same role in both View & Create and Deny View & Create. The system will default to the minimum level of access, therefore denying this role any ability to either view or create this Note Type. |
| Note Type Change | |
| Entity Restriction | Select from the drop-down if you would like to restrict this Note Type by entity - that is, a Level 1, 2, or 3 Entity of a specific UTA in your instance. |
Configuration - Advanced
You must toggle on Advanced Options on the top right of your Note Type page in order for the Process and Classic tab to appear.
Configuring Workflows on Note Types
The tab labelled Process will always show you whether or not there is a workflow in place with this note type.

Clicking into the field labelled Workflow will enable a drop-down to appear with all the available Workflows associated with this note type. Here, you can switch between Workflows, or you can select the right arrow icon on the right of the field in order to edit the specific Workflow chosen.
Clicking on the Workflow Settings button will open a modal window that allows you to edit the details related to that Workflow.
-
-
- If you want to associate a Workflow that is not yet created for a Note Type, please see how to create a workflow. You just need to ensure that the Workflow Type is set to Notes in order for the created workflow to appear as an option under a Note Type's Process tab.

Pre-created Notes Options
When you create a note, you can choose to configure pre-created Notes Options. The impact is that the user who sees this note can select initial content for the note instead of manually and personally typing in the content. After the content is selected from the options, it can then be edited. The options are displayed only when a note is first created; after saving, they are no longer available.
The pre-created Options are a good method of enforcing a standardized Templates for your Notes feature.
To define pre-created notes options, go to the Classic Options tab that is available when you first create a Note Type from Global Settings.

Each option that you want to add should be delimited by semicolon, without spaces between.
In some application cases, there may only be a certain amount of responses a person could theoretically answer. The pre-created Notes Options helps to efficiently streamline the process in these situations. For instance, the Yes/No/Maybe options that are shown in the above screenshot, or a Don't fund/Fund option for grant applications would both be appropriate use cases.