Difference between revisions of "Creating User Roles"
| Line 7: | Line 7: | ||
The Roles & Permissions window is displayed. | The Roles & Permissions window is displayed. | ||
| − | |||
| − | 2. Click the '''User Roles''' link. | + | 2. Click the '''User Roles''' link. The Roles window is displayed. |
| − | |||
| − | The Roles window is displayed. | ||
| − | |||
| − | |||
Each [[Role|role]] is displayed with a name, '''Edit''' button (to access the [[Role|role]] name, description, portal settings, role menu settings, and [[Custom Fields|custom fields]]), general description and a flag to indicate if a portal has been configured. | Each [[Role|role]] is displayed with a name, '''Edit''' button (to access the [[Role|role]] name, description, portal settings, role menu settings, and [[Custom Fields|custom fields]]), general description and a flag to indicate if a portal has been configured. | ||
| − | 3. Click the '''New Role''' tab. | + | 3. Click the '''New Role''' tab. A blank "New Role" page will be displayed. |
| − | |||
| − | |||
| − | |||
| − | A blank "New Role" page will be displayed. | ||
4. Create the following role: | 4. Create the following role: | ||
Revision as of 14:29, 10 July 2017
Contents
Creating Role
There are only two fields that need to be defined for a role: the name of the role and a narrative description.
1. Click the Configuration, Roles & Permissions menu.
The Roles & Permissions window is displayed.
2. Click the User Roles link. The Roles window is displayed.
Each role is displayed with a name, Edit button (to access the role name, description, portal settings, role menu settings, and custom fields), general description and a flag to indicate if a portal has been configured.
3. Click the New Role tab. A blank "New Role" page will be displayed.
4. Create the following role:
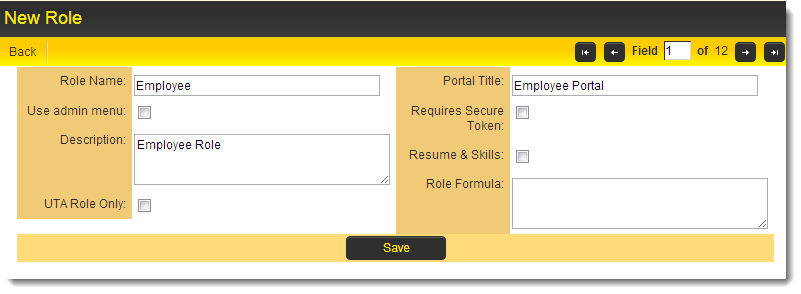
For detailed instructions on this page's settings, see User Role.
5. Click the Save button.
The complete role window is displayed.

Role Permissions
Able To Set
Controls the roles that a user can add or remove when configuring other users. When you view someone's profile in a business card section you will be to see only roles you are Able To Set. For example if you are looking at user who has roles Applicant and Researcher but you can set only Researcher you will see only Role: Researcher on their business card. Typically, System Administrators are given rights to set all roles.
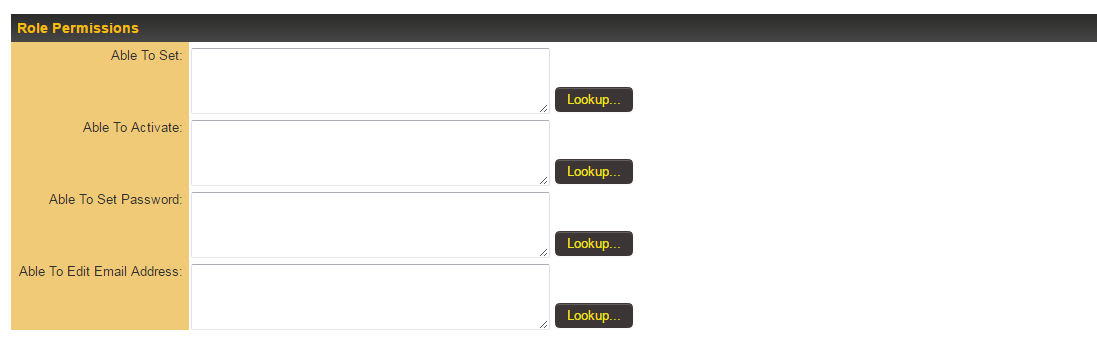
Able To Activate
Controls the roles that a user must have before the current user can activate their user account.
Able To Set Password
Controls the roles that a user must have before the current user can manually set their password. For example if you are looking at user who has roles Applicant, but you can set password only for Researcher you will not see the Set Password button against that users profile.
Able To Edit Email Address
Controls the roles that a user must have before the current user can edit their email address. For example if you are looking at user who has roles Applicant, but you can set password only for Researcher you will see a read-only version of the Email standard field when access that users profile.
Add Users
Users can be added or removed from a role individually by navigating to that User's profile, and then setting the role by using the Settings, Roles & Access menu.
You can also add or remove users in bulk from the Current Users section of the Role's edit page, using the Add User button.
- Click the Add User tab.
- The Add User to Role screen launches, with search options including the ability to select Roles.
NOTE: IF this is a brand new instance then there may be no users in any role. In this case change the Role to No Role Assigned.
- Click the check box next to each name you wish to select.
- Click the Add button.
- Click the Close button.
- All the users are added to the role.