SmartSimple Microsoft Access Plug-In
Contents
Overview
The SmartSimple Access Plug-In feature is used in conjunction with SmartSimple reports to merge information from these reports into an Access Database.
- Each report you run will create a new table in the database (or optionally append data to an existing table).
- Once the tables are created you can apply any formatting, link the table to other tables, or create any additional queries and reports that you need.
- This document describes how to install and use the Access plug-in.
- This plug-in will work with Microsoft Access versions 2002 and 2003.
Installing the Access Plug-In
You can download the latest copy of the Access Plug-In from your copy of SmartSimple.
1. Select the Help, Downloads menu.
2. Right click on the SSACCESS.dll file, and choose the Save Target As menu.
3. Place this file in any folder.
4. Note the location of the folder.
Adding the Plug-in to MS-Access
- The Access plug-in must be installed to a specific database. It cannot be globally installed for all databases.
- Once installed in the database you must open the database through the Windows file system. Do not launch Access and try to open the database, as the SmartSimple menu will not be displayed.
1. Launch Microsoft Access.
2. Create a New Blank Database.
3. Choose the Tools, ActiveX Controls menu.
4. Click the Register button.
5. Change the File Type to Libraries (*.dll).
6. Navigate to the folder where you stored the Access Plug-in file.
7. Select the file SSAccess.dll from this folder.
8. Click the OK button.
The SmartSimple toolbar is added to Access.
There are two buttons: the first – SmartSimple Settings is used to configure your username and password for SmartSimple access and the second – SmartSimple Reports is used to display the reports you have permission to execute.
Configuring the Access Plug-in
- The first time you use the Access Plug-In, you need to input your SmartSimple credentials (username and password) and the setting of the SmartSimple server that you access.
- If you have previously installed any other SmartSimple integration features (Word, Excel or Outlook), then your user setting will already be established.
Setting the User Options
1. Click the SmartSimple Settings button.
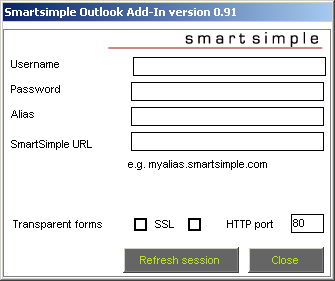
The SmartSimple Settings window is displayed.
You use this window to set the following settings:
Username - The same name you use to log into SmartSimple using a Web Browser. Password - Your normal SmartSimple password. Using SSL (port 443) - Select this option if your company is using Secure Socket Layers (SSL) to connect to SmartSimple. If in doubt, consult your administrator. Alias - Your organization's SmartSimple "entry point" HTTP Port - Defines the communications port used in your copy of SmartSimple. Normally this will be Port 80. Check with your administrator if this port does not work. You don't need to change this setting if you use SSL. SmartSimple URL - The alias is your organization's SmartSimple "entry point" (i.e. for ACME it would be acme.smartsimple.com). Do not use a www or http:// prefix. Resume Processing and Document Merging - Choose the option required for both resume processing and document merging. Select both check boxes.
SmartSimple URL Samples
1. Set the username to the name you use to log into SmartSimple.
2. Set the password to your SmartSimple password.
3. Set the Alias.
4. Set the URL.
5. Click the OK button.
In future you will be automatically connected to SmartSimple every time you open this database.
Generating a Report in Access
The purpose of the Access Plug-In is to display the results of reports created in SmartSimple, in an Access table.
1. Click the SmartSimple Reports button.
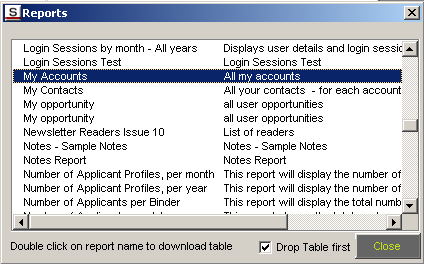
The report list is displayed.
All the reports you are permissioned to see are displayed in this list.
Drop Table
If you have previously downloaded some data and created a table, you may wish to either overwrite all the data or simply add new records to the end of the existing table.
- Deselect the Drop Table First check box to add new data to the existing table.
1. Double click in the required report.
If there are any parameters required you will be prompted.
2. Click the OK button.
The following message will be displayed:
3. Click the OK button.
The report is displayed in the Access Database window as a new table.
You can now apply any formatting, link this table to other tables, or create any additional queries and reports that you need.
Common Errors
Common errors you may encounter when using this |plug-in are:
1. User does not have access to a report due to their role.
2. Duplicate header (field) name in SmartSimple report will stop MS-Access from creating the new table, as it cannot create duplicate field names.
Programmatic Use of the Access DLL
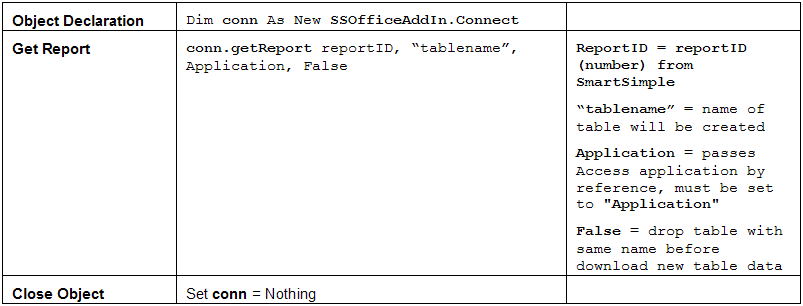
You can also access SmartSimple reports using Visual Basic for Applications code (VBA).
In order to use this technique you will need Visual Basic and Microsoft Access programming skills.
In order to access the object, use the following syntax.
System Requirements
- This feature requires Microsoft Access 2002 or 2003 installed on your computer
- Access to the Internet is required plus a valid SmartSimple username and password.


