Security Settings
Contents
Business Security Settings
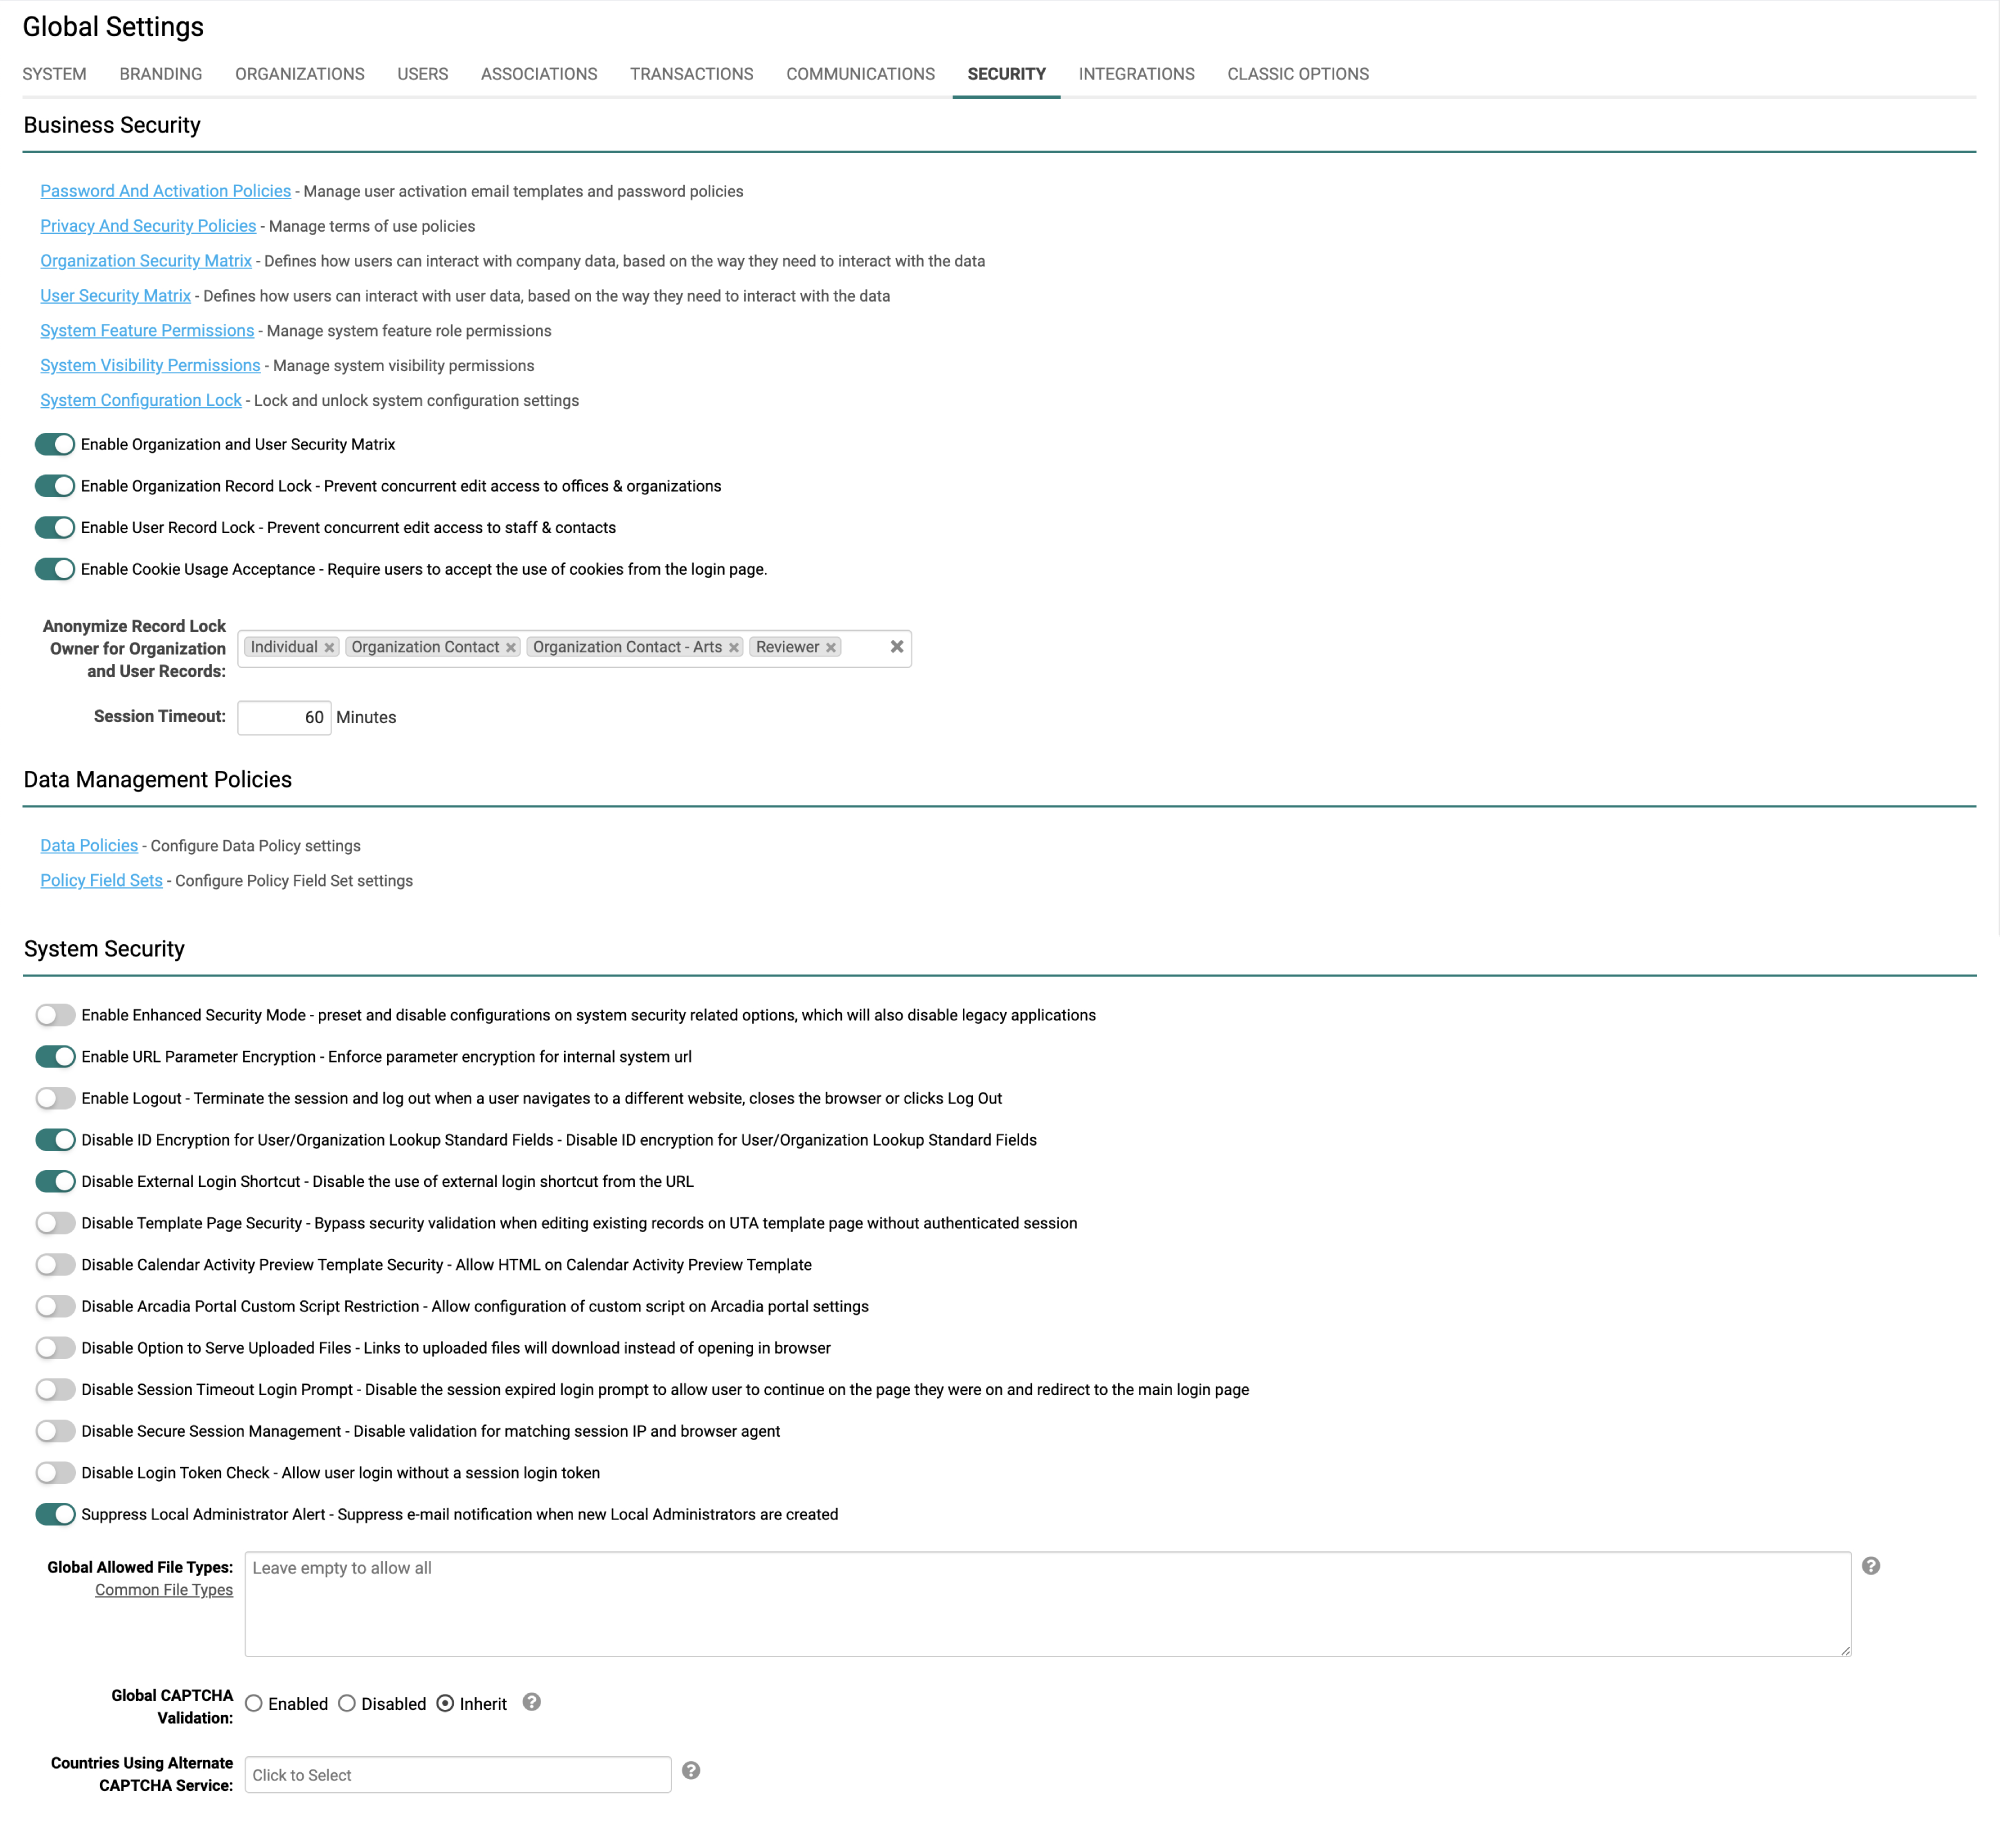
These settings are used to control system security.
To access the security settings, follow these steps:
1. Click on the 9-square menu icon on the top right of your page.
2. Under the heading Configuration, select Global Settings.
3. Click into the Security tab.
4. The Business Security Settings, which will each be explained below, are displayed under the first heading on the page.
Password and Activation Policies
The Password Policy is used to control the length and complexity of passwords, password expiration and history, the number of retries that the user is allowed, and the lockout time for the account if they exceed the number of retries. Captcha Validation can be enabled here as well. Click here for detailed information.
Privacy and Security Policies
The Privacy and Security Policies allows organizations to better highlight their privacy and other stated policies, provides tools to manage country and language combinations, and places persistent links to policies on login pages and user portals.
Organization Security Matrix
Allows system administrators to restrict interaction with organizations and associated categories. The Organization Security Matrix defines how users can interact with company data, based on the way they need to interact with the data. In order to do this you will need to Enable Organization and User Security Matrix. Once this is toggled on, the matrix can be enabled per role.
User Security Matrix
Allows system administrators to restrict interaction with the application and associated entities. The User Security Matrix defines how users can interact with user data, based on the way they need to interact with the data. In order to do this you will need to Enable Organization and User Security Matrix. Once this is toggled on, the matrix can be enabled per role.
System Feature Permissions
Allows for system administrators to personalize their copy of SmartSimple and to make various system features available to users in different roles. Some of the features located here include: Batch Update, Email Broadcast, SmartFolder Access, Emulation Mode, Personal Dashboards, SmartCards, and many more.
System Visibility Permissions
Allows for system administrators to personalize their copy of SmartSimple and to make various system objects available to users in different roles.
System Configuration Lock
The Instance Lock-Down provides the ability to remove access to all settings in your copy of SmartSimple using a global system-lock password. Click here for details on how to use this feature.
Enable Organization and User Security Matrix
Switch the Organization and User Security Matrix off or on using this toggle.
Enable Organization Record Lock
Prevent concurrent edit access to offices & organizations by toggling this on. Organization records which are presently being accessed in Edit Mode by a given user will be locked to other users attempting to edit the record.
Enable User Record Lock
Prevent concurrent edit access to staff & contacts by toggling this on. User records which are presently being accessed in Edit Mode by a given user will be locked to other users attempting to edit the record.
Enable Cookie Usage Acceptance
Toggling this on will require users to accept the use of cookies from the login page.
Anonymize Record Lock Owner for Organization and User Records
Select roles for those users who will not see the details of who has locked the particular User or Organization record they are accessing.
Session Timeout
The Session Timeout controls how long a user can be inactive in their browser before they are automatically logged out by the system. Enter your duration in minutes. See Session Timeout for more information.
Data Management Policies Settings
You can access the Data Management Policies from the same page as the Business Security options.
1. Click on the 9-square menu icon on the top right of your page.
2. Under the heading Configuration, select Global Settings..
3. Click into the Security tab.
4. Scroll down until you see the Data Management Policies heading.
Data Policies
Configure Data Policy settings here. Policy types include both Retention as well as Security policies. Policies can be set to require acceptance at a regular interval.
Policy Field Sets
Configure Data Policy Field Sets here. These are linked to Data Policies to ensure that policies contain the correct information.
System Security Settings
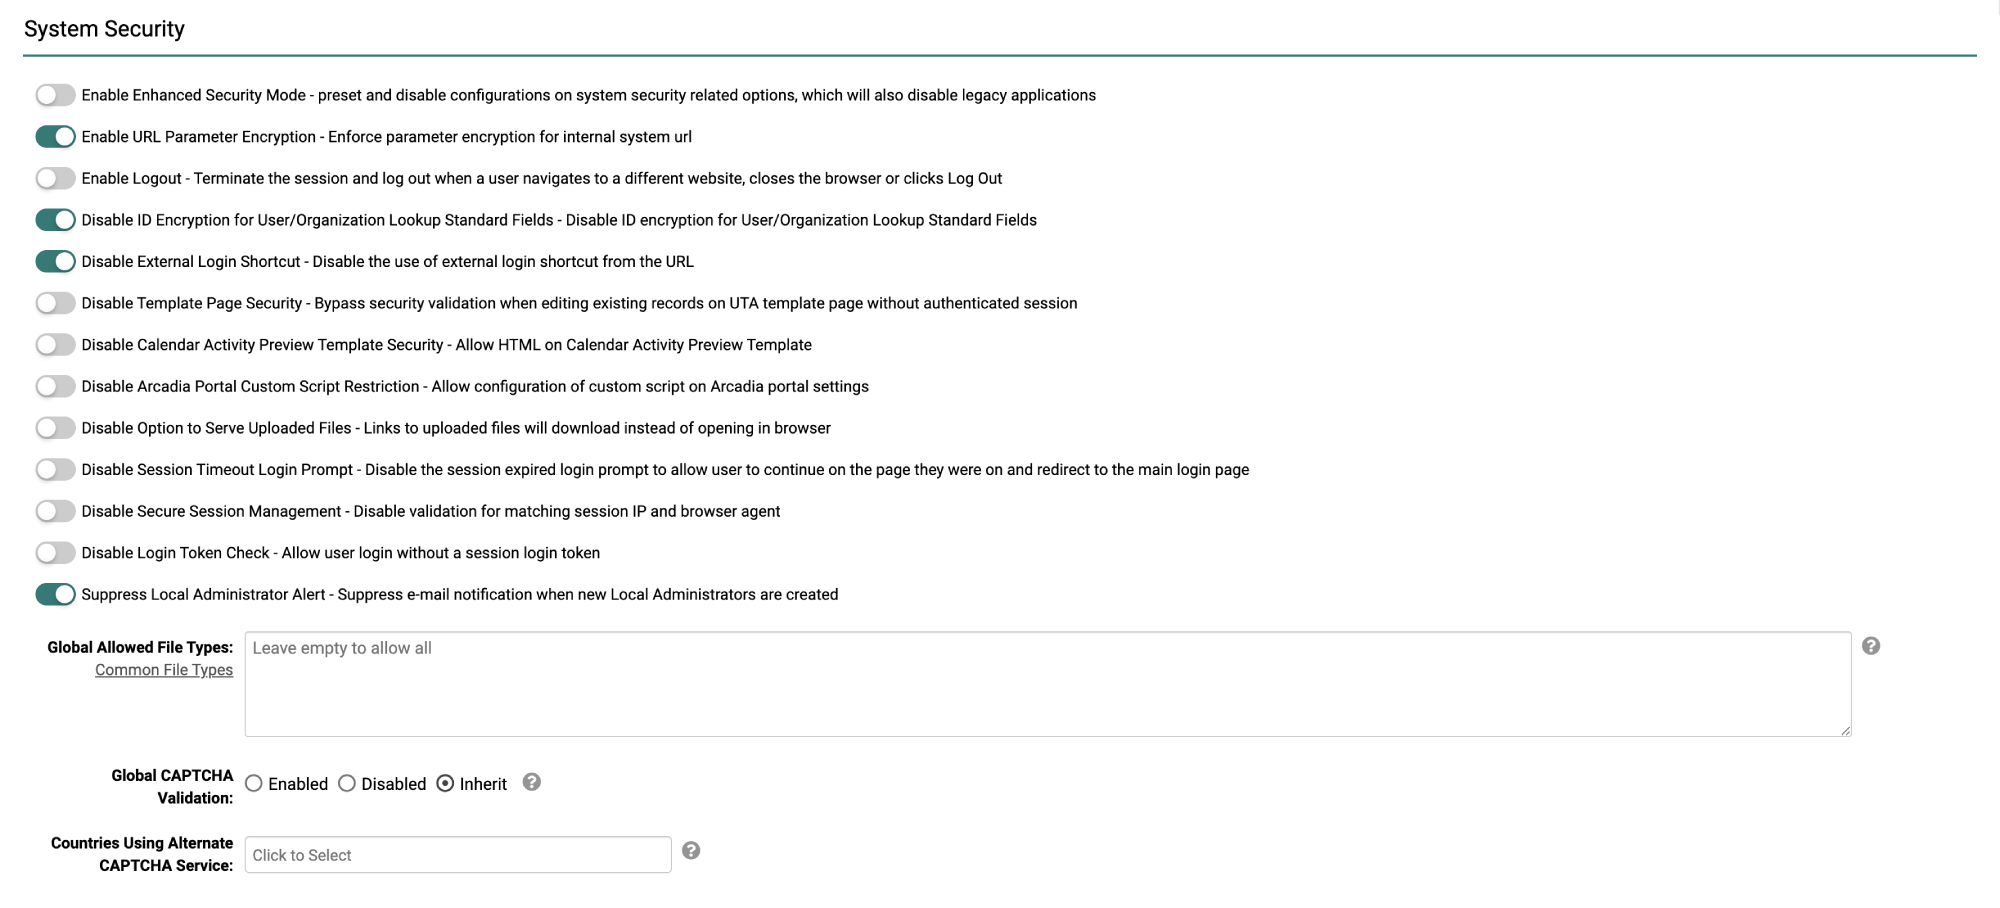
You can access the Security Settings, otherwise known as the System Security, from the same page as the Business Security options.
1. Click on the 9-square menu icon on the top right of your page.
2. Under the heading Configuration, select Global Settings..
3. Click into the Security tab.
4. Scroll down until you see the System Security heading.
Enable Enhanced Security Mode
Preset and disable configurations on system security related options. This will also disable legacy applications.
Enable URL Parameter Encryption
This setting will encrypt object IDs such as custom field IDs, userid, companyid, activity. This enhances security by making it impossible to guess URLs.
Enable Logout
The system can be configured to automatically logout the user and store the session end time in the user log whenever the Logout button is clicked, the user navigates to a different website, or when the browser is closed.
A confirmation message can also be enabled to confirm that the user will be logged out.
Disable ID Encryption for User/Organization Lookup Standard Fields
This setting will disable identity encryption for both User and Organization Lookup Standard fields.
Disable External Login Shortcut
This setting will disable the use of the external login shortcut (exlogin) from the URL.
Disable Template Page Security
Bypass security validation when editing existing records on UTA template page without authenticated session.
Disable Calendar Activity Preview Template Security
Allow HTML code on Calendar Activity Preview Template.
Disable Arcadia Portal Custom Script Restriction
Allow configuration of custom scripts on Arcadia portal settings. This is not recommended.
Disable Option to Serve Uploaded Files
If toggled on, links to uploaded files will download instead of opening in browser
Disable Session Timeout Login Prompt
If Session Timeout is set, this setting will disable the 30-second alert and login prompt pop-ups. Toggling on will disable the session expired login prompt to allow user to continue on the page they were on and redirect to the main login page.
Disable Secure Session Management
This Global System Security Setting will disable the validation for matching session IP and browser agent, which is one part of the security features in the platform that protect against Cross Site Framing attacks.
Options if users are being randomly logged out:
- Set the network proxy to sticky sessions when communicating with SmartSimple
- Set the network proxy to bypass the proxy and just direct connect from the desktop/laptop computer to SmartSimple
- Disable the Secure Session Management setting and accept the potential risk
Disable Login Token Check
Allow user login without a session login token. This is not recommended due to security reasons.
Suppress Local Administrator Alert
Toggling on will suppress e-mail notification when new Local Administrators are created. If toggled off, emails will be sent to all administrators when new Administrators are created.
Global Allowed File Types
File types listed here will be allowed to be uploaded in upload fields. Leave this section empty if you'd like to allow all file types system-wide. Specify a comma separated list of extensions for file types you'd like to allow. Additional restrictions can be added on individual upload fields.
Global CAPTCHA Validation
Enabled and Disabled will control whether or not CAPTCHA will appear in all areas of the system. If Inherit is selected, you can choose at the signup and template page level when you want the CAPTCHA to appear. CAPTCHA will automatically appear on login and activation pages. The default CAPTCHA service is Google's reCAPTCHA.
Countries Using Alternate CAPTCHA Service
Countries added here will use alternate CAPTCHA services. This is only if Global Captcha Validation is set to Enabled or Inherit. The default CAPTCHA service is Google's reCAPTCHA.

