Configuring the Level 2 Entity
Contents
Configuring the Level 2 Entity
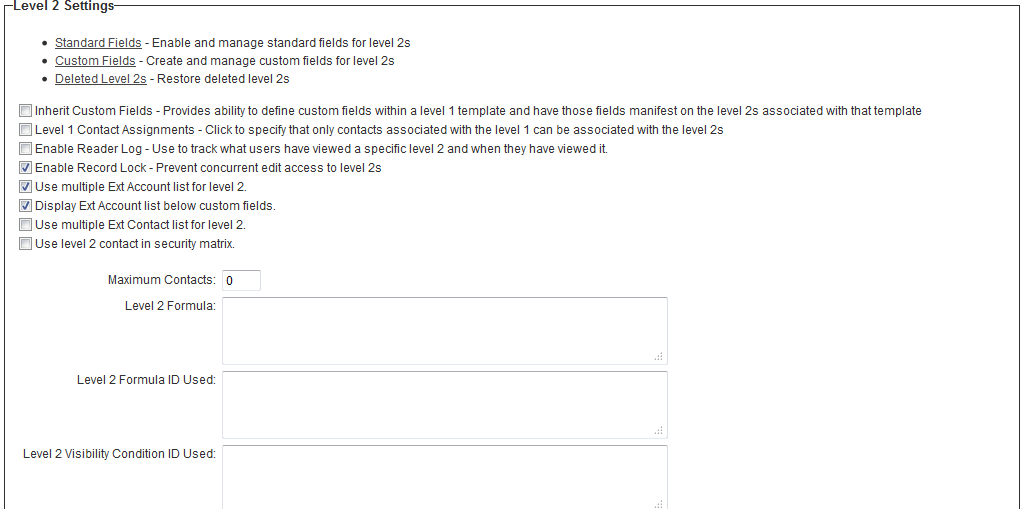
1. Click on the Settings menu, UTA Settings - Entity link.
2. Scroll to the Activity Settings section of the page.
The Level 2 Entity will consist of:
- Standard fields relabeled to suit the application.
- Custom fields that will be associated with all Level 1 items.
- Inherit Custom Fields – Provides the ability to create Level 2 item custom fields that are only available based on the selected Level 1 template.
- Level 1 Contact Assignments – Restrict the people that can be associated with a Level 2 activity to only those associated with the Level 1 item.
- Auto Assign People – Automatically assign people associated with the Level 1 item to all Level 2 activities.
- An optional Reader Log that will track every time a user displays the Level 2 item and the amount of time that they review that item. This is a privacy audit feature that can be enabled in sensitive applications. The user will not be aware of their display of the item. This feature is used in conjunction with the Manager Permission – View Reader Log.
3. Click the Standard Fields link.
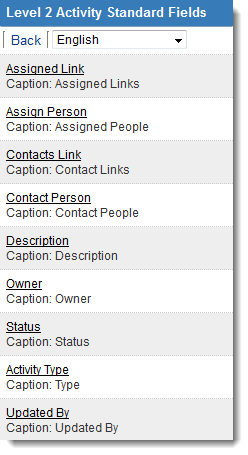
The Standard field list is displayed.
Level 2 Standard Field Features
This screen works in a similar manner to the Level 1 standard field list.
- Adding a field – Click the right arrow next to the field name and the field name will be copied to the label box.

- Adding and renaming a field – Type a new caption for the field in the label box.
- Removing a field – Click the left arrow next to the field name or select and delete the field name from the label box.

- To provide mouse over help on a field – Type the help in the instruction box to the right of the label box.
- Clicking the Mandatory check box will make the field required before the record can be saved.
Standard Level 2 Field List
The following standard fields are available at Level 2.
| Field Name | Description | Associated Variable |
| Activity List | Displays list of activities on the Level 2. | not applicable |
| Activity Type | Displays the Level 2 Types in a combo box. | @type@ |
| Amount | An amount field. | @eamount@ |
| Assign Person | Displays a lookup button so internal people can be assigned to the item. If you have the [UTA_Standard_Field_Settings#Auto_Assign|Enable Auto Assign Creator to this field on New Records] setting switched onn, then on save the field will be automatically populated with the details of the current external user. | @assigned@ |
| Assigned Link | Displays links to the assigned people. Clicking the link will display the contact details. Assigned people are always internal people. | not applicable |
| Contact Person | Displays a lookup button so external people can be assigned to the item. | @contact@ |
| Contacts Link | Displays links to the contact people. Clicking the link will display the contact details. Contact people are always external people. | not applicable |
| Created By | Stamp of user name that created the record. | not applicable |
| Created Date | Stamp of the date and time that the record was created. | not applicable |
| Description | Narrative description. | @description@ |
| Duration | Duration in hours. | @span@ |
| End Date | Generally represents an end date or milestone. | @enddate@ |
| End Time | An end time for a short event. | @endhour@:@endminute@ @endampm@ |
| Follow-up | Specifies the number of day or hours after the activity that a message should be sent. This field is displayed as a combo box. | not applicable |
| Follow-up Sent | Indicates if the follow-up message has been sent. This field is displayed as two options buttons (Yes = Sent, No = Not Sent yet). If you use this field and change the setting to Yes before the message is due the message will not be sent. | not applicable |
| Follow-up Type | Indicates if the message should be sent by quick message (internal to SmartSimple users) or email. You can also specify which group of people should receive the message. This field displays as a combo box. | not applicable |
| Last Modified | Shows date/time stamp of when record was last modified. | not applicable |
| Location | Indicates a location for the Level 2 item. If you prefix the caption that you give the field with an @ sign, the caption will display a globe icon and the user can look up the location using their selected mapping service. | @location@ |
| Owner | Enable Auto Assign Creator to this field on New Records] setting switched onn, then on save the field will be be automatically populated with the details of the current external user. | @owner@ |
| Parent Name | The name of the associated Level 1 item. | @parent.name@ |
| Reminder | Specifies the number of day or hours before the activity that a message should be sent. This field is displayed as a combo box. | not applicable |
| Reminder Sent | Indicates if the reminder message has been sent. This field is displayed as two option buttons (Yes = Sent, No = Not Sent yet). If you use this field and change the setting to Yes before the message is due the message will not be sent. | not applicable |
| Reminder Type | Indicates if the message should be sent by quick message (internal to SmartSimple users) or email. You can also specify which group of people should receive the message. This field displays as a combo box. | not applicable |
| Start Date | Generally represents a start date. | @startdate@ |
| Start Time | Start time of a short event. | @starthour@:@startminute@ @startampm@ |
| Status | The status of the Level 2 item. | @status@ |
| Subject | A short one line narrative for the Level 2 item. | @subject@ |
| Updated By | The name of the user that last updated the Level 2 items. | @updatedbyname@ |
| UTA Providers | Adds section to Level 2 items that allows for association of objects from other UTAs with this record. See Configuring UTA Provider/Receiver (Consumer) Relationships for further details. | not applicable |
| Whole Day Event | Indicates if the event is a whole day event. | @isallday@ |
| Latitude | Displays latitude if Address Mapping configured against the Level 2. | @latitude@ |
| Longitude | Displays longitude if Address Mapping configured against the Level 2. | @longitude@ |
Selecting the Activity fields
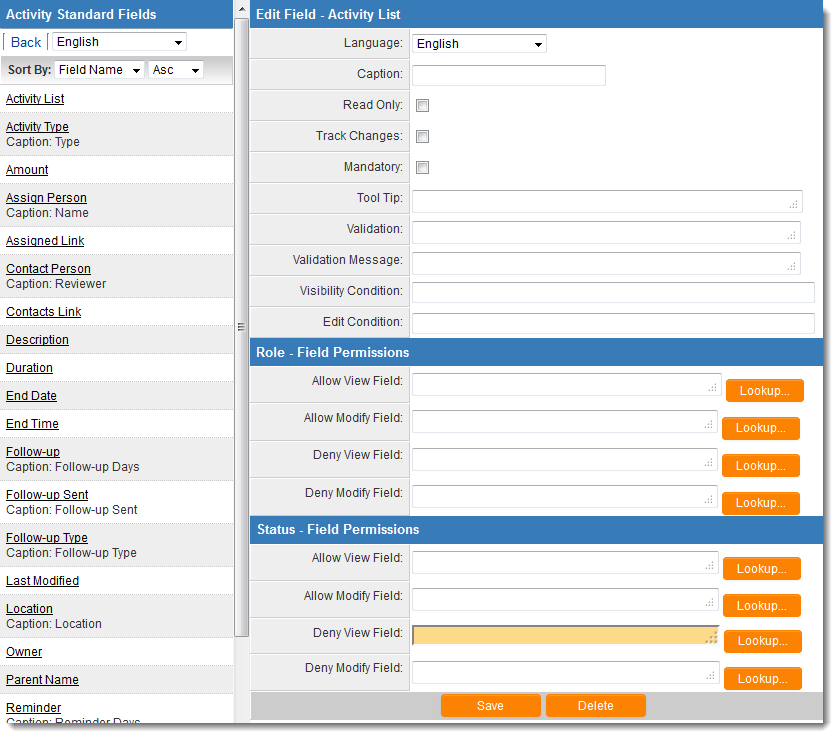
1. Configure the following Activity Fields:
Not all activity fields are shown in this screen – only the ones that you need to set.
- The parent name field is not being used, as the contract Level 1 name does not have a name.
- The Amount field is not being used as the amount is not a property of all Level 2 items, but only a property of the invoice type entity.
2. Click the Save button.
3. Click the Edit Application tab to return to the Configuration window.
Setting the Level 2 settings
Generally, at this stage you would add the custom fields required for all Level 2 entities, but in this case you will only add custom fields to the type of Level 2 Entity – Invoice. This technique provides more flexibility as the generic Level 2 Entity does not contain any specific fields.
1. Click the Settings tab.
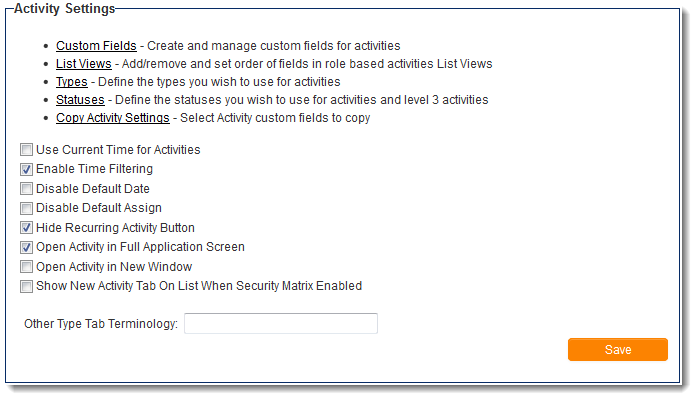
2. Scroll to the Activity Settings Section.
This panel is used to set:
- Custom fields – Common to all Level 1 items.
- List View – The fields and order required for the Level 2 list view.
- Types – The types of Level 2 items required (the equivalent to Level 1 Templates).
- Statuses – The statuses required for the Level 2 items. In addition to these links you can also enable the following Level 2 options:
- Use Current Time for Activities – This option defaults the time fields to the current time. This option is only applicable if you are using the Level 2 time fields.
- Enable Time Filtering – Displays From and To time fields on the Level 2 list view.
- Open Activity in Full Application Screen – When clicking on a Level 2 item at the bottom of the Level 1 item, this option displays the Level 2 item in the full window. If you don’t use this option the Level 2 item will be displayed below the Level 1 in the same window.
- Open Activity in New Window – Displays the Level 2 item in a separate window. The Level 1 item is still displayed.
3. Click the Open Activity in Full Screen check box.
4. Click the Save button.


