Difference between revisions of "How to Add Users and Contacts"
Julia Decker (talk | contribs) |
m |
||
| Line 103: | Line 103: | ||
3. Click on the [[User|user’s]] name to cancel the duplicate check and display the user record. | 3. Click on the [[User|user’s]] name to cancel the duplicate check and display the user record. | ||
| − | [[Category:System Management]] | + | [[Category:System Management]][[Category:FAQ]] |
Revision as of 16:42, 21 November 2007
Contents
How to Add Users and Contacts
You can add people to the organisational hierarchy using any of the following techniques:
- Manually entering contacts.
- Uploading in bulk through Import wizards.
- Uploading in bulk through Autoloader.
- Enabling one or more company sign up pages.
- Importing contacts from Microsoft Outlook using the Outlook Plug-in feature.
- Importing using the API functionality and a custom program that your organisation could create.
Users Versus Contacts
- If you enable the login feature when adding people, they will be able to log into the system and you can consider then “users”, otherwise they are simply contacts.
- When you add people that you wish to use the system, you can choose to send each person an e-mail containing their username, password, and the URL (link) to access your copy of SmartSimple.
- As part of the contact setup process, you assign people "roles" to define their access to system resources such as applications, folders, calendars, or discussions. Peoples' roles also control the interface that they will see when they log into your copy of SmartSimple.
Manually adding Users
People are always added to some “level’ of the hierarchy, so when you wish to add a new person you must first select the appropriate organisational level.
1. Click the Company, Internal Users menu.
The original person is displayed directly under the "root" organisation name. If you wish to add a new person to the root you click on the root organisation link.
2. Click the organisation to which you wish to add the person.
3. Click the New, User menu.
The New User – Quick Entry for Duplication Check window is displayed.
First name, last name, email address and phone number will be checked for duplicate entries.
If no potential duplicates are found, then the New User window is displayed.
The company address has been added to the contact.
Standard People Fields
The standard fields used to describe a person are:
- First Name - First Name of the person.
- Last Name - Last Name of the person.
- Title - Business title of the person.
- Prefix/Suffix - Prefix and suffix of the contact.
- Phone/Extension - Direct line for the person and their extension.
- E-mail - E-mail address. An email address is required to allow a user to log into the system.
- Primary Contact - Check box to indicate if this person is the primary contact at the organisation.
- Organisation - The organisation to which this person should be associated. Changing the organisation will “move’ that person to another organisation.
- Address - Street of the person – if different from their organisation.
- Address 2 - Additional address line
- City - City address of the person – if different from their organisation.
- Province - Province address of the person – if different from their organisation.
- Country - Country of the person – if different from their organisation.
- Postal - Postal code of the person – if different from their organisation.
1. Complete the user details.
2. Click the Save button.
Note that new menu items are enabled for the user.
3. Click the View User menu.
Extending the User Details
Contact details are easily extended through the addition of custom fields.
Once the profile is saved, you can add further information to the user profile.
User Duplicate Checking
In this exercise, you will attempt to create a new user of the same name.
1. Choose the New, User menu.
2. Enter the same contact details.
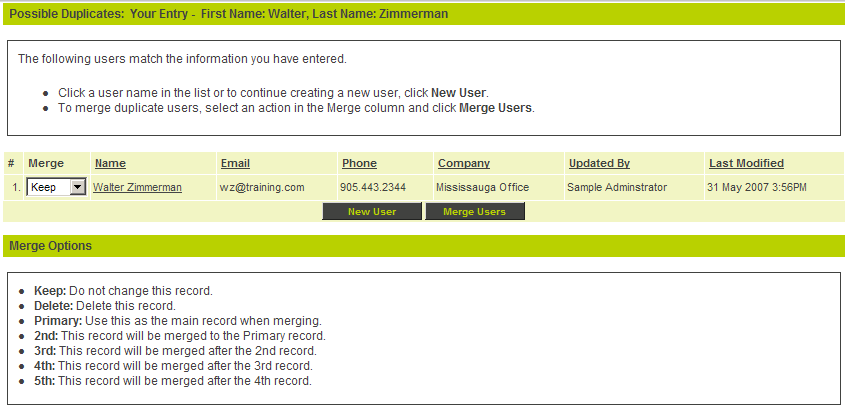
The Possible Duplicates window is displayed.
Possible duplicates are displayed in chronological sequence from the most recently updated to the oldest.
This screen is used to:
Combine multiple contact records into a single record.
- Missing fields in the primary record are added in sequence from the other records.
- Activities and notes from all records are merged into the primary record.
- The Merged records are deleted.
Delete redundant records.
If the new record is actually different then you can continue and create the new record.
3. Click on the user’s name to cancel the duplicate check and display the user record.


