Difference between revisions of "Online Editing"
| (8 intermediate revisions by 3 users not shown) | |||
| Line 1: | Line 1: | ||
| − | Microsoft Word, Excel and PowerPoint documents uploaded to SmartSimple can be edited directly from the system, rather than having to download, edit and upload each document. When you save the file from within the application that you are using it will | + | Microsoft Word, Excel and PowerPoint documents uploaded to SmartSimple can be edited directly from the system, rather than having to download, edit and upload each document. When you save the file from within the application that you are using it will be uploaded to SmartSimple automatically. |
| − | While you are editing the file, it will be marked as "checked out" so no one else will be able to edit the file at the same time. | + | While you are editing the file, it will be marked as "checked out" so no one else will be able to edit the file at the same time. |
When enabled, clicking on an ''Edit'' button next to the uploaded file will launch the file in the Microsoft application. All versions of Word, Excel and PowerPoint are supported. When the edits have been made, and the file is saved, the edits will be reflected in the document saved to the [[Smart Folder]] or [[custom fields|custom field]]. | When enabled, clicking on an ''Edit'' button next to the uploaded file will launch the file in the Microsoft application. All versions of Word, Excel and PowerPoint are supported. When the edits have been made, and the file is saved, the edits will be reflected in the document saved to the [[Smart Folder]] or [[custom fields|custom field]]. | ||
| + | |||
| + | ==Before You Begin== | ||
| + | ===System Requirements=== | ||
| + | * Microsoft Windows operating system | ||
| + | * Microsoft Office | ||
| + | * Microsoft .NET framework 4.5 | ||
==Enabling Online Editing== | ==Enabling Online Editing== | ||
===Download the application=== | ===Download the application=== | ||
Firstly, download the Online Editing application from the [[Administration_Interface#Help_Menu|Help > Downloads]] link:<br /> | Firstly, download the Online Editing application from the [[Administration_Interface#Help_Menu|Help > Downloads]] link:<br /> | ||
| − | [[Image:OnlineEditingDownloadLink.png | + | [[Image:OnlineEditingDownloadLink.png|link=|600px]]<br /> |
Install the application on each computer that will be using the Online Editing feature:<br /> | Install the application on each computer that will be using the Online Editing feature:<br /> | ||
[[Image:OnlineEditorApplication.png|link=]]<br /> | [[Image:OnlineEditorApplication.png|link=]]<br /> | ||
| − | Next, run the application to enter your user credentials: (This only needs to be completed the first time you install Online Editing on your machine)<br />. | + | Next, run the application to enter your user credentials: (This only needs to be completed the first time you install Online Editing on your machine)<br />. |
| − | [[Image:OnlineEditSettingConfig.png|link=]] | + | [[Image:OnlineEditSettingConfig.png|link=]] |
| + | |||
* '''User Name''': the ''user name'' that you use to log into SmartSimple (typically, your email address). | * '''User Name''': the ''user name'' that you use to log into SmartSimple (typically, your email address). | ||
* '''Password''': the password you use to log into SmartSimple. | * '''Password''': the password you use to log into SmartSimple. | ||
| Line 23: | Line 30: | ||
===Enable Online Editing from Global Settings=== | ===Enable Online Editing from Global Settings=== | ||
Now, enable the ''Online Editing'' feature in [[Global Settings]]:<br /> | Now, enable the ''Online Editing'' feature in [[Global Settings]]:<br /> | ||
| − | [[Image:Business and System Configuration Online Editing.png|link=]] | + | [[Image:Business and System Configuration Online Editing.png|link=]] |
When ''Online Editing'' is enabled, the ''Edit'' button will appear next to all files uploaded to [[Smart Folder]]s:<br /> | When ''Online Editing'' is enabled, the ''Edit'' button will appear next to all files uploaded to [[Smart Folder]]s:<br /> | ||
| Line 30: | Line 37: | ||
===Enable Online Editing on Individual Custom Fields=== | ===Enable Online Editing on Individual Custom Fields=== | ||
On each custom field to which you can upload files ([[Custom Field Type: Link – Single File|Link – Single File]] and [[Custom Field Type: Link – Multiple Files|Link – Multiple Files]] field types), edit the field and check off ''Enable Online Editing'' for the fields on which you want to enable editing.<br /> | On each custom field to which you can upload files ([[Custom Field Type: Link – Single File|Link – Single File]] and [[Custom Field Type: Link – Multiple Files|Link – Multiple Files]] field types), edit the field and check off ''Enable Online Editing'' for the fields on which you want to enable editing.<br /> | ||
| − | [[Image:OnlineEditingConfiguration.png|link=]] | + | [[Image:OnlineEditingConfiguration.png|link=]] |
| − | For those fields, the ''Edit'' icon will now be visible next to the field. | + | For those fields, the ''Edit'' icon will now be visible next to the field.<br /> |
| − | [[Image:EditButtononCustomField.png|link=]] | + | [[Image:EditButtononCustomField.png|link=]] |
==Editing documents== | ==Editing documents== | ||
| − | When the ''Edit'' button or icon is clicked next to an editable document, you will be prompted to open the document. You will note that the suffix "''_m.ssdoc''" has been added to the filename. | + | When the ''Edit'' button or icon is clicked next to an editable document, you will be prompted to open the document. You will note that the suffix "''_m.ssdoc''" has been added to the filename. |
| − | [[Image:Ssdoc extension.png|350px|link=]] | + | |
| − | Click ''OK'' and the file will be opened in your computer's version of Word, Excel or PowerPoint (depending on the file type being edited. | + | * '''Note:''' Your browser and security settings control the options, if the file can opened immediately or must be saved to your machine first. You may see one of the following: |
| + | |||
| + | [[Image:Ssdoc extension.png|link=|350px]] | ||
| + | |||
| + | :: OR | ||
| + | [[Image:OnlineEditOpenSave2.png|link=|800px]] | ||
| + | |||
| + | |||
| + | Click '''Open''', '''Save''', or ''OK'' as appropriate and the file will be opened in your computer's version of Word, Excel or PowerPoint (depending on the file type being edited.) | ||
| − | Now make your edits, and when the file is saved in Word, Excel or PowerPoint, the "''_m.ssdoc''" extension will | + | Now make your edits, and when the file is saved in Word, Excel or PowerPoint, the "''_m.ssdoc''" extension will automatically save the file back into the record within SmartSimple. |
| − | [[Category:Plug-Ins for Microsoft Office]] | + | [[Category:Plug-Ins for Microsoft Office]][[Category:Desktop Plugins]][[Category:SmartFolders]] |
Latest revision as of 10:56, 31 May 2019
Microsoft Word, Excel and PowerPoint documents uploaded to SmartSimple can be edited directly from the system, rather than having to download, edit and upload each document. When you save the file from within the application that you are using it will be uploaded to SmartSimple automatically.
While you are editing the file, it will be marked as "checked out" so no one else will be able to edit the file at the same time.
When enabled, clicking on an Edit button next to the uploaded file will launch the file in the Microsoft application. All versions of Word, Excel and PowerPoint are supported. When the edits have been made, and the file is saved, the edits will be reflected in the document saved to the Smart Folder or custom field.
Contents
Before You Begin
System Requirements
- Microsoft Windows operating system
- Microsoft Office
- Microsoft .NET framework 4.5
Enabling Online Editing
Download the application
Firstly, download the Online Editing application from the Help > Downloads link:

Install the application on each computer that will be using the Online Editing feature:

Next, run the application to enter your user credentials: (This only needs to be completed the first time you install Online Editing on your machine)
.
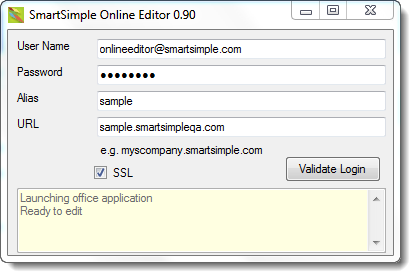
- User Name: the user name that you use to log into SmartSimple (typically, your email address).
- Password: the password you use to log into SmartSimple.
- Alias: the alias for your copy of SmartSimple can be found in Global Settings
- URL: the URL for your copy of SmartSimple (example: grants.smartsimple.com)
- SSL: if the URL in the address bar of your browser is prefaced with "https:" when you log in to SmartSimple, check this box.
Fill in all of the applicable field and click the Validate Login button to confirm that the credentials have been entered correctly.
Enable Online Editing from Global Settings
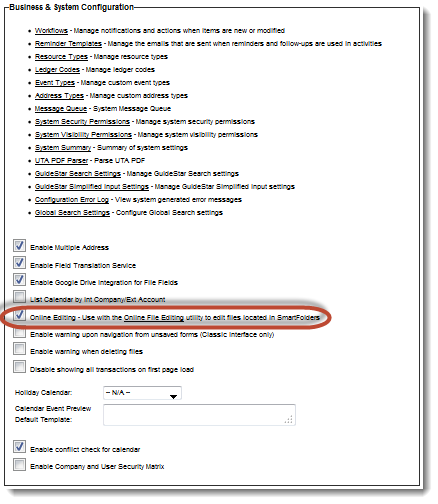
Now, enable the Online Editing feature in Global Settings:
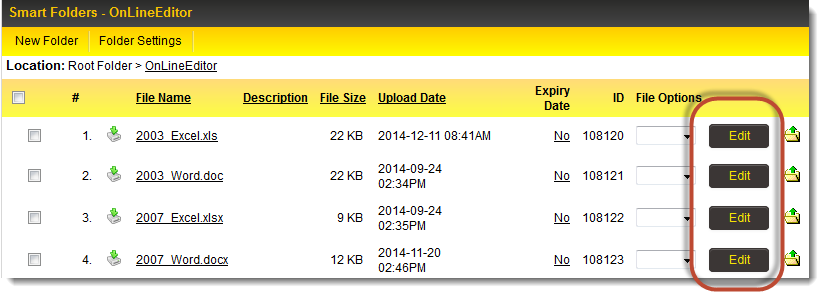
When Online Editing is enabled, the Edit button will appear next to all files uploaded to Smart Folders:
Enable Online Editing on Individual Custom Fields
On each custom field to which you can upload files (Link – Single File and Link – Multiple Files field types), edit the field and check off Enable Online Editing for the fields on which you want to enable editing.
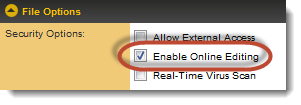
For those fields, the Edit icon will now be visible next to the field.

Editing documents
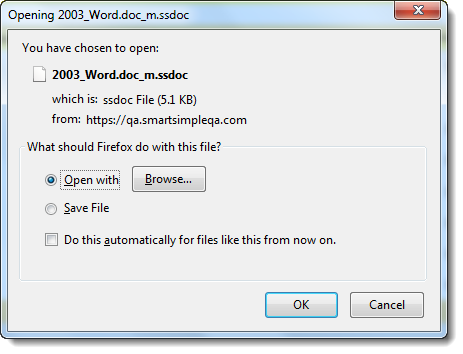
When the Edit button or icon is clicked next to an editable document, you will be prompted to open the document. You will note that the suffix "_m.ssdoc" has been added to the filename.
- Note: Your browser and security settings control the options, if the file can opened immediately or must be saved to your machine first. You may see one of the following:
- OR
Click Open, Save, or OK as appropriate and the file will be opened in your computer's version of Word, Excel or PowerPoint (depending on the file type being edited.)
Now make your edits, and when the file is saved in Word, Excel or PowerPoint, the "_m.ssdoc" extension will automatically save the file back into the record within SmartSimple.
