Difference between revisions of "Using Date Criteria"
| (2 intermediate revisions by the same user not shown) | |||
| Line 96: | Line 96: | ||
| − | + | {{ReportBuilderDateFormatOption}} | |
| − | |||
| − | |||
| − | |||
| − | |||
| − | |||
| − | |||
{{PrevNextStart}} [[Prompting for a Criteria using a Wildcard]] | {{PrevNextStart}} [[Prompting for a Criteria using a Wildcard]] | ||
| − | {{PrevNextMid}} [[Using Date Translation in Reports]] | + | {{PrevNextMid}} [[Using Date Translation in Reports]] {{PrevNextEnd}} |
| − | {{PrevNextEnd}} | ||
| − | [[Category:Reports]][[Category:Criteria]] | + | [[Category:Reports]][[Category:Criteria]][[Category:Date Formats]] |
Latest revision as of 12:13, 30 August 2013
All Date/time fields are stored in SmartSimple in the same field type – Date/Time. This means that when you are working with fields of this type, you need to deal with a value that contains both the date and the time stored in a single value.
You will need to manipulate this field type in two ways:
- Extract the required value and display in date-specific formats.
This is achieved by using the Date/Time Translation combo box displayed under the field name combo box.
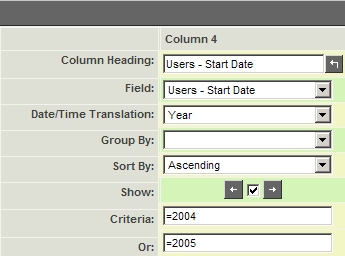
In this example, the year will be displayed from the date.
- Set date criteria to select records based on the dates.
You may need to combine these techniques to get the types of reports that you require.
For example, if you wish to list all the employees hired in a specific year and only show the year (not the date), you could translate the date format to only display the year, and then set a criteria to the value of that year.
If you wished to show the actual date, then you would have to set two date criteria representing 1-January and 31-December of the year.
In the following example, you will be using employee data that includes an employee start date field.
1. Click the New Report tab.
2. Add the following report details:
3. Select the User table.
The user table provides access to all internal people, as well as any custom fields associated with internal people, and associated role-based fields.
In this instance, there are two custom fields: The salary and the start date.
4. Click the Save button.
5. Click the Report Builder button.
6. Add the following fields:
7. Click the Build Query button.
8. Click the Save button.
9. Click the Preview button.
All records are displayed.
The date is displayed in the default format of year, month, and date.
It is always a good idea to ensure that the basic query returns some results before applying criteria.
10. Close the report and parameter window.
11. Click the Report Builder tab.
Once you have selected the appropriate format for the date, you can apply criteria to match the format.
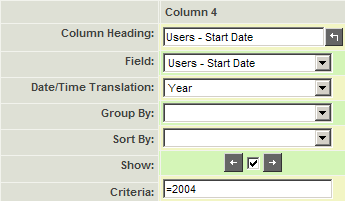
In the current example you can set the criteria to =2004 to list all the people with a start date in that year.
1. Set the Criteria to =2004.
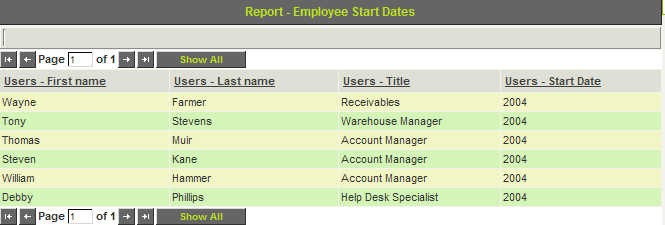
2. Build, save and preview the report.
Only employees with a start date in 2004 are displayed.
3. Close the preview.
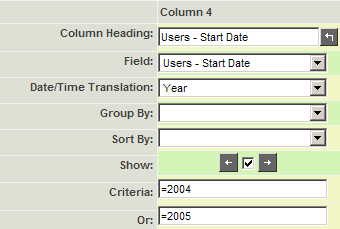
4. Add additional criteria to display employees that started in 2005.
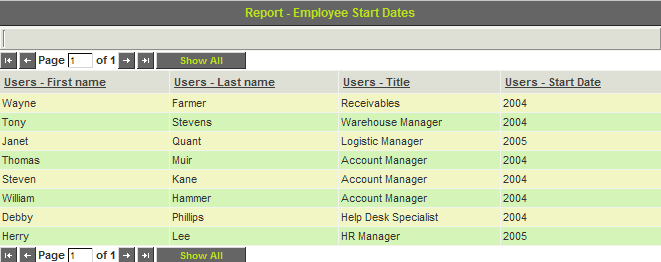
5. Build, save, and preview the report.
These dates are not displayed in ascending order.
6. Apply the Ascending Sort Order to the report.
7. Redisplay the report.
Report Builder Date Format Option
Under the Calculated Field section of the Report Builder, you can use the following format for a date field:
| Syntax | Output |
| DATE_FORMAT([this], '%W, %M %D') | Thursday, November 5th |
| DATE_FORMAT([this], '%h:%i %p') | 11:45 AM, 02:00 PM |


