Difference between revisions of "SmartSync for Folder Synchronization"
(updating categories) |
|||
| Line 1: | Line 1: | ||
| + | {{Deprecated}} | ||
| + | |||
==Overview== | ==Overview== | ||
| + | The '''SmartSync''' feature is an extension of [[SmartSimple]], which lets [[SmartSimple]] [[User|users]] keep a local set of file folders synchronized with a set of [[Smart Folder|SmartFolders]]. | ||
| − | + | Using the '''SmartSync''' feature you can: | |
| − | |||
* Schedule synchronization at regular intervals. | * Schedule synchronization at regular intervals. | ||
* Force synchronization on demand. | * Force synchronization on demand. | ||
| Line 9: | Line 11: | ||
'''SmartSync''' is a program that you must install on the local computer. | '''SmartSync''' is a program that you must install on the local computer. | ||
| − | The '''SmartSync''' feature functions with Microsoft Windows versions 98, 2000, and XP. | + | The '''SmartSync''' feature functions with Microsoft Windows versions 98, 2000, and XP. It will not work with any other operating system. |
==Installing SmartSync== | ==Installing SmartSync== | ||
| − | + | Download the latest copy of the '''SmartSync''' from your copy of [[SmartSimple]]. Use the '''Help''', '''Downloads''' [[Menu|menu]] to access this [[Application|application]]. | |
| − | Download the latest copy of the '''SmartSync''' from your copy of [[SmartSimple]]. | ||
If the '''Download''' or '''Help''' [[Menu|menu]] items are not available, you should contact your [[System Administrator|system administrator]]. | If the '''Download''' or '''Help''' [[Menu|menu]] items are not available, you should contact your [[System Administrator|system administrator]]. | ||
==Launching SmartSync== | ==Launching SmartSync== | ||
| − | |||
1. Use the '''Start''', '''Programs''' [[Menu|menu]] to launch '''SmartSync'''. | 1. Use the '''Start''', '''Programs''' [[Menu|menu]] to launch '''SmartSync'''. | ||
[[Image:Sync2.png]] | [[Image:Sync2.png]] | ||
| − | + | ||
| − | There are two views of '''SmartSync''': the '''Synchronization''' and the '''Setting''' view. | + | There are two views of '''SmartSync''': the '''Synchronization''' and the '''Setting''' view. The default view is the '''Synchronization''' view. |
Before you can use '''SmartSync''' you must use the '''Setting''' view to establish your [[Username|username]], [[Password|password]], local and remote folders. | Before you can use '''SmartSync''' you must use the '''Setting''' view to establish your [[Username|username]], [[Password|password]], local and remote folders. | ||
==Setting the User Options== | ==Setting the User Options== | ||
| − | |||
1. Click the '''Settings''' button. | 1. Click the '''Settings''' button. | ||
| Line 34: | Line 33: | ||
[[Image:Sync1.png]] | [[Image:Sync1.png]] | ||
| − | + | ||
2. Set the '''Web Alias''' to your [[SmartSimple]] login [[Alias|alias]]. (e.g. for ACME the login [[URL]] would be acme.smartsimple.com and the Web [[Alias]] would be acme). | 2. Set the '''Web Alias''' to your [[SmartSimple]] login [[Alias|alias]]. (e.g. for ACME the login [[URL]] would be acme.smartsimple.com and the Web [[Alias]] would be acme). | ||
| Line 56: | Line 55: | ||
[[Image:Sync3.png]] | [[Image:Sync3.png]] | ||
| − | :'''''NOTE''': If you have in excess of 600 folders within your [[SmartFolder]] structure (including all subfolders) SmartSync will be unable to enumerate the folders and will fail at this point. In this case you must reduce the number of SmartFolders in order to use SmartSync.'' | + | |
| − | + | : '''''NOTE''': If you have in excess of 600 folders within your [[SmartFolder]] structure (including all subfolders) SmartSync will be unable to enumerate the folders and will fail at this point. In this case you must reduce the number of SmartFolders in order to use SmartSync.'' | |
2. Select the name of the top folder that you wish to have synchronized. | 2. Select the name of the top folder that you wish to have synchronized. | ||
| Line 73: | Line 72: | ||
[[Image:Sync4.png]] | [[Image:Sync4.png]] | ||
| − | + | ||
The local files will be automatically uploaded to [[SmartSimple]] once you synchronize for the first time. | The local files will be automatically uploaded to [[SmartSimple]] once you synchronize for the first time. | ||
==Enabling SSL== | ==Enabling SSL== | ||
| − | |||
If your copy of [[SmartSimple]] is using Secure Socket Layer you can enable the [[SSL]] option. | If your copy of [[SmartSimple]] is using Secure Socket Layer you can enable the [[SSL]] option. | ||
[[Image:Sync5.png]] | [[Image:Sync5.png]] | ||
| − | + | ||
==Setting the Synchronization Frequency== | ==Setting the Synchronization Frequency== | ||
| + | [[Image:Sync6.png]] | ||
| − | |||
| − | |||
You can set '''SmartSync''' to automatically synchronize: | You can set '''SmartSync''' to automatically synchronize: | ||
| Line 96: | Line 93: | ||
==Synchronization== | ==Synchronization== | ||
| − | |||
1. Click on the '''Sync Now''' button to synchronize the folders. | 1. Click on the '''Sync Now''' button to synchronize the folders. | ||
==How the Synchronization Works== | ==How the Synchronization Works== | ||
| − | |||
The following rules are applied during the synchronization process: | The following rules are applied during the synchronization process: | ||
| Line 116: | Line 111: | ||
==Closing the Application== | ==Closing the Application== | ||
| − | |||
The '''SmartSync''' [[Application|application]] normally runs in the system tray. | The '''SmartSync''' [[Application|application]] normally runs in the system tray. | ||
[[Image:Sync7.png]] | [[Image:Sync7.png]] | ||
| − | + | ||
* If you click the '''Close''' button in the [[Application|application]], it will still be running, but from the system tray. | * If you click the '''Close''' button in the [[Application|application]], it will still be running, but from the system tray. | ||
[[Image:Sync8.png]] | [[Image:Sync8.png]] | ||
| − | + | ||
You should use this technique if you are using the scheduled backup feature. | You should use this technique if you are using the scheduled backup feature. | ||
| Line 130: | Line 124: | ||
[[Image:Sync9.png]] | [[Image:Sync9.png]] | ||
| − | + | ||
==Setting Security== | ==Setting Security== | ||
| − | |||
'''SmartSync''' stores your [[User|user]] information in an encrypted format in the file: '''SETTING.INI''', in the same directory that you selected to install the program. | '''SmartSync''' stores your [[User|user]] information in an encrypted format in the file: '''SETTING.INI''', in the same directory that you selected to install the program. | ||
Latest revision as of 13:49, 12 September 2022
Contents
Overview
The SmartSync feature is an extension of SmartSimple, which lets SmartSimple users keep a local set of file folders synchronized with a set of SmartFolders.
Using the SmartSync feature you can:
- Schedule synchronization at regular intervals.
- Force synchronization on demand.
SmartSync is a program that you must install on the local computer.
The SmartSync feature functions with Microsoft Windows versions 98, 2000, and XP. It will not work with any other operating system.
Installing SmartSync
Download the latest copy of the SmartSync from your copy of SmartSimple. Use the Help, Downloads menu to access this application.
If the Download or Help menu items are not available, you should contact your system administrator.
Launching SmartSync
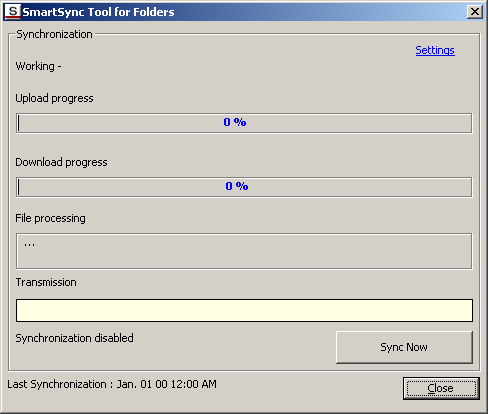
1. Use the Start, Programs menu to launch SmartSync.
There are two views of SmartSync: the Synchronization and the Setting view. The default view is the Synchronization view.
Before you can use SmartSync you must use the Setting view to establish your username, password, local and remote folders.
Setting the User Options
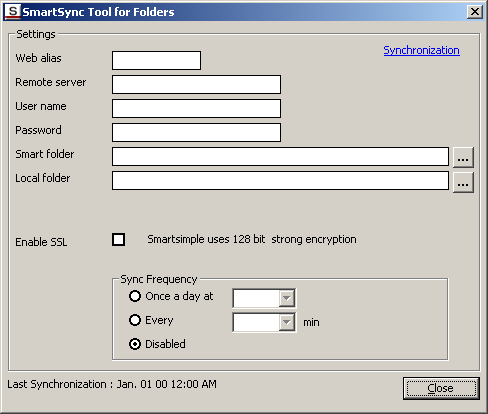
1. Click the Settings button.
The Settings view is displayed.
2. Set the Web Alias to your SmartSimple login alias. (e.g. for ACME the login URL would be acme.smartsimple.com and the Web Alias would be acme).
Do not use a www or http:// prefix or the smartsimple.com suffix.
3. Set the Remote server name to your SmartSimple Login URL (i.e. acme.smartsimple.com), if you are using the hosted (ASP) version, or your own server name, if you are using the installed version.
If you are unsure which version you are using, contact your system administrator.
4. Set the username to the name you use to log into SmartSimple.
5. Set the password to your SmartSimple password.
Setting the Remote and Local folders
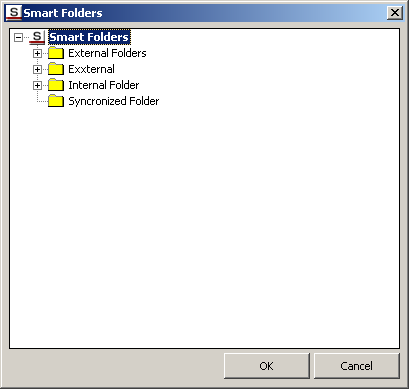
1. Click the … button next to Smart Folder.
The Smart folders that you have access to within SmartSimple are displayed.
- NOTE: If you have in excess of 600 folders within your SmartFolder structure (including all subfolders) SmartSync will be unable to enumerate the folders and will fail at this point. In this case you must reduce the number of SmartFolders in order to use SmartSync.
2. Select the name of the top folder that you wish to have synchronized.
3. Click the OK button.
4. Click the … button next to Local folder.
The Local folders are displayed.
5. Select the name of the top folder that you wish to have synchronized.
6. Click the OK button.
If the local folder is not empty, the following message will be displayed:
The local files will be automatically uploaded to SmartSimple once you synchronize for the first time.
Enabling SSL
If your copy of SmartSimple is using Secure Socket Layer you can enable the SSL option.
Setting the Synchronization Frequency
You can set SmartSync to automatically synchronize:
- Once a day at a specific time.
- Every 5, 15, 30, 60, or 120 minutes.
Or you can disable and synchronize manually.
Once you have established the synchronization frequency, you can return to the Synchronization view.
Synchronization
1. Click on the Sync Now button to synchronize the folders.
How the Synchronization Works
The following rules are applied during the synchronization process:
- If a file exists in a local folder, but does not exist in the remote folder, it is copied to the remote folder.
- If a file exists in a remote folder, but does not exist in the local folder, it is copied to the remote folder.
- If a file on the local folder has a later date/time stamp than the same file in the remote folder, then the file in the remote folder is over written by the local copy.
- If a file on the remote folder has a later date/time stamp than the same file in the local folder, then the file in the local folder is over written by the local copy.
There is one important consequence of these rules:
- If you delete a local file, then the remote copy will be restored to the folder when you next synchronize the folder.
- If you delete a remote file, then the local copy will be deleted to the folder when you next synchronize the folder.
This means that you can only permanently delete files from the remote directly.
Closing the Application
The SmartSync application normally runs in the system tray.
- If you click the Close button in the application, it will still be running, but from the system tray.
You should use this technique if you are using the scheduled backup feature.
If you click the Window Close button, then the application will be terminated.
Setting Security
SmartSync stores your user information in an encrypted format in the file: SETTING.INI, in the same directory that you selected to install the program.


