Difference between revisions of "Arcadia - Level 1 Summary (matrix) Settings"
(→Level 1 Summary Options) |
|||
| Line 6: | Line 6: | ||
* [[Arcadia_-_Level_1_Summary_(matrix)_Settings#Level_1_Type_to_Omit_for_Summary|Level 1 Type to Omit for Summary]] | * [[Arcadia_-_Level_1_Summary_(matrix)_Settings#Level_1_Type_to_Omit_for_Summary|Level 1 Type to Omit for Summary]] | ||
* [[Arcadia_-_Level_1_Summary_(matrix)_Settings#Level_1_Status_to_Omit_for_Summary|Level 1 Status to Omit for Summary]] | * [[Arcadia_-_Level_1_Summary_(matrix)_Settings#Level_1_Status_to_Omit_for_Summary|Level 1 Status to Omit for Summary]] | ||
| − | * Level 1 Summary Options | + | * [[Arcadia_-_Level_1_Summary_(matrix)_Settings#Level_1_Summary_Options|Level 1 Summary Options]] |
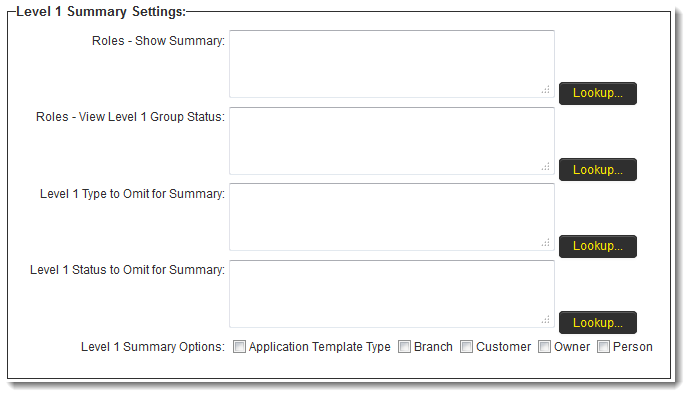
[[Image:ArcadiaL1SummarySettings.png|border|link=]] | [[Image:ArcadiaL1SummarySettings.png|border|link=]] | ||
Revision as of 12:24, 17 September 2013
There are five configurable options available:
- Roles - Show Summary (matrix)
- Roles - View Level 1 Group Status
- Level 1 Type to Omit for Summary
- Level 1 Status to Omit for Summary
- Level 1 Summary Options
Roles - Show Summary (matrix)
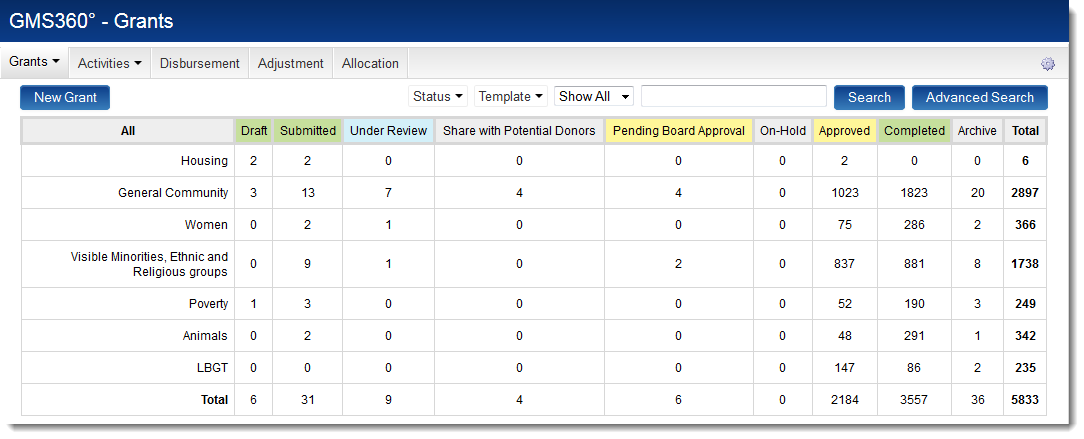
The Show Summary section provides access to cross-tabbed standard view of the Level 1, with drill-down options.
It can be made available on a role-by-role basis, using the button to select those roles that can access the Summary section against the Level 1.
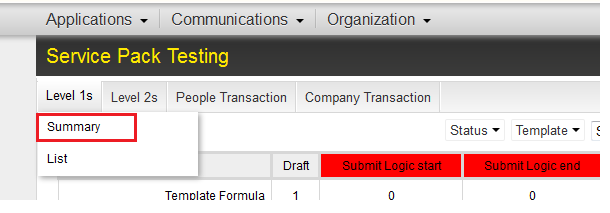
If a user logs in with a role that is permitted to see the Summary section against the Level 1 when they access the UTA in the Arcadia view they have the option to view the Summary section.
If a user logs in with a role that is not permitted to see the Summary section then they will not have the option to view the Summary section. Instead they only see the List View.
Roles - View Level 1 Group Status
- The View Level 1 Group Status is used to restrict certain roles from seeing the exact status of Level 1s.
- Instead they see a group status that masks multiple individual statuses within a single overall status.
- This setting is used in conjunction with the Group Name field of the UTA Statuses.
- Use the
button to select those roles that should see the group status.
Level 1 Type to Omit for Summary
- The Level 1 Type to Omit for Summary section is used to exclude certain Level 1 Types from the Summary Matrix.
- This could include historic types that are no longer of interest to the organization.
- Click on the
button and select the Level 1 Types to be excluded, then click OK.
- Leave the section blank if all Level 1 Types are to be included in the Summary Matrix.
Level 1 Status to Omit for Summary
- The Level 1 Status to Omit for Summary section is used to exclude certain Level 1 statuses from the Summary Matrix.
- Click on the
button and select the Level 1 statuses to be excluded, then click OK.
- Leave the section blank if all Level 1 statuses are to be included in the Summary Matrix.
Level 1 Summary Options
The default setting is to display:
- Level 1 Templates as the row headings and
- statuses as the column headings in the cross-tab view.
- "Housing," "General Community," "Women," etc. are the row headings and correspond to the different Level 1 Templates in the UTA.
- "Draft," "Submitted," "Under Review," etc. are the column headings and correspond to the different statuses in the UTA.
Statuses are hard-coded to be always displayed as the column headings, but the following standard fields can be configured to be used as row headings:
- Branch,
- Customer
- Owner, and
- Person.
Note that these standard fields may be renamed in your instance of SmartSimple using a standard field caption.
In the following examples:
* "Level 1 Templates" have been renamed to "Funding Program"
* the "Branch" standard field remains "Branch"
* the "Customer" standard field has been renamed to "Organization"
* the "Owner" standard field has been renamed to "Primary Contact"
* the "Person" standard field has not been enabled, so it is not shown as an option.
To enable these alternate standard fields as , take the following steps:


