Template:Adding a Workflow Task
In this article you will add the step to the workflow and connect that step to the start and complete.
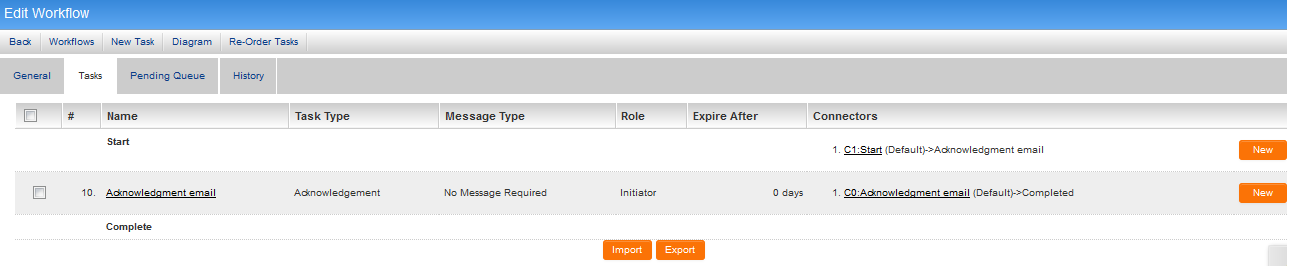
The Task List is displayed.

Note the Start and Complete entries, plus the connector for the start step.
1. Click the New task button.
![]()
The Task details are displayed, with a Task Number initially set to 10 and increasing in increments of 10 for each subsequent workflow task.

The first thing to do is to select the Task Type. The list of available Task Types is controlled by the workflow type.

The type selected will then control the properties available within the task. The general options available to all Task types include:
- Name - Narrative name for the task.
- Task Type - Acknowledge, process, complete, and move type tasks. See below.
- Task Number - A system generated number that determines the presentation order of the task in the workflow. This number can be changed to display the step in a different location.
- Description - Detailed description of the task.
- Expire After - Intended duration of the workflow.
There are a number of other settings specific to the Task Type selected. These are covered in the individual entries specific to each [[Workflow Task Types|Task Type].
2. Set the Name of the Task as appropriate.
3. Populate the Description field if required.
4. Click Save at the bottom of the page.
5. Click on the Back button to return to the Edit Workflow screen.
6. The Task will be listed but there will be no Connectors, so the task will not be executed if the workflow was triggered.

Connecting Tasks
The task is a steps that must be executed when the workflow is triggered. However, all tasks must first be connected to other tasks or to the start and complete before they will be executed.
1. Click on the New option in the row preceding the task you wish to connect. In the example below the preceding task may be the Start option, but it could also be a preceeding Task.


2. The New Connector screen launches with number of options.
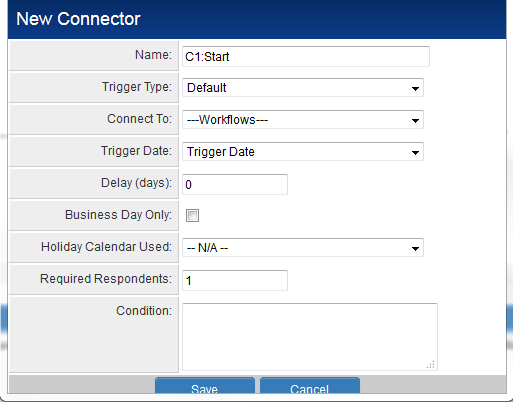

- Name: Free text field to enter a descriptive name for the connectro
- Trigger Type: drop-down with Default or Expired options
- Connect To: drop-down allowing you to select what you want to connect to. All tasks within the workflow will be listed. along side the Start and Complete options. Also, there will be a list of other workflows in the system.
- Trigger Date: drop-down allowing user to specify whether the task should be triggered on the day it was called, or based on a date field within the entity (i.e. level one, contact, etc.) that the workflow was triggered from.
- Delay(s): user can specify any delays based on the trigger date.
- If the value 1 was entered here then the task would be triggered one day after the defined Trigger Date.
- If the value -1 was entered here then the task would be triggered one day before the defined Trigger Date.
- If the value 0 was entered here then the task would be triggered on the defined Trigger Date.
- Business Day Only: If this is checked then the triggering based on dates and delays will take into account the normal working week, and statutory holidays
- Holiday Calendar Used: drop-down list to allow users to select their own calendars. Primarily used when the normal Business Day Only option is insufficient
- Required Respondents: If there is an action required then you can specify how many people must complete this action before the workflow moves on to the next task.
- Condition: field to define conditions under which the connector will bypass the proceeding task The field allows the use of variables.
3. Complete as appropriate and click Save sat the bottom of the screen.
4. Now click on the New option in the row for the task you wish to connect and try and connect to a proceeding task, the Complete option or to another workflow entirely. Click Save when finished.
5. Click Save at the bottom of the Edit Workflow screen once all connectors have been defined. When the page refreshes then the connectors should be displayed.