Form1
Contents
- 1 Introduction to Form 1 Integration Process
- 2 Integrating Form 1
- 2.1 Step 1: Creation of the L2 Type
- 2.2 Step 2: Import of L2 Custom Fields
- 2.3 Step 3: Creation of L3 Type
- 2.4 Step 4: Import of L3 Custom Fields
- 2.5 Step 5: Dynamic Field Visibility Controls
- 2.6 Step 6: Map the new L3 type custom fields to the appropriate XML
- 2.7 Removing Standard Fields from Form 1
- 3 Code to be Imported
Introduction to Form 1 Integration Process
Overview
As of October 1, 2018, facilities enrolled with HCAI are required to submit the Form 1 Attendant Care Assessment electronically. This section will briefly overview the steps necessary to integrate the Form 1 field and associated settings from an existing SmartSimple instance into the target instance.
- Navigate to the UTA where the Form 1 type will be created
- Create a new L2 Type called “Form 1"
- Import the Custom Fields under the new Form 1 type
- Create a new L3 type called “Form 1 Activities”
- Associate the L2 type as the parent of the L3
- Import the custom fields into the L3 Form 1 Activities type
- Map the new L3 type custom fields to the appropriate XML
Integrating Form 1
Step 1: Creation of the L2 Type
Navigate to the UTA where the Form 1 type will be created. Once there, click the “Configuration Settings” button (represented as a cog ).
Once in the configuration Settings menu, navigate to the tab which shares the name of the Level 2 (L2) object. This is typically the second tab in from the left-hand side.
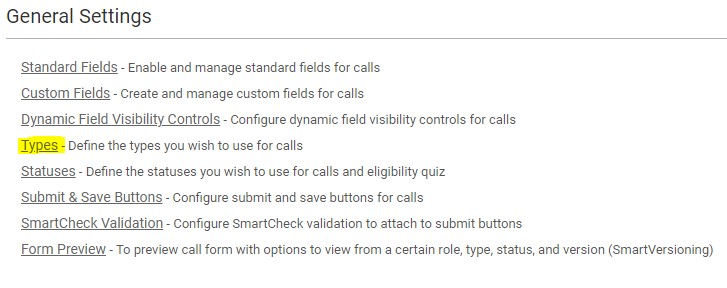
Click “Types” under the “General Settings” menu.
Level 2 General Settings
Within the Types menu, click the “+” New Type button to create a new L2 Type. Within the “Name:” field input “Form 1". Click “Save”.
Naming Convention
Ensure a naming convention is used on your Type fields. This will ensure consistency and will make it easier to find a specific Type when looking for it.
Step 2: Import of L2 Custom Fields
Once the new type has been saved, click the “Custom Fields” link within the left-hand menu. Once in the menu, click the “Import” button. This will allow you to import a previously exported list of custom fields.
Form 1 Type Custom Field Import
When the “Import” button is clicked, the code containing the exported custom fields can be pasted into the “Import” modal window. Please find the code by clicking here.
Step 3: Creation of L3 Type
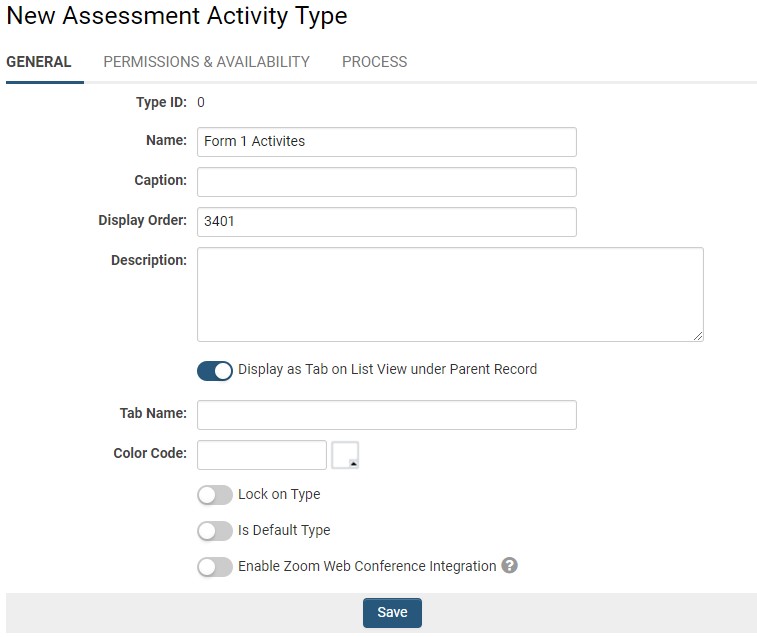
The Level 3 type must now be created. Navigating back to the Configuration Settings of the relevant UTA, click the Level 3 header. Now click the “Types” link under “General Settings”. Click the “+” (New Type) button at the top of the page to create a new Level 3 type. Under the “Name:” field, input the name “Form 1 Activities”.
Ensure the button next to “Display as Tab on List View under Parent Record” is selected.
Click “Save”.
L3 Assessment Activity Type creation
Under the “Permissions & Availability” tab, ensure “Source” has the radio button next to “Provider UTA Level 2’s” selected under the “Associated Parent Availability” section as seen below.
L3 Associated Parent Availability
Step 4: Import of L3 Custom Fields
Once the new type has been saved, click the “Custom Fields” link within the left-hand menu. Once in the menu, click the “Import” button. This will allow you to import a previously exported list of custom fields. Please use the following code to import the Level 3 fields.
Form 1 Type Custom Field Import
When the “Import” button is clicked, the code containing the exported custom fields can be pasted into the “Import” modal window. Please find the code by clicking here.
Step 5: Dynamic Field Visibility Controls
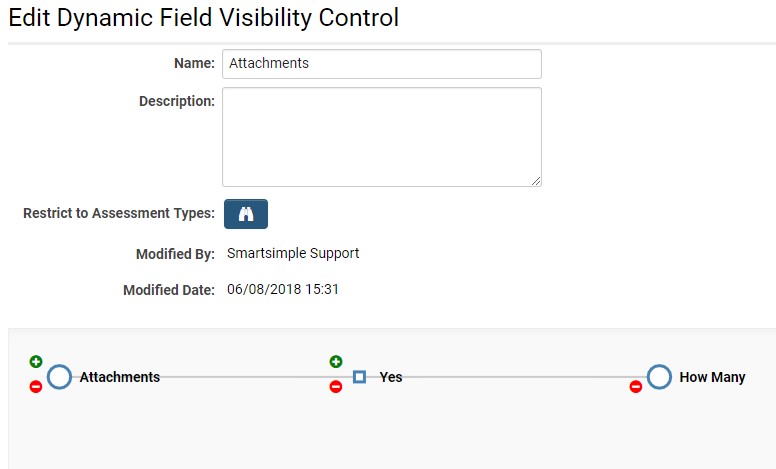
We must create a Dynamic Field Visibility Control that will either show or hide the “How Many” field depending on the selection made on the “Part 4 Attachments” field.
Navigate back to the Configuration Settings menu and click the Level 2 tab. Click “Dynamic Field Visibility Controls”. Click the “+” (New Dynamic Field Visibility Control) button. Input a name in the “Name” field and click “Save”. Now the Primary Field can be selected.
Click the Primary Field in the diagram, and in the Edit Field window select “Attachments” from the drop-down menu.
Once this has been done, you can now click the green “+” button. In the “Add New Branch” window select “Yes” from the dropdown menu and click “Apply”.
Now on the newly created “Yes” node, click the green “+” button. In the “Add New Field” window, select “How Many” from the dropdown menu and click “Apply”.
Click “Save” at the bottom of the “Edit Dynamic Field Visibility Control” page.
L3 Part 4 Attachments Dynamic Field Visibility Control
Permission & Availability
It is always a good idea to set the Available to ____ Types under the Permissions & Availability tab of the Form 1 Activities to allow the necessary L2 types to have access to the Form 1 Activities.
Step 6: Map the new L3 type custom fields to the appropriate XML
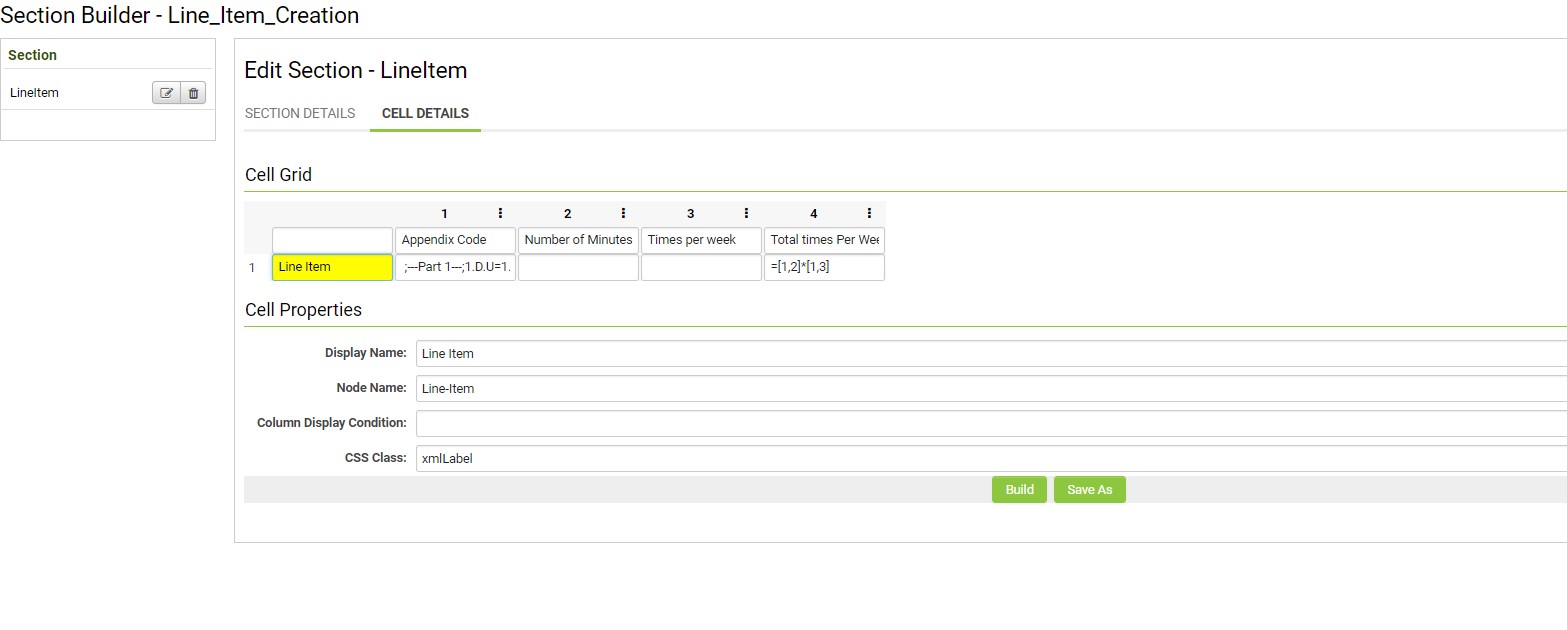
The Advanced Data Table (XML) must be created using the section builder within the “Line_Item_Creation” custom field. In order to do this, we must first navigate to the list of Level 2 “Types” and select “Form 1”.
Once in the “Form 1” type, navigate to the “Custom Fields” section from the menu on the left-hand side of the page. Find the “Line_Item_Creation” field with the Field Type of “Special - Advanced Data Table”. At the top of the page, click the “Section Builder” button ( ).
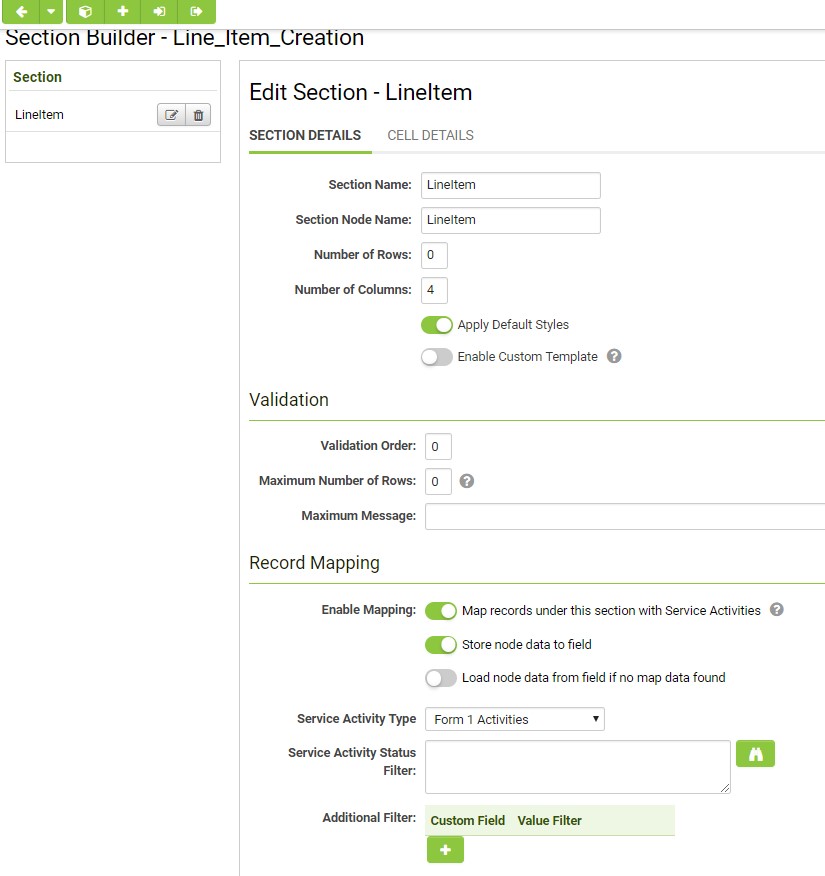
Once the Section Builder has loaded, click the “+” button to create a new Section. Under “Section Name” and “Section Node Name” input “LineItem”. “Number of Rows” should be set to 0 and “Number of Columns” to 4. Click Save.
Once Saved, go back to the Section Details and, under “Record Mapping” > “Enable Mapping”, check the buttons next to “Map records under this section with Assessment Activities” and “Store node data to field”.
From the “Assessment Activity Type” dropdown menu, select “Form 1 Activities”.
Navigate to the “Cell Details” tab.
Input the following information into the specified cells:
Cell 0,0
CSS Class: xmlHead
Cell 0,1
Display Name: Line Item
Node Name: Line-Item
CSS Class: xmlLabel
Cell 1,0
Display Name: Appendix Code
Node Name: Appendix-Code
Map Field: Appendix Form 1 Codes
Format: Text
CSS Class: xmlHead
Total Cell Class: xmlTotal
Total Input Class: xmlTotal
Cell 1,1
Type: Select One Combo Box
Content: Paste the code found under the “LINE_ITEM_CREATION XML SELECT ONE COMBO BOX CONTENT” section below into the “Content” field. Please click here for the necessary code.
Cell CSS Class: xmlCell
Cell 2,0
Display Name: Number of Minutes
Node Name: Minutes
Map Field: Number of Minutes
Format: Text
CSS Class: xmlHead
Total Cell Class: xmlTotal
Total Input Class: xmlTotal
Cell 2,1
Type: Single Line Text
Cell CSS Class: xmlCell
Cell 3,0
Display Name: Times per week
Node Name: Times-Week
Map Field: Times per week
Format: Text
CSS Class: xmlHead
Total Cell Class: xmlTotal
Total Input Class: xmlTotal
Cell 3,1
Type: Single Line Text
Cell CSS Class: xmlCell
Cell 4,0
Display Name: Total times Per Week
Node Name: Total-times-Per-Week
Map Field: Total Times Per Week
Format: Text
CSS Class: xmlHead
Total Cell Class: xmlTotal
Total Input Class: xmlTotal
Cell 4,1
Type: Single Line Text
Content: =[1,2]*[1,3]
Cell CSS Class: xmlCell
Once each of the cells has been filled out, click the “Build” button to finalize the creation of the Advanced Data Table.
Removing Standard Fields from Form 1
In order to remove all Custom Fields other than those necessary for Form 1, navigate back to the UTA configuration settings and go to the Level 2 tab. Click the “Custom Fields” link.
Select all of the Custom Fields by clicking the checkbox at the extreme top-left of the columns.
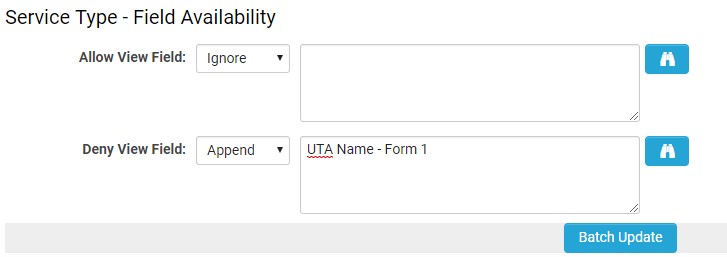
In the set of icons that will now appear above the columns, click the “Batch Update” button ( ).
Scroll down to the “Service Type – Field Availability” section. From the drop-down menu next to “Deny View Field” select “Append”. Click the “Lookup…” button and find the “Form 1” Level 2 type. Click “Batch Update”.
Form 1 Type Custom Field Import
Code to be Imported
Level 2 Fields Import Code
Please click the link below and download the text file. Select all (Ctrl+A) of the code below and Paste into the text field of the Form 1 Type Import window.
Level 3 Fields Import Code
Please click the link below and download the text file. Select all (Ctrl+A) of the code below and Paste into the text field of the Form 1 Type Import window.
Line_Item_Creation XML Select One Combo Box Content
Please click the link below and download the text file. Select all (Ctrl+A) of the code below and Paste into the "Content" section of the Select One Combo Box field.
File:LINE ITEM CREATION XML Select One Combo Box Content.txt
