Content management
Contents
[hide]Content Management application
Create content based portals.
[#ssupdate @session.expire@#] - expire a session, usually embedded in a logout page
Websites
Allows the creation of custom login pages. This allows you to create multiple custom login pages for various groups of users within the same system.
Virtual Alias
Within Websites you have the option to configure a Virtual Alias. This virtual alias allows your to mask the instance URL and will only function when used in combination with the virtual folder.
Ex. grants.smartsimple.com/welcome/MyFolder/ = gms.smartsimple.com/welcome/MyFolder/
When using a virtual alias, you must append ?u=1 to the end of the URL:
Ex. gms.smartsimple.com/welcome/MyFolder/?u=1
Virtual Alias for a Custom Login Page
If you are using Content Management for a separate login page using virtual alias, you will need add the origin URL on the page to ensure users who login from this page get redirected back to the same page after logging out.
This must be added within the <form> tags, preferrably after <form method="POST">:
<input type="hidden" name="origin" value="url" />
Ex.
<form method="POST">
<input type="hidden" name="origin" value="/welcome/MyFolder/?u=1" />
Variables
use "<!--VP-->" directive for content required to be processed by variable processor.
To reference the Content Management page the user logged into the instance with:
@cmpageid@ - returns the unique ID
Can be used to control what content is displayed to user (such as logo) by numbering the content to match the unique ID.
Example: logo@cmpageid@.jpg
Login Page - Alternate tab
Content Management is also now possible from the overall Login Screen Config page.
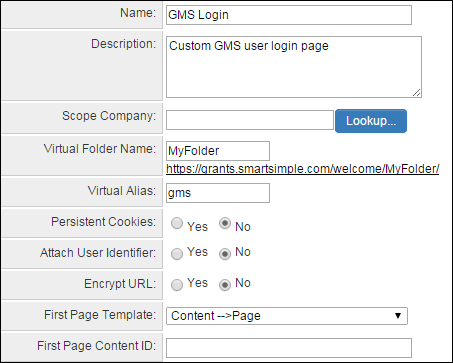
The Alternate tab is used to view and create multiple custom login pages for various groups of users within the same system. It uses virtual alias to mask the instance URL.
- Login Page Name: name of the virtual alias login page
- Description: description of the virtual alias login page
- Scope Organization: Lookup that allows the virtual alias login page to be restricted to users in the selected organization
- Virtual Folder Name: user adds a name such as “grants” and then you can direct different users to appropriate logins. Example: https://smart.smartsimple.com/welcome/grants/
- Web Alias: user enters the alias they want such as “gms” instead of the instances defined alias
- Persistent Cookies: enable or disable persistent cookies
- Attach User Identified:
- Encrypt URL: enable or disable encryption of the URL
- Redirect URL: enter URL if users should be redirected on successful login.
- Primary Role: pick what the role is when someone logs in. It is used to force the user to see the correct portal.
- Login Properties - Login Type: drop-down with 3 options (All Users; Activated Users only; No Access)
- Login Properties - User Field: field on login page used to identify user when they login. Usually set to Email.
- Login Properties - Password Field: field on login page used to capture user password when they login.
- Login Properties - Login Error Message: message to appear on login page after failed login attempt
- Login Properties - Login Page Content: how virtual alias login page will look. Use the Sample Template button to populate the content of the Rich Editor field, and then modify as necessary
