Workflow Task Type: Create New Activity
You can use the Create New Activity Workflow Task Type to automatically create and attach one or more Level 2 records to a Level 1 record.
- This workflow can be driven by a Status change on the Level 1 record.
- The Create New Activity workflow will also trigger (in this sequence):
- Auto-assignments
- Level 2 Formulas
- Level 2 Workflows
The workflow can either:
- Create the same Level 2 record Type every time the workflow is triggered
- or
- Create a custom set of Level 2 record Types, controlled by a field on the Level 1 record (Custom Field Driven)
IMPORTANT: because the underlying workflow is Status driven, if the status of the Level 1 record is changed, and then changed back to the Status that drives the Create New Activity workflow, the workflow will be triggered a second time, and a new set of Level 2 records will be created as per the Workflow.
Options
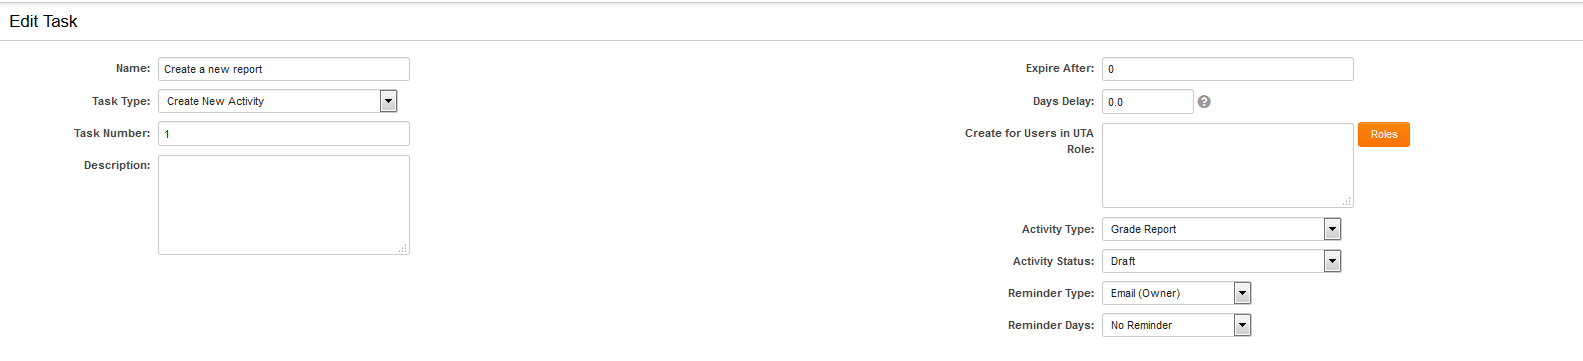
Create New Activity Tasks have the following settings:
- Name - Narrative name for the task.
- Task Number - A system generated number that determines the presentation order of the task in the workflow. This number can be changed to display the step in a different location.
- Description - Detailed description of the task (optional).
- Expire After - Intended duration of the workflow.
- Days Delay - Number in days of delay before creation of new activity. If left blank, the new activity will be created immediately.
- Create for Users in UTA Role - creates an activity of the specified type for each contact in the role(s) selected
- Subject: Allows you to specify the value in Subject standard field for the Level 2 record(s) that are created by the Workflow.
- Note: you can include variables, referenced as you would from a Level 1 record.
- For example, to create Level 2 records that have Subject the same as the Level 1 Application Name standard field you would use the following in the Workflow subject:
@name@
- The Subject standard field is displayed in the title bar when viewing a Level 2 or Level 3 record, just as the Application Name standard field is for Level 1 records.
- If you wish to have an e-mail sent out as part of the Create New Activity workflow with a different subject than the Level 2 record you can simply create a separate Workflow Task to send the e-mail immediately following the Create New Activity
- Activity Type: This is where you specify which Level 2 Type you wish to create.
- The Custom Field option is explained in Custom Field Driven below.
- If you wish to create more than one Level 2 Type you should create multiple Create New Activity Workflow Tasks, one for each Level 2 record you want to be created.
- Custom Field ID: Used for Custom Field Driven as explained below.
- Activity Status: Allows you to define the Status for the newly created Level 2 record(s).
- Note: If that Level 2 Status has a workflow attached to it the workflow will be triggered at the point of creation of the Level 2 record.
- Reminder Type - You can select whether a Quick Message or reminder email will be sent out to the Owner or contacts attached to the record, or any combination of the above.
- Reminder Days - Sets delay for reminder message being sent.
Custom Field Driven
The Create New Activity workflow can be driven by a Custom Field. For example, you could have check boxes at Level 1 corresponding to various Level 2 Types. Selecting each check box would create and attach the relevant Level 2 activity type.
- The Create New Activity workflow will also trigger any relevant Auto-assignments, Level 2 Workflows and Level 2 Formulas for each Level 2 record created.
You must first create a Custom Field on the Level 1 record which stores the typeid(s) of the Level 2 Types to be created. This is normally done using one of the following field types:
- To create multiple Level 2 records:
- To create only one Level 2 record:
Rather than displaying the typeid(s) of the Level 2 Types you would normally want to display the name of the Level 2 Type, or some other more descriptive value to the user who is filling in the Level 1 record. Thus you would use the following special syntax for the Values section of the Custom Field:
typeid1=DisplayValue1;typeid2=DisplayValue2;typeid3=DisplayValue3;
- Where the typeids are the typeids of each Level 2 Type, and the DisplayValues are the names of the Level 2 Types, or any other text you wish to display.
The value before the equal sign (the typeid) will be stored. The value after the equal sign is what will be displayed by each check box (or in the Combo Box), but does not get saved.
Example:

Once you have created the Custom Field that will be used to control the Create New Activity Workflow Task, use the following settings on the Workflow Task:
- Activity Type: Select Custom Field.
- Custom Field ID: Enter the Custom Field ID of the Select Many – Check Boxes or Select One – Combo Box created above.
- Activity Status: Select the Status you want for the newly created Level 2 record(s).
IMPORTANT
You must also ensure Level 1 Workflows are enabled on the Level 1 Template:
- On the UTA Settings Page select Templates
- For each Template you want Workflows for:
- Click on the name of the Template
- Click Edit Template
- Change the Level 1 Workflows to Yes and save the Template.
If you need to create multiple Level 2 activities of the same Type you will need to create multiple Workflow Tasks. Each Workflow task can either:
- create a defined Level 2 Type, or
- be Custom Field driven, with each Task being driven by a different Select Many – Check Boxes or Select One – Combo Box.