Difference between revisions of "SmartFileRetriever"
From SmartWiki
(updating categories) |
|||
| (34 intermediate revisions by 2 users not shown) | |||
| Line 1: | Line 1: | ||
| − | ''' | + | The '''SmartFileRetriever''' (formerly called the UTA Browser) is a stand-alone tool that will allow you to '''download to your desktop''' the files that are stored in [[Custom Field Type: Link – Single File|Single File]] or [[Custom Field Type: Link – Multiple Files|Multiple Files]] custom fields at {{l1}} within your SmartSimple [[Universal Tracking Application]]. |
| − | + | If you wish to have access to this application please contact [[:Category:Help Desk|SmartSimple support]]. | |
| − | |||
| − | |||
| − | If you wish to have access to this | ||
==Instructions== | ==Instructions== | ||
| − | * Install the | + | * Install the '''SmartFileRetriever''' application, following the instructions that came with the tool. |
| − | :''If you are logged into SmartSimple via a | + | * Open the '''UTA Browser''' from your Programs menu. |
| − | + | :''If you are logged into SmartSimple via a web browser you should log out.'' | |
* Enter your [[SmartSimple]] Server URL, Alias, User Name and Password:<br> | * Enter your [[SmartSimple]] Server URL, Alias, User Name and Password:<br> | ||
[[Image:UTABrowser1.PNG]] | [[Image:UTABrowser1.PNG]] | ||
* Click to Enable SSL if you wish to encrypt the connection to SmartSimple. | * Click to Enable SSL if you wish to encrypt the connection to SmartSimple. | ||
| − | |||
| − | |||
| − | |||
| − | |||
| + | * Click '''Login.'''<br /> | ||
| + | :''Once the Smart File Retriever has authenticated with [[SmartSimple]] the Application pull-down list will populate with a list of the UTAs in your [[SmartSimple]] instance, and the "Launch" and "Download" buttons will become active.'' | ||
| + | |||
| + | |||
| + | * Select the desired UTA from the Applications list and click '''Launch'''. After a few seconds you will be presented with the Level 1 interface for your UTA. | ||
| + | * Using the filter options on the right-hand side of the '''SmartFileRetriever''' window you should now filter the records as desired. ''(Click "Show Search" if you do not see the search panel on the right).'' If you wish to download the files stored in [[Custom Field Type: Link – Single File|Single File]] or [[Custom Field Type: Link – Multiple Files|Multiple Files]] fields for '''all''' records you should select "Show All Level 1 Items" and ensure that all Statuses are selected. Then click on the '''Search''' button: | ||
| + | ::[[Image:UTABrowser2.PNG]] | ||
| + | |||
| + | |||
| + | * '''Important:''' if you have more than one page of records be sure to click on the '''Show All''' button in the upper-right corner of the screen before proceeding to the next step: | ||
| + | :[[Image:UTABrowser3.PNG]] | ||
| + | |||
| + | |||
| + | * You should now click on the check-box in the upper left corner of the screen in order to select all records, or if you want a sub-set of the records displayed you can manually select individual records: | ||
| + | ::[[Image:UTABrowser4.PNG]] | ||
| + | :''Selecting all may take a few moments if there are a large number of records.'' | ||
| + | |||
| + | :''If you do not see the check boxes in the first column of the Level 1 list view you will need to close the '''SmartFileRetriever''', open your UTA via a Web Browser, go to Settings >> [[UTA Settings - Entity|Entity tab]] and check to '''Enable Calendar''' in the Level 1 Settings section. | ||
| + | * Once all the desired records have been selected click on the '''Next''' button in the lower left-hand corner of the screen: | ||
| + | ::[[Image:UTABrowser5.PNG]] | ||
| + | |||
| + | |||
| + | * The following page will tell you how many records you have selected, and will provide a list of all the [[Custom Field Type: Link – Single File|Single File]] and [[Custom Field Type: Link – Multiple Files|Multiple Files]] custom fields available at Level 1. | ||
| + | * If you wish to download the files stored in all the fields listed click the check box at the top of the list. Otherwise select the subset of fields you wish. | ||
| + | ::[[Image:UTABrowser6.PNG]] | ||
| + | * Click '''Next''' | ||
| + | |||
| + | * You will be asked to choose a location to download the files. Select a folder on your local machine and click '''OK'''. | ||
| + | :''If the file download does not start automatically, please click the '''Download''' button on the toolbar.'' | ||
| + | * A window will appear to indicate the progress of the download. Any errors will be reported in this window. | ||
| + | * The '''SmartFileRetriever''' window will also show the total number of "Records", "Fields", "Files" and the "Total Size" of the download. | ||
| + | |||
| + | |||
| + | ==Results== | ||
| + | Within the folder you selected for the download you will find the following: | ||
| + | * A folder will have been created for each Level 1 record. The folder will be given the same name as the Level 1 record.<br /> | ||
| + | ::-''If no files were present in any of the selected fields for a given record, no folder will be created for that record.'' | ||
| + | ::-''If you have not used the Level 1 Standard Field "Application Name", the folders will be named with the Tracking ID of the record. | ||
| + | * Within each Level 1 record folder you will find folder(s) with the same name as the [[Custom Field Type: Link – Single File|Single File]] or [[Custom Field Type: Link – Multiple Files|Multiple Files]] Custom Fields that you selected to be downloaded. | ||
| + | ::''If no files were present in a given field for that record, no folder will be created for that field.'' | ||
| + | * Within each of the folders you will find the files that were stored within the relevant [[SmartSimple]] Custom Fields. | ||
| − | |||
| − | + | [[Category:Integration]] | |
| + | [[Category:Desktop Plugins]] | ||
Latest revision as of 15:09, 20 July 2017
The SmartFileRetriever (formerly called the UTA Browser) is a stand-alone tool that will allow you to download to your desktop the files that are stored in Single File or Multiple Files custom fields at Level 1 within your SmartSimple Universal Tracking Application.
If you wish to have access to this application please contact SmartSimple support.
Instructions
- Install the SmartFileRetriever application, following the instructions that came with the tool.
- Open the UTA Browser from your Programs menu.
- If you are logged into SmartSimple via a web browser you should log out.
- Enter your SmartSimple Server URL, Alias, User Name and Password:
- Click to Enable SSL if you wish to encrypt the connection to SmartSimple.
- Click Login.
- Once the Smart File Retriever has authenticated with SmartSimple the Application pull-down list will populate with a list of the UTAs in your SmartSimple instance, and the "Launch" and "Download" buttons will become active.
- Select the desired UTA from the Applications list and click Launch. After a few seconds you will be presented with the Level 1 interface for your UTA.
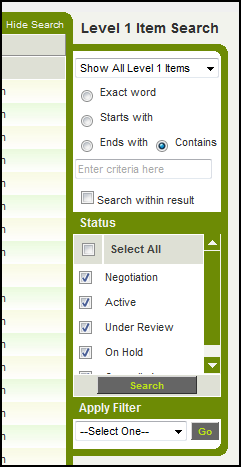
- Using the filter options on the right-hand side of the SmartFileRetriever window you should now filter the records as desired. (Click "Show Search" if you do not see the search panel on the right). If you wish to download the files stored in Single File or Multiple Files fields for all records you should select "Show All Level 1 Items" and ensure that all Statuses are selected. Then click on the Search button:
- Important: if you have more than one page of records be sure to click on the Show All button in the upper-right corner of the screen before proceeding to the next step:
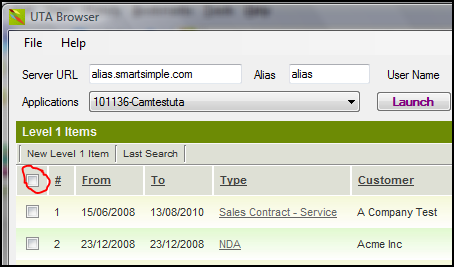
- You should now click on the check-box in the upper left corner of the screen in order to select all records, or if you want a sub-set of the records displayed you can manually select individual records:
- If you do not see the check boxes in the first column of the Level 1 list view you will need to close the SmartFileRetriever, open your UTA via a Web Browser, go to Settings >> Entity tab and check to Enable Calendar in the Level 1 Settings section.
- Once all the desired records have been selected click on the Next button in the lower left-hand corner of the screen:
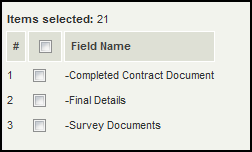
- The following page will tell you how many records you have selected, and will provide a list of all the Single File and Multiple Files custom fields available at Level 1.
- If you wish to download the files stored in all the fields listed click the check box at the top of the list. Otherwise select the subset of fields you wish.
- Click Next
- You will be asked to choose a location to download the files. Select a folder on your local machine and click OK.
- If the file download does not start automatically, please click the Download button on the toolbar.
- A window will appear to indicate the progress of the download. Any errors will be reported in this window.
- The SmartFileRetriever window will also show the total number of "Records", "Fields", "Files" and the "Total Size" of the download.
Results
Within the folder you selected for the download you will find the following:
- A folder will have been created for each Level 1 record. The folder will be given the same name as the Level 1 record.
- -If no files were present in any of the selected fields for a given record, no folder will be created for that record.
- -If you have not used the Level 1 Standard Field "Application Name", the folders will be named with the Tracking ID of the record.
- Within each Level 1 record folder you will find folder(s) with the same name as the Single File or Multiple Files Custom Fields that you selected to be downloaded.
- If no files were present in a given field for that record, no folder will be created for that field.
- Within each of the folders you will find the files that were stored within the relevant SmartSimple Custom Fields.


