Difference between revisions of "Setting the Applicant Role"
From SmartWiki
| Line 1: | Line 1: | ||
| − | |||
| − | |||
To gather applicant type information, you must set the applicant [[Role|roles]] to one of the [[Role|roles]] you have already created. | To gather applicant type information, you must set the applicant [[Role|roles]] to one of the [[Role|roles]] you have already created. | ||
| − | You can change your personal setting to define the default [[Role|role]] that should be used when creating a new person. | + | You can change your personal setting to define the default [[Role|role]] that should be used when creating a new person. If you have defined this as an applicant [[Role|role]], you will not need to change the new [[User|user]] [[Role|role]]. |
1. Click the '''Settings''', '''Roles and Access''' [[Menu|menu]]. | 1. Click the '''Settings''', '''Roles and Access''' [[Menu|menu]]. | ||
| Line 10: | Line 8: | ||
[[Image:Appr.png]] | [[Image:Appr.png]] | ||
| − | + | ||
2. Set the [[Role]] to [[External]] Applicant. | 2. Set the [[Role]] to [[External]] Applicant. | ||
[[Image:Appr1.png]] | [[Image:Appr1.png]] | ||
| − | + | ||
3. Click the '''Save''' button. | 3. Click the '''Save''' button. | ||
[[Image:Appr2.png]] | [[Image:Appr2.png]] | ||
| − | + | ||
4. Click the '''View Contact''' [[Menu|menu]]. | 4. Click the '''View Contact''' [[Menu|menu]]. | ||
[[Image:Appr3.png]] | [[Image:Appr3.png]] | ||
| − | + | ||
* The [[Custom Fields|custom fields]] associated with the [[External|external]] applicant [[Role|role]] are now displayed in the window. | * The [[Custom Fields|custom fields]] associated with the [[External|external]] applicant [[Role|role]] are now displayed in the window. | ||
* The '''Skills and Resume''' tab is displayed so you can set the applicant skills and upload the resume. | * The '''Skills and Resume''' tab is displayed so you can set the applicant skills and upload the resume. | ||
| Line 32: | Line 30: | ||
| − | [[Category:System Management | + | [[Category:System Management]][[Category:Applicant Tracking]] |
Latest revision as of 16:18, 4 June 2019
To gather applicant type information, you must set the applicant roles to one of the roles you have already created.
You can change your personal setting to define the default role that should be used when creating a new person. If you have defined this as an applicant role, you will not need to change the new user role.
1. Click the Settings, Roles and Access menu.
The Role list is displayed.
2. Set the Role to External Applicant.
3. Click the Save button.
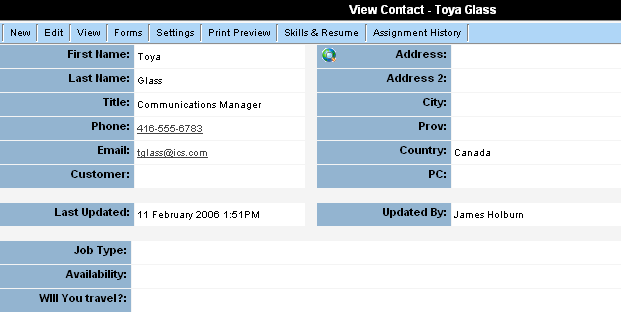
4. Click the View Contact menu.
- The custom fields associated with the external applicant role are now displayed in the window.
- The Skills and Resume tab is displayed so you can set the applicant skills and upload the resume.
- The Assignment History tab is displayed so you can review previous job assignments that an applicant has undertaken.
- The Notes and Activities sections are also displayed.
You can now add the skills, resume, and any other information that you need to associate with the applicant.

