Difference between revisions of "Portal design"
| Line 1: | Line 1: | ||
| − | + | ==Modifying the Portal== | |
| − | |||
| − | |||
| − | |||
| − | ==Modifying the | ||
You can make further modifications to the [[Portal|portal]] view through the use of the '''Portal Design''' feature. | You can make further modifications to the [[Portal|portal]] view through the use of the '''Portal Design''' feature. | ||
| Line 39: | Line 35: | ||
The [[Portal]] is redisplayed in '''Preview''' mode with captions displayed below the left icons. | The [[Portal]] is redisplayed in '''Preview''' mode with captions displayed below the left icons. | ||
| + | |||
| + | [[Image:Menu6.png|link=]] | ||
| + | |||
| + | ==Contemporary Portal Design== | ||
| + | |||
| + | [[Image:Menu11.png]] | ||
| + | |||
| + | This feature provides control of the following items: | ||
| + | * '''Priority''' – defines the priority of this [[Portal|portal]], if the [[User|user]] has more than one portal [[Role|role]] - 0 being the highest priority. | ||
| + | * '''Side Bar Icons''' – the icon size for the left panel. Choose from small, medium and large. | ||
| + | * '''Side Bar Width''' – the width in pixels of the left panel. | ||
| + | * '''Dividing Bar Width''' – the width in pixels of the dividing line, between the left panel and the main panel. | ||
| + | * '''Show Text''' – displays the name of the icon in the left panel. | ||
| + | * '''Shortcut Variables''' - provides the ability to add shortcut variables to custom portals using HTML formatting. | ||
| + | * '''Header''' – HTML content of the top panel. | ||
| + | * '''Left Menu''' – HMTL content of the left panel. | ||
| + | * '''Body''' – HTML content of the body of the portal. | ||
| + | |||
| + | 3. Click the '''Show Text''' check box. | ||
| + | |||
| + | 4. Click the '''Save''' button. | ||
| + | |||
| + | 5. Click the '''Edit Portal''' tab. | ||
| + | |||
| + | 6. Click the '''Preview''' button. | ||
| + | |||
| + | The [[Portal]] is redisplayed in '''Preview''' mode with captions displayed below the left icons. | ||
| + | |||
| + | [[Image:New-portal-interface.jpg|link=]] | ||
[[SmartSimple]] provides a one day course for HTML designers wishing to learn more about the capabilities of the portal design. | [[SmartSimple]] provides a one day course for HTML designers wishing to learn more about the capabilities of the portal design. | ||
Revision as of 09:50, 7 August 2013
Modifying the Portal
You can make further modifications to the portal view through the use of the Portal Design feature.
1. While logged in as a system administrator, click on the Roles & Permissions link.
2. Click on the hyperlink for "User Roles."
3. Click the "Portal" button for the role whose portal you would like to edit.
- The wrench icon (
 ) will be displayed to the left of the Portal button for portals that have already been configured.
- The wrench icon (
4. Click on the Portal Design tab.
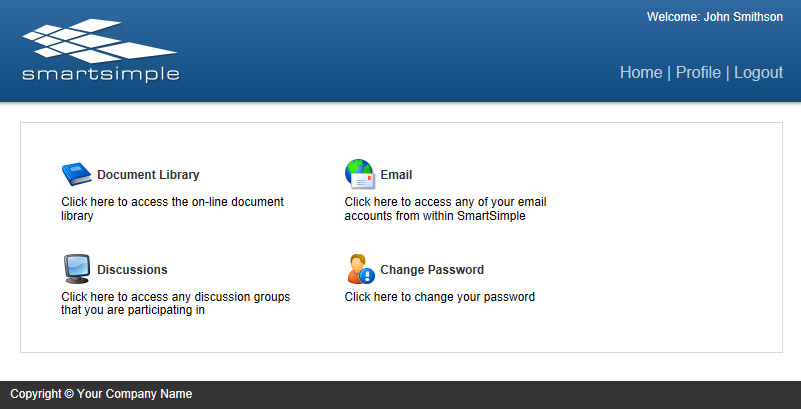
The Portal Design window is displayed. There are two styles of portal designs: Classic and Contemporary.
Classic Portal Design

This feature provides control of the following items:
- Priority – defines the priority of this portal, if the user has more than one portal role - 0 being the highest priority.
- Side Bar Icons – the icon size for the left panel. Choose from small, medium and large.
- Side Bar Width – the width in pixels of the left panel.
- Dividing Bar Width – the width in pixels of the dividing line, between the left panel and the main panel.
- Show Text – displays the name of the icon in the left panel.
- Shortcut Variables - provides the ability to add shortcut variables to custom portals using HTML formatting.
- Header – HTML content of the top panel.
- Left Menu – HMTL content of the left panel.
- Body – HTML content of the body of the portal.
3. Click the Show Text check box.
4. Click the Save button.
5. Click the Edit Portal tab.
6. Click the Preview button.
The Portal is redisplayed in Preview mode with captions displayed below the left icons.
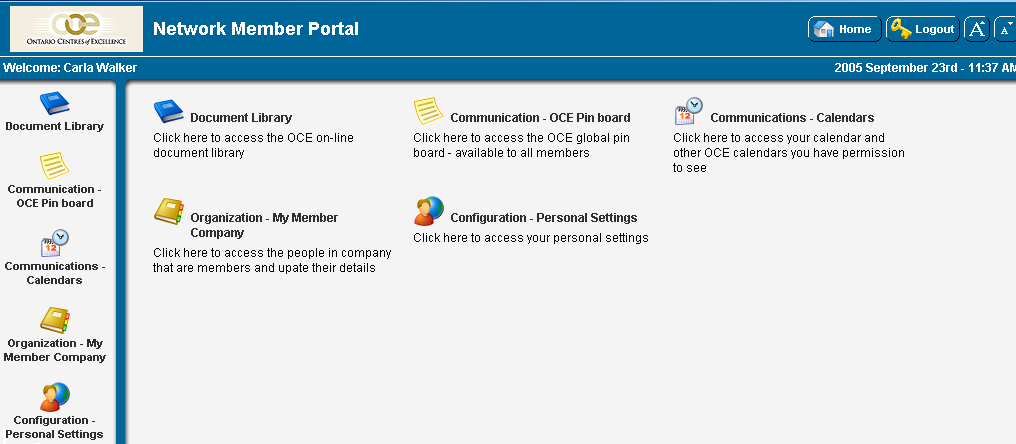
Contemporary Portal Design
This feature provides control of the following items:
- Priority – defines the priority of this portal, if the user has more than one portal role - 0 being the highest priority.
- Side Bar Icons – the icon size for the left panel. Choose from small, medium and large.
- Side Bar Width – the width in pixels of the left panel.
- Dividing Bar Width – the width in pixels of the dividing line, between the left panel and the main panel.
- Show Text – displays the name of the icon in the left panel.
- Shortcut Variables - provides the ability to add shortcut variables to custom portals using HTML formatting.
- Header – HTML content of the top panel.
- Left Menu – HMTL content of the left panel.
- Body – HTML content of the body of the portal.
3. Click the Show Text check box.
4. Click the Save button.
5. Click the Edit Portal tab.
6. Click the Preview button.
The Portal is redisplayed in Preview mode with captions displayed below the left icons.
SmartSimple provides a one day course for HTML designers wishing to learn more about the capabilities of the portal design.