Difference between revisions of "Multi-Factor Authentication"
| Line 1: | Line 1: | ||
| − | __TOC__ | + | * __TOC__ |
=Overview= | =Overview= | ||
| Line 8: | Line 8: | ||
The '''Two-Factor Authentication '''function provides a second factor - this can be something that someone has (for example, an access card) or some unique property of that person (for example, a fingerprint, or a code sent to a personal mobile device). | The '''Two-Factor Authentication '''function provides a second factor - this can be something that someone has (for example, an access card) or some unique property of that person (for example, a fingerprint, or a code sent to a personal mobile device). | ||
| − | + | The security impact of the '''Two-Factor Authentication '''is that while a user may lose an access card or get duped into sharing a password, the odds of both happening to a single user are dramatically reduced. Using '''Two-Factor Authentication '''therefore enhances an organization's ability to ensure that no one is using illegitimate means to gain access. | |
'''Two-Factor Authentication '''is a required component of maintaining [[SmartSimple]]'s SOC2 security status. SmartSimple supports two different '''Two-Factor Authentication '''approaches: | '''Two-Factor Authentication '''is a required component of maintaining [[SmartSimple]]'s SOC2 security status. SmartSimple supports two different '''Two-Factor Authentication '''approaches: | ||
| Line 23: | Line 23: | ||
==Configuring a Role to Use Two-Factor Authentication== | ==Configuring a Role to Use Two-Factor Authentication== | ||
| − | '''Two-Factor Authentication '''is configured by [[User Role]]. For best practice, it is recommended to specifically create '''Two-Factor Authentication '''as a new role and | + | '''Two-Factor Authentication '''is configured by [[User Role]]. For best practice, it is recommended to specifically create '''Two-Factor Authentication '''as a new role and add it to the existing users. While '''Two-Factor Authentication '''can be added to an existing role, it is not recommended because it will become more complex to manage. <br />For roles that have this feature enabled, the use of '''Two-Factor Authentication '''becomes mandatory. This involves a drastic change in user experience, so SmartSimple recommends that this action be rolled out to users in small groups at the beginning of the process. |
The first step of the implementation process is to create this role in your [[SmartSimple]] [[instance]]. | The first step of the implementation process is to create this role in your [[SmartSimple]] [[instance]]. | ||
| − | Follow the steps below in order to configure a user role | + | Follow the steps below in order to configure a [[User Role|user role]] to '''Two-Factor Authentication: ''' |
1. Click on the 9-square menu icon on the top right of your page. | 1. Click on the 9-square menu icon on the top right of your page. | ||
| Line 41: | Line 41: | ||
4. Click on the '''+ icon '''on the top left in order to '''Create a New Role. ''' | 4. Click on the '''+ icon '''on the top left in order to '''Create a New Role. ''' | ||
| − | :: [[File:2factor create new user role.png| | + | :: [[File:2factor create new user role.png|500px|border]] |
| + | 4. The '''New Role '''page will be displayed. | ||
| − | + | :: [[File:2factor new role.png|500px|border]] | |
| + | |||
| + | Fill out the following details: | ||
| + | |||
| + | * '''Name: '''2 Factor Authentication (for clarification of the role purpose) | ||
| + | * '''Caption: '''2 Factor Authentication (as the caption is typically the same or similar to the '''Name''') | ||
| + | * '''Description: '''TOTP (for clarification of the role purpose) | ||
| + | |||
| + | 5. In the '''Two Factor Authentication '''field, click into it and select the option '''Time-based One-time Password (TOTP).''' | ||
| + | |||
| + | * '''Note''': If you select the '''None '''option, this means that '''t'''here will be no two-factor authentication enabled for this user role. When someone with this user role tries to enter the system, they are able to successfully log in by inputting just their correct username and password combo. | ||
| + | |||
| + | 6. Click the '''Save '''button at the bottom of the page. | ||
| + | |||
| + | The page will refresh with the role saved into the system. | ||
| + | |||
| + | To check that your role has been successfully added: | ||
| + | |||
| + | 1. Click the '''list icon '''in the top left row of buttons on the '''2 Factor Authentication '''Role page. | ||
| + | |||
| + | :: [[File:Return to user roles.png|90px|border]] | ||
| + | |||
| + | 2. This will bring you to the [[List View Overview|list]] of all user roles in the system once more. You should now see the '''2 Factor Authentication '''role listed. | ||
| + | |||
| + | :: [[File:2factor role.png|600px|border]] | ||
| − | |||
This will bring you to the '''Edit '''details for that role. | This will bring you to the '''Edit '''details for that role. | ||
5. Under the '''General '''tab, scroll down until you see the '''Two-Factor Authentication '''field. | 5. Under the '''General '''tab, scroll down until you see the '''Two-Factor Authentication '''field. | ||
| − | |||
| − | |||
| − | |||
| − | |||
| − | |||
| − | |||
| − | |||
Revision as of 13:21, 4 July 2019
-
Contents
Overview
When using Two-Factor Authentication, each new user can use the Google Authenticator app to obtain one-time passwords which are calculated from time and/or event-based algorithms.
Most websites that a user can log into require a username and password, both "known" by the individual in order to log in. In short, this means that anyone who knows the correct username and password combination for a unique account can log into that account; thus, there is very little that can be done to identify that the individual logging is is actually the individual who owns the account.
The Two-Factor Authentication function provides a second factor - this can be something that someone has (for example, an access card) or some unique property of that person (for example, a fingerprint, or a code sent to a personal mobile device).
The security impact of the Two-Factor Authentication is that while a user may lose an access card or get duped into sharing a password, the odds of both happening to a single user are dramatically reduced. Using Two-Factor Authentication therefore enhances an organization's ability to ensure that no one is using illegitimate means to gain access.
Two-Factor Authentication is a required component of maintaining SmartSimple's SOC2 security status. SmartSimple supports two different Two-Factor Authentication approaches:
- TOTP (Time-based One-Time Password) - this technique uses an authentication app that is installed on a mobile phone
- RSA Disconnected Token - this technique requires a physical device used to generate a one-time code
This article deals specifically with the TOTP protocol. To learn more about the RSA Disconnected Token protocol and its related costs, please contact your account manager.
Prerequisites
In order to configure Two-Factor Authentication, you will need to have the following:
- System Administrator access - your user role in your SmartSimple instance must be System Administrator.
- Access to a mobile device and the appropriate Google Authenticator application installed on the device - the app can be retrieved from Google Play, App Store, etc by searching for "Google Authenticator" in the application store.
Configuring a Role to Use Two-Factor Authentication
Two-Factor Authentication is configured by User Role. For best practice, it is recommended to specifically create Two-Factor Authentication as a new role and add it to the existing users. While Two-Factor Authentication can be added to an existing role, it is not recommended because it will become more complex to manage.
For roles that have this feature enabled, the use of Two-Factor Authentication becomes mandatory. This involves a drastic change in user experience, so SmartSimple recommends that this action be rolled out to users in small groups at the beginning of the process.The first step of the implementation process is to create this role in your SmartSimple instance.
Follow the steps below in order to configure a user role to Two-Factor Authentication:
1. Click on the 9-square menu icon on the top right of your page.
2. Under the heading Configuration, select Roles and Security.
3. Click on the first hyperlink labelled User Roles.
The list of available user roles in your system will be displayed.
4. Click on the + icon on the top left in order to Create a New Role.
4. The New Role page will be displayed.
Fill out the following details:
- Name: 2 Factor Authentication (for clarification of the role purpose)
- Caption: 2 Factor Authentication (as the caption is typically the same or similar to the Name)
- Description: TOTP (for clarification of the role purpose)
5. In the Two Factor Authentication field, click into it and select the option Time-based One-time Password (TOTP).
- Note: If you select the None option, this means that there will be no two-factor authentication enabled for this user role. When someone with this user role tries to enter the system, they are able to successfully log in by inputting just their correct username and password combo.
6. Click the Save button at the bottom of the page.
The page will refresh with the role saved into the system.
To check that your role has been successfully added:
1. Click the list icon in the top left row of buttons on the 2 Factor Authentication Role page.
2. This will bring you to the list of all user roles in the system once more. You should now see the 2 Factor Authentication role listed.
This will bring you to the Edit details for that role.
5. Under the General tab, scroll down until you see the Two-Factor Authentication field.
When the user receives the new password then they navigate to the activation screen.
If this is the first time the user has had a code generated then the screen should include a QR Code that can be scanned using Google Authenticator. The actual authentication code is also provided in case there are issues with the use of Google Authenticator.
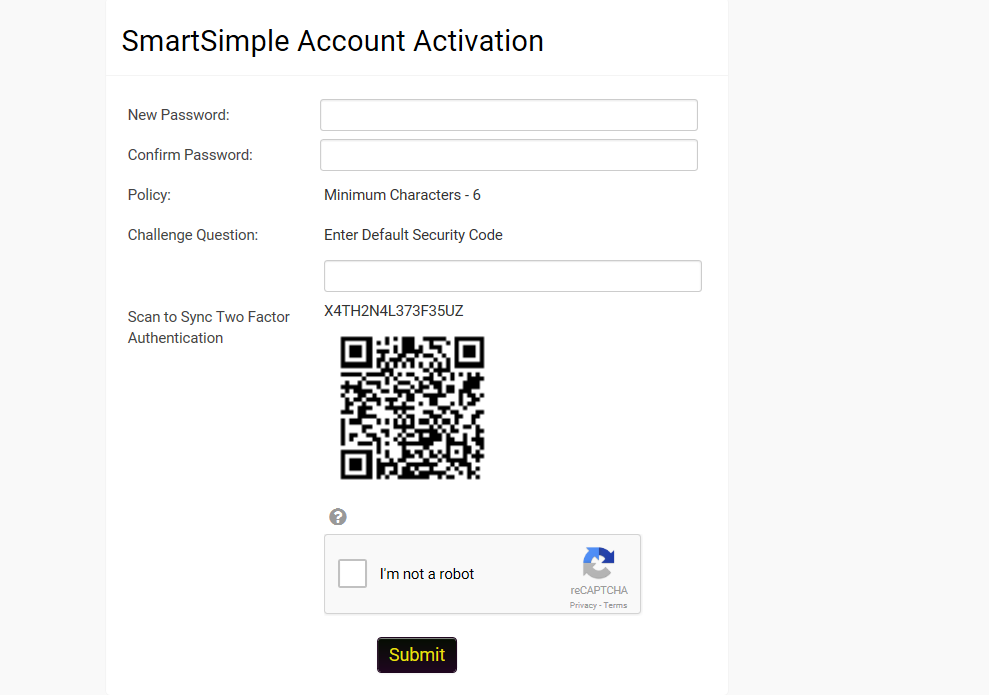
If the user has an existing QA Code then the user can click a button to generate a new code and re-sync or can proceed to the login page.
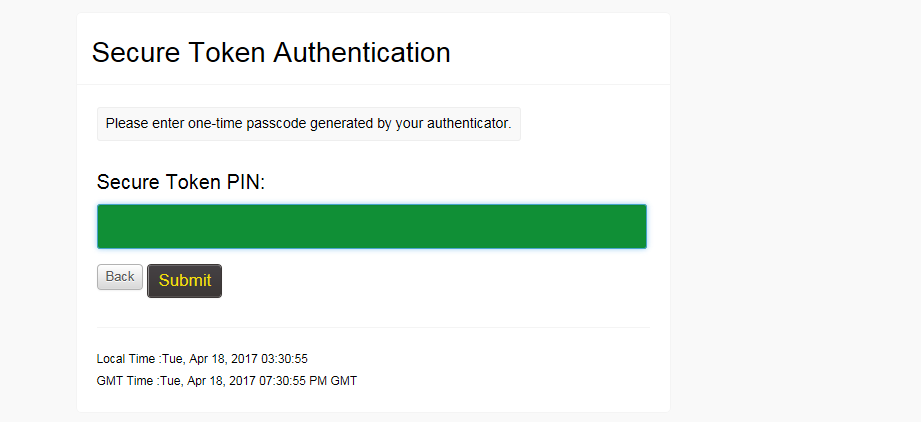
Users will then be prompted to enter the one-time code after entering their user name and password.
Notes
- If both Single Sign-On and Two-Factor Authentication are in use, there is a Single Sign-On setting option that will control whether or not Two-Factor Authentication will be required when a user authenticates via SSO.
See Also


