Difference between revisions of "Level 3 Activity List Batch Update"
From SmartWiki
(→Configuring Activity List Batch Update) |
|||
| Line 24: | Line 24: | ||
1) Manager Permission:<br> | 1) Manager Permission:<br> | ||
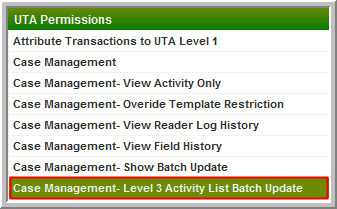
The [[Roles]] permitted to use this feature must be selected for each [[UTA]] via the [[Manager_Permissions_-_UTA_Permissions|Manager Permission]] setting under '''Roles & Permissions''': | The [[Roles]] permitted to use this feature must be selected for each [[UTA]] via the [[Manager_Permissions_-_UTA_Permissions|Manager Permission]] setting under '''Roles & Permissions''': | ||
| − | :[[File:L3BatchUpdateMgrPerm.png]] | + | :[[File:L3BatchUpdateMgrPerm.png|link=]] |
2) UTA Settings:<br> | 2) UTA Settings:<br> | ||
The destination [[Status]] must be set on the [[UTA_Settings_-_Miscellaneous|Miscellaneous tab]] of the [[UTA Settings Page]]: | The destination [[Status]] must be set on the [[UTA_Settings_-_Miscellaneous|Miscellaneous tab]] of the [[UTA Settings Page]]: | ||
| − | :[[File:L3BatchUpdateSettings.png]] | + | :[[File:L3BatchUpdateSettings.png|link=]] |
The label for the button can also be defined in this section. | The label for the button can also be defined in this section. | ||
Latest revision as of 08:31, 29 August 2013
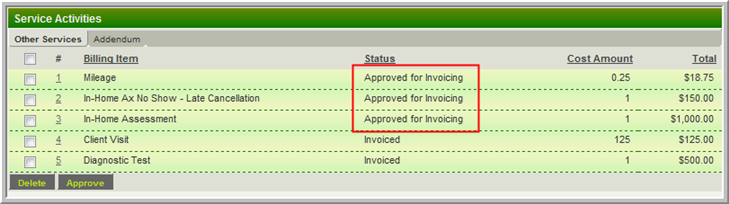
The Level 3 Activity List Batch Update feature allows the status of one or more Level 3 Activities to be changed directly from the Level 3 List View.
- This includes both the List View of all Level 3 activities (if enabled) and the list of Level 3 activities at the bottom of a Level 2 record.
The process is illustrated here:
- Select the appropriate records and click the Approve button (Note the initial status is Submitted)

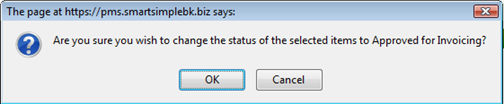
- Click OK to accept the change:
- The result with status changed to Approved for Invoicing:
Configuring Activity List Batch Update
There are two settings that must be configured to use the Level 3 Activity List Batch Update
1) Manager Permission:
The Roles permitted to use this feature must be selected for each UTA via the Manager Permission setting under Roles & Permissions:
2) UTA Settings:
The destination Status must be set on the Miscellaneous tab of the UTA Settings Page:
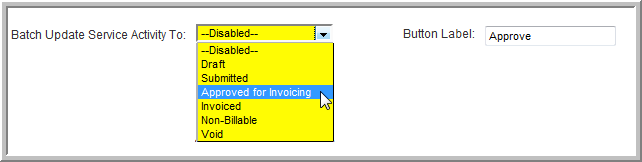
The label for the button can also be defined in this section.
- Note: if no label is entered the default label of Approve will be used.
Notes
- If the Batch Update Level 3 to: Status setting on the UTA Settings Page is set to --Disabled-- the button will not appear.
- Only one Status can be set in this manner.
- Any Level 3 record displayed can be changed with this feature. Users must be careful to not change the status of any records that should not be changed (i.e.: from Invoiced to Approved for Invoicing)