Difference between revisions of "Auto Convert Documents to PDF on Upload"
From SmartWiki
| Line 18: | Line 18: | ||
| − | 1. Go to the desired UTA. | + | 1. Go to the desired '''[[UTA]]'''. |
| − | 2. Select the relevant '''Level 1''' or '''Level | + | 2. Select the relevant '''[[Level 1 Entity|Level 1]]''', '''[[Level 2 Entity|Level 2]]''', or '''[[Level 3 Entity|Level 3]]''' tab |
| − | 3. Click on the '''Custom Fields''' hyperlink. | + | 3. Click on the '''[[Custom Fields]]''' hyperlink. |
[[Image:Custom-fields.png|link=|551px]] | [[Image:Custom-fields.png|link=|551px]] | ||
Revision as of 15:34, 1 February 2016

|
This article will explain how you can implement this feature for use on your SmartSimple system. |
Enable Auto Convert Documents to PDF on Upload
In this article, you will enable the Auto Convert Documents to PDF on upload feature within the File Options for a Link - Multiple Files custom field.
| This article is applicable to the custom field - Link - Multiple Files. |
1. Go to the desired UTA.
2. Select the relevant Level 1, Level 2, or Level 3 tab
3. Click on the Custom Fields hyperlink.
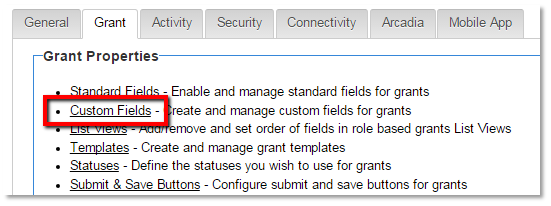
The Custom Fields list is displayed.
4. Click the Edit button on the targeted “Link - Multiple Files” custom field.
5. Under the File Options menu - check the box marked “Auto Convert Documents to PDF on Upload”.
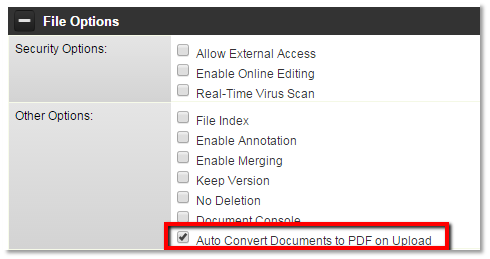
6. Click the Save button to save the change.

|
Click here to learn why this feature is a benefit to your organization. |