Difference between revisions of "Archiving Records"
(→Configuration - Essentials) |
(→Configuration - Essentials) |
||
| Line 14: | Line 14: | ||
5 Select '''Archiving''', then from the '''Update Archiving''' select '''Archived''' option.<br /> | 5 Select '''Archiving''', then from the '''Update Archiving''' select '''Archived''' option.<br /> | ||
6 To complete the process press '''Update''' at the bottom of the Batch Update window. | 6 To complete the process press '''Update''' at the bottom of the Batch Update window. | ||
| − | + | : [[Image:archive2.png]] | |
7 Click '''Update''' in the popup window to confirm your decision.<br /> | 7 Click '''Update''' in the popup window to confirm your decision.<br /> | ||
| + | : [[Image:archive3.png]] | ||
8 Selected objects are now archived. | 8 Selected objects are now archived. | ||
| − | |||
| − | |||
| − | |||
| − | |||
| − | |||
| − | |||
==Search Records== | ==Search Records== | ||
Revision as of 06:50, 5 April 2024
Contents
Overview
This article outlines the procedures for archiving and unarchiving records within the SmartSimple Cloud system. It covers how to manage records' visibility by toggling their archived status, thereby improving system performance and ensuring data is easily retrievable when needed. Key features include filtering records based on their archival status, detailed steps for using the Batch Update feature for both archiving and unarchiving, and the use of the @archived@ system variable for conditional visibility and editing of records.
Additionally, the article describes an alternative method for unarchiving records individually through custom JavaScript, offering a solution for a custom control.
Configuration - Essentials
Archiving Records
1 In order to archive records navigate to UTA Level 1 list view with those records.
2 Use the Search / Filter option to return the list of records that are to be archived.
3 Once the search is complete select desired records to archive using the toggle next to each record or use select all if you wish to archive all records visible in the list view.

4 Click on the Batch Update icon.
5 Select Archiving, then from the Update Archiving select Archived option.
6 To complete the process press Update at the bottom of the Batch Update window.

7 Click Update in the popup window to confirm your decision.

8 Selected objects are now archived.
Search Records
Searches can be filtered based on whether or not the object has been archived.
-
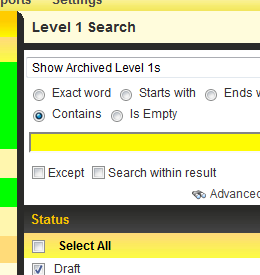
- The above image of the Level 1 search shows how to filter for only records that have been Archived.
- To filter for records that are not archived simply search using normal criteria.

Archive Records
1 Use the Search / Filter option to return the list of records that are to archived.
2 Once the search is complete select the records to be archived using the check boxes in the search screen.

3 Click the Batch Update button.
4 In the resulting screen select the Archived option from the Update Archive to drop-down list.

5 Then click the Batch Update button.
6 Click OK on any windows related to the execution of workflows.

7 User should get a confirmation screen to notify them that everything has been updated successfully.

8 The list view should also update to reflect that fact that the selected records have now been archived.
Unarchive Records
1 Use the Search / Filter option to return the list of Archived records.
2 Select the records to be unarchived using the check boxes in the search screen.
3 In the resulting screen select the Not Archived option from the Update Archive to drop-down list.

4 Then click the Batch Update button.
5 Click OK on any windows related to the execution of workflows.
6 User should get a confirmation screen to notify them that everything has been updated successfully.
7 The list view should also update to reflect that fact that the selected records are no longer archived.
Referencing the field
You can use the @archived@ variable to reference the archive status of a UTA L1 object, where 1 = Archived and 0 = Not-Archived.
This can be used within conditional statements such as visibility and edit conditions to display/hide fields based on the object's archive status.
Unarchiving records without using Batch Update
An alternative method for unarchiving involves using Pandora in a custom javascript button. The sample code below is to be used within a Custom Field Type: Read Only – System Variables field.
This method is best used in combination with a report built to list all archived records, with a hyperlink for each record.
The process for the user will be:
- The report is run where a record can be filtered according to search criteria.
- The user will click on a hyperlink into the record where the "Unarchive" button will be exposed.
- Upon clicking the button, the record will be unarchived where it will now re-appear when searched within the UTA.
//Displays a button where when clicked will call the "unarchive()" function

<input class="Button" type="Button" value="Unarchive Record" />
<script type="text/javascript">// <![CDATA[
function unarchive(){
	updatefields('archived',0);  //Sets Archived flag to 0
}

function updatefields(fieldname,fielddata){
	ss_developer_key="xxxxx";   //Enter Developer Key
	var gbappid=xxxxx;   //Enter application ID

	var addfields="opportunityid,"+fieldname;
	var rset=new ssRecordSet(null);
	rset.addfieldnames(addfields);
	var idx=rset.getnewrecnumber();
	rset.addfieldvaluebyname(idx,'opportunityid','@opportunityid@');
	rset.addfieldvaluebyname(idx,fieldname,fielddata);
	var rs=levelone_update(false ,'',gbappid,rset);
}
// ]]></script>