Company and User Security Matrix

|
This article will explain how you can implement this feature for use on your SmartSimple system. |
Contents
Overview
Enabling the Company and User Matrix
Note: You will need Global User Administrator Privileges to enable and configure this feature
- In the Configuration menu, Click on Global Settings
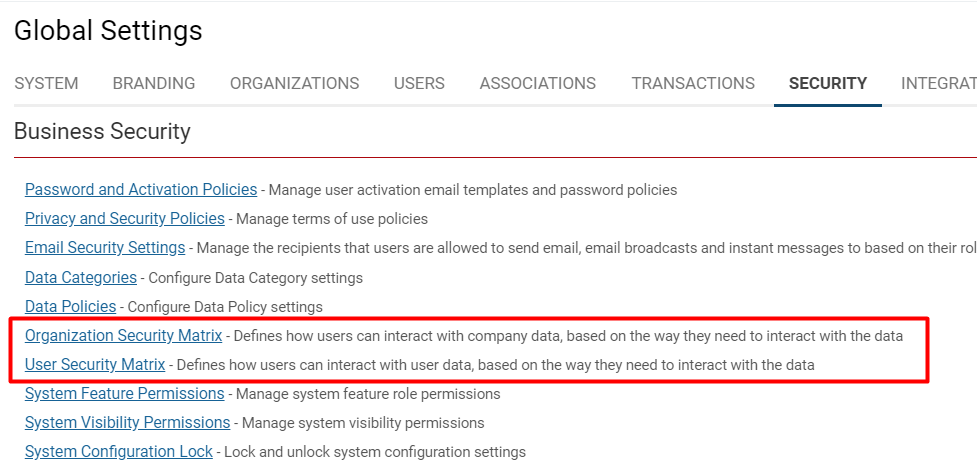
- Under the Security Tab, add a check mark to the box Enable Company and User Security Matrix
- Click Save.
Configuring the User Security Matrix
- In the Configuration menu, click on Global Settings
- Under the Security Tab, click on the User Security Matrix
- Under the Login User Role select the user role you will be permissioning
- First set Hierarchy Permissions if applicable - This sets what general permissions a specific user role has to view and modify based on the following options
- Users Under All Organizations - access to all users under all organizations
- Users Under their Own Organization - access to those users found under the current users organization
- Users Under Sub Organizations - access to those users found under the current users organization or its sub-organizations
- Own Profile - access to users own profile
- Set Roles Permissions if applicable - This sets the granular role-by-role permissions to perform views, edits, deletes, and lookups.
Configuring the Company Security Matrix
- In the Configuration menu, click on Global Settings
- Under the Security Tab, click on the Company Security Matrix. This defines how users can interact with company data
- Under the Login User Role is displayed a list of all defined user roles. Select the user role you will be permissioning
- Set appropriate Hierarchy Permissions if applicable - This sets what general permissions a specific user role has to view and modify organization data that they belong to.
- Options include the ability to view, edit, add, delete, and lookup permissions for All Organizations, their Own Organizations, and their Sub Organizations.
- By adding a check mark to the specific check box in the matrix you will be enabling that permission for the specified user role.
- Set Category Permissions if applicable - This sets granular category-by-category permissions to perform views, edits, deletes, and lookups.
Permission Types
The following 10 permission types are available:
- Deny View - Users in this role are denied access to this item.
- Deny Edit - Users in this role can access but cannot edit.
- Deny Add - Users in this role can access but cannot create a new item.
- Deny Delete - Users in this role can access but cannot delete an existing item.
- Deny Lookup - Users in this role can access but cannot search an existing item.
- View – View the item.
- Add – Create a new item.
- Edit – Edit an existing item.
- Delete – Delete an existing item.
- Lookup – Search an existing item.
Company Security Matrix Example
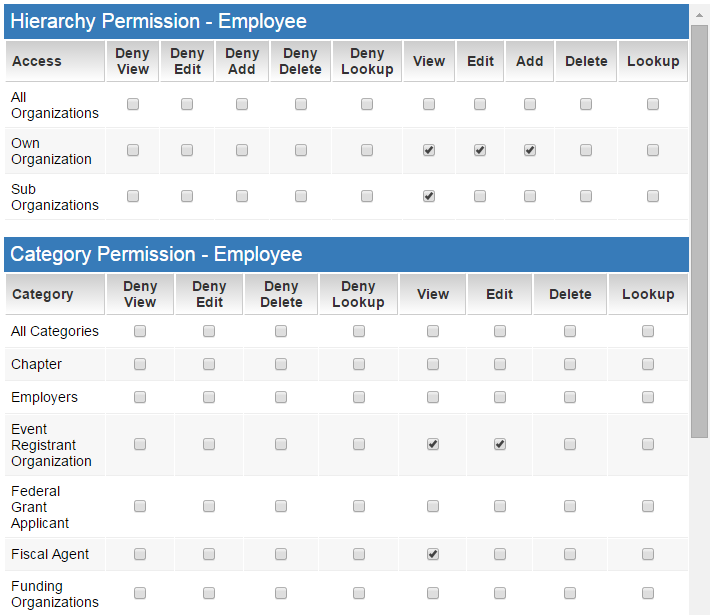
1. Review the Hierarchy Permission and Category Permission shown below for the Employee Role:
A. From the Hierarchy Permissions - Employees can View, Edit, and Add data related to their Own Organization.
B. From the Category Permissions - Employees can View and Edit "Event Registrant Organization" and View "Fiscal Agents".
Notes
- Only a Global User Administrator can define or modify roles.
- When Company or User security matrix is enabled, then the system will ignore any other Company or User specific permissions when the current user is either a Local User Administrator or basic User.
Also See
Security Matrix
The Key Control Element – Roles
Using Roles
Roles & Permissions

|
Click here to learn why this feature is a benefit to your organization. |

