Difference between revisions of "Creating a Single Step Workflow"
| Line 14: | Line 14: | ||
[[Image:100504_workflow_manager_permission_01.jpg]] | [[Image:100504_workflow_manager_permission_01.jpg]] | ||
| + | |||
| + | - select the role that will be triggering the workflow. | ||
| + | |||
| + | - once the role is selected, the options will display in the edit company view. | ||
| + | [[Image:100504_workflow_manager_permission_02]] | ||
Revision as of 11:59, 4 May 2010
Contents
Overview
Single step workflows are useful for creating alert type messages. Some examples of where you may consider using single step workflows would be to:
- Alert a sales person when a customer adds a file to the system.
- Get an alert when a new contact is added to the database.
- Send a copy of a new file to your customer, by simply adding the file to a folder.
- Send a confirmation message to a new customer when they are added to the system.
- Trigger an e-mail alert when someone registers on your website for information.
Configure System Before New Company Workflow Trigger
- the user creating the workflow must have permission to set company workflow trigger. Go to - Roles & Permissions - Manager Permissions, Under permissions, click on Workflows - Attach Workflow to Company
- select the role that will be triggering the workflow.
- once the role is selected, the options will display in the edit company view. File:100504 workflow manager permission 02
Creating an Acknowledgment Workflow
In this example you will create a workflow that sends an alert when a contact is added to a company.
1. Click the New Workflow button.
The New Workflow window is displayed.
Setting the Workflow Type
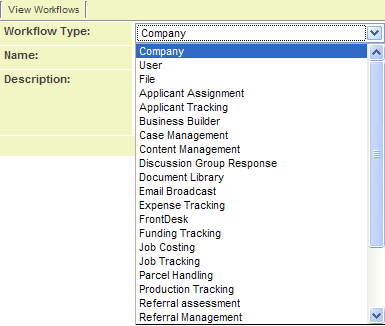
SmartSimple provides the ability to attach a workflow to many different objects. If you do not select the correct type, the workflow name will not be listed when you attempt to connect the workflow to the object.
1. Click the Workflow type combo box. The workflow object types are listed.
See Workflow Types for details.
This workflow will be attached to a company, but will trigger only when a contact is added to that company.
2. Set the Workflow type to User.
3. Set the Name to New Contact Added.
4. Set the Description to A new contact has been added to the system.
Setting the Trigger Type
The Workflow trigger determines when a new instance of the workflow should be started.
- The New option will only trigger when a new object is created. In this example, when a new user is added to the company.
- The Modified option will trigger the workflow when an existing object is changed.
The default New option is correct.
Saving the Workflow
It is necessary to save to workflow details before you can add any tasks.
1. Click the Save button.
The workflow is saved.
The following tabs are also displayed:


