Difference between revisions of "List View Overview"
| Line 3: | Line 3: | ||
* Within the [[Universal Tracking Application]] the '''Settings''' page allows you to define the list view for Level 1, Level 2 and Level 3 as well as the Accounts and/or Contacts sections on the Level 1 records (if the Contacts/Accounts Standard Fields have been enabled). | * Within the [[Universal Tracking Application]] the '''Settings''' page allows you to define the list view for Level 1, Level 2 and Level 3 as well as the Accounts and/or Contacts sections on the Level 1 records (if the Contacts/Accounts Standard Fields have been enabled). | ||
* Within most other [[Applications]] you can set the '''List View''' via the '''Settings''' page. | * Within most other [[Applications]] you can set the '''List View''' via the '''Settings''' page. | ||
| − | ::''Some list views contain special items and cannot be | + | ::''Some list views contain special items and cannot be configured, such as the list of Applicants on an Opportunity within [[Sales Tracking]].'' |
* When viewing the list of '''Contacts''' you can set the '''List View''' by clicking on the '''Edit View''' tab:<br> | * When viewing the list of '''Contacts''' you can set the '''List View''' by clicking on the '''Edit View''' tab:<br> | ||
::[[Image:ListViewC.PNG]] | ::[[Image:ListViewC.PNG]] | ||
Revision as of 14:10, 15 May 2009
The List View allows you to define which Standard and Custom Fields are displayed when viewing a list of records. You can also define the sequence in which the records are displayed.
- Within the Universal Tracking Application the Settings page allows you to define the list view for Level 1, Level 2 and Level 3 as well as the Accounts and/or Contacts sections on the Level 1 records (if the Contacts/Accounts Standard Fields have been enabled).
- Within most other Applications you can set the List View via the Settings page.
- Some list views contain special items and cannot be configured, such as the list of Applicants on an Opportunity within Sales Tracking.
- When viewing the list of Contacts you can set the List View by clicking on the Edit View tab:
- Note: changes here will affect the Contacts List View throughout SmartSimple (UTA Contacts Tab, Search People, Sales Tracking, etc.)
- The Accounts list view is fixed and cannot be customized.
Defining a List View
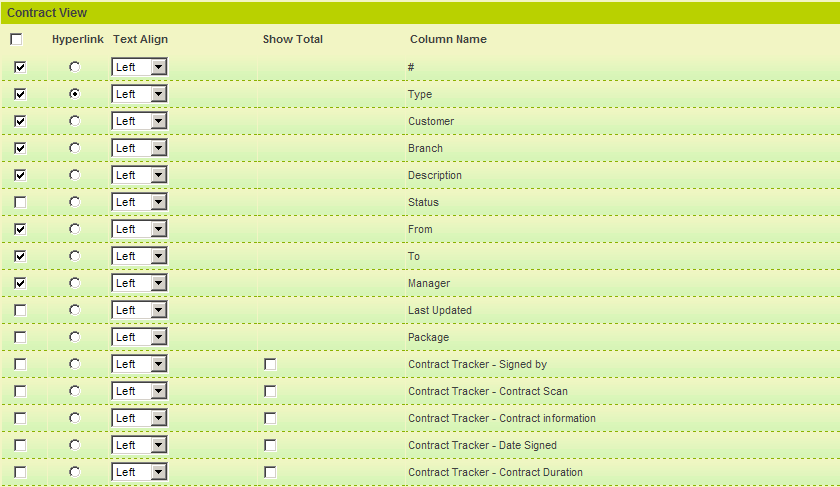
Click into any List View shortcut to display the list of fields available:
- Standard Fields are listed at the top of the list, followed by Custom Fields.
- The # field displayed at the top of the list will display a record counter (index) for the items displayed.
- Click the check box on the left of each field to include that field in the List View.
- Click the Hyperlink button to designate a single field that will provide a drill-down to the associated record.
- Text Align defines if the data should be left, centred or right aligned in the column.
- For numeric fields, you can display a total at the bottom of each page by clicking the Show Total check box.
- The Total displayed at the bottom of the column will have the same formatting (example: #.##) as specified in the Custom Field that is being totalled. If no formatting is specified, the total will be displayed to 1 decimal place.
Once you have saved the field list you can set the Display order.
Note: anytime you make changes to the List View page as described above the Field Order settings (described below) will be reset and will need to be re-defined.
Setting the Field Order
Once you have selected the fields to be displayed, you can reorder the fields in the list view and if required create a formatting template specifically for this list view.
From the List View page click the Set Order button at the bottom.
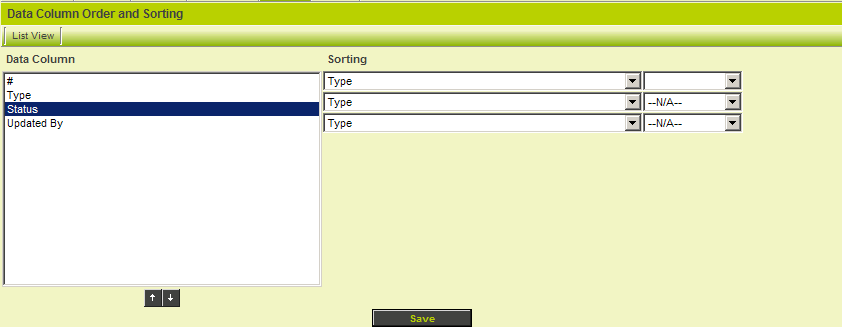
The Data Column Order and Sorting window is displayed:
To change the Display order:
- Click on the required field in the left panel.
- Use the Up and Down arrows to move the field.
- Once complete, click the Save button.
To change the Sort order:
- Choose the first field you wish to order by in the right field combo box.
- Select Ascending or Descending in the Order combo box.
- If required repeat this process for a second and third field.
Defining a List View Template
You can customize the list view by clicking on the Template button at the bottom of the List View page.
Note: a basic understanding of HTML may be required to make changes to the List View Templates.
- The Header section can be used to adjust the column headings. You can change the formatting, as well as the column heading displayed.
- The Columns section controls the display of the actual record list view.
- The Order Clause allows you to manage the sequence of records in a more complex way than on the Set Order page.
- For example, if you are trying to arrange your sort order based on a field that has an integer value the sort may not work properly if the data is stored as string. To make this a numeric value to sort do the following:
- In the list view template go to the section of 'Order Clause' and find the field that your looking for based on custom field id.
- Change the value from cf_967517 desc to tbl_967517.valuestr*1 desc; which converts it to a numeric value now.
- For example, if you are trying to arrange your sort order based on a field that has an integer value the sort may not work properly if the data is stored as string. To make this a numeric value to sort do the following:


